Powers e420 Series Combination T/P Tempering Valves - Cartridge (420-616) User Manual
Installation instructions, Hydroguard, T/p series e420 complete retrofit
The following instructions explain how to retrofit your existing
420 HydroGuard to the new, enhanced version which utilizes
a wax element and cartridge type design. The combination of
these design concepts results in a valve with enhanced per-
formance. See the exploded view of this new assembly
below:
Before you begin your upgrade, take the time to ensure you have
all the necessary pieces. Your retrofit kit, for each valve, consists
of the following (refer to above diagram when taking inventory):
1. Cartridge Assembly (w/2 “O”-Rings).
2. Wax Element.
3. Stem Assembly.
4. Spline Temperature Limit Stop (1 piece).
5. Bonnet “O”-Ring.
6. Lubricant.
After you verify that you have everything needed to complete
the retrofit, proceed with the next section.
Retrofit:
Follow the instructions below to perform your retrofit. Save all
components until you have successfully completed your retrofit.
Disassembly:
1. Turn off hot & cold water supply-stops (required for this retrofit).
2. Remove the handle and trim plate.
3. Remove 4 bonnet screws and bonnet assembly.
4. Remove all internal components from valve body.
5. Remove hot water seat using 7/8" hex socket.
6. At this point you should have an empty valve body.
You are now ready to put the new components into your
existing valve.
Reassembly:
1. Ensure the inside of the valve body is free of deposits
and debris. Clean as necessary.
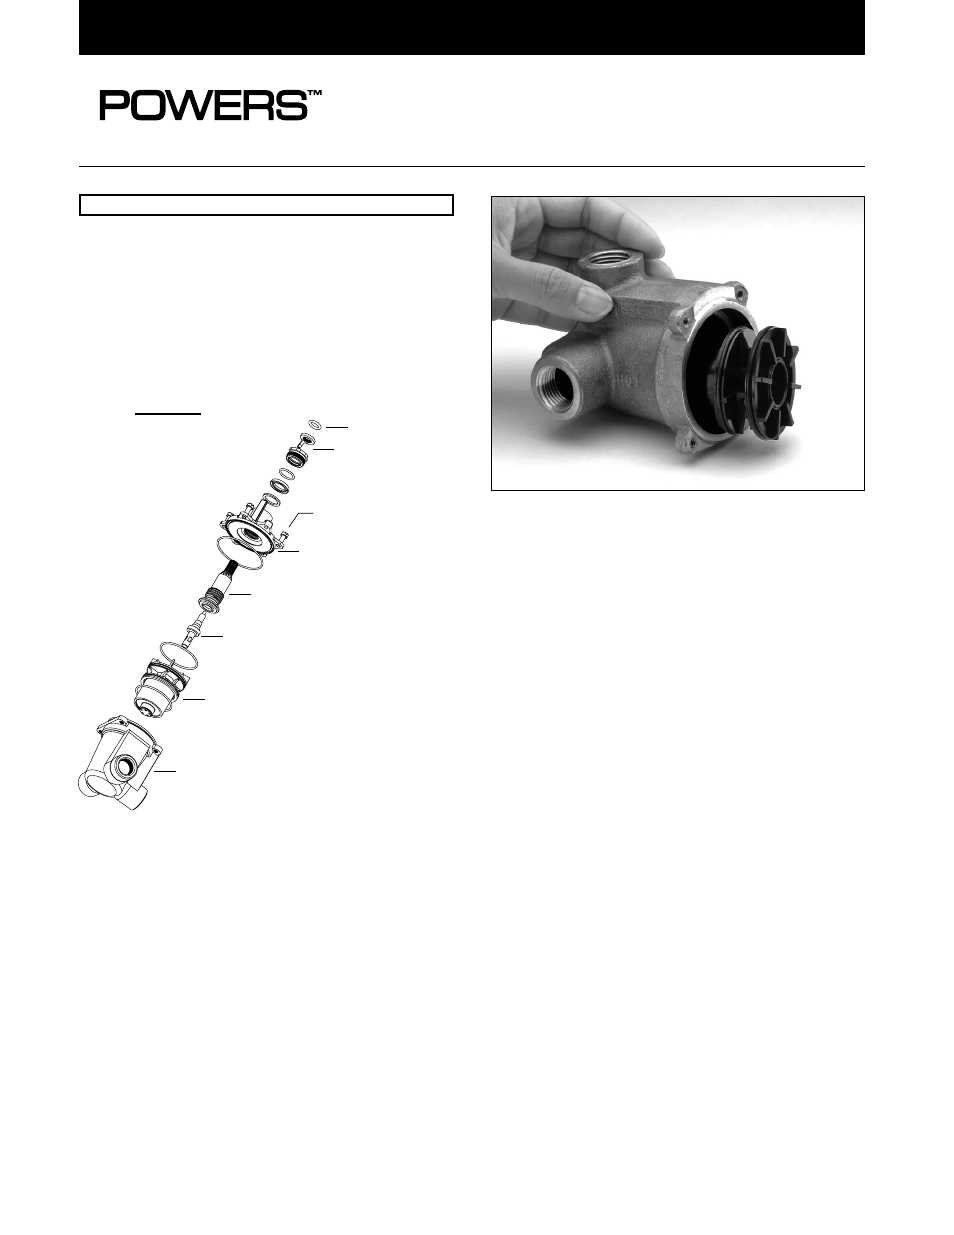
2. Push the cartridge into the body without the “O” rings
installed. The cartridge should slide in easily, and
bottom out with its large fins just inside the front
surface of the casting. If the cartridge is difficult to
install, or does not go in all the way, remove the
cartridge and clean the the body or remove any
obstructions. Repeat this step until the cartridge
installs easily.
3. Remove the cartridge and install the 2 “O” rings. One is
slightly larger than the other. The larger one goes closest
to the front (fins). Lubricate the “O” rings with silicon
lubricant.
4. Install the cartridge back into the body. The cartridge
should go in until the large fins are just inside the
front surface of the casting (same position as in step 2).
If you cannot push it in all the way due to “O”-rings, use
bonnet and two (2) screws to force in.
5. Remove old stem and replace with new stem. Install
stem into the existing bonnet.
INSTALLATION INSTRUCTIONS
HydroGuard
®
T/P Series e420
Complete Retrofit
Form II 420R-1 v2
EXISTING VALVE BODY
CARTRIDGE
ASSEMBLY
WAX ELEMENT
STEM ASSEMBLY
EXISTING BONNET ASSEMBLY
EXISTING BONNET SCREWS (4)
SPLINED TEMPERATURE
LIMIT STOP/ON-OFF ASSEMBLY
"O" RING
420-616 KIT
Figure 1
420 RETROFIT INSTRUCTIONS
Figure 2