Mallory Ignition Mallory HYFIRE 6A and 6AL SERIES ELECTRONIC IGNITION CONTROLS 6852M_6853M User Manual
Page 2
MALLORY IGNITION
www.malloryperformance.com
2
area, such as the glovebox. When you find a suitable
location to mount the unit, make sure all wires of the ignition
reach their connections. Hold the ignition in place and mark the
location of the mounting holes. Use a 1/8" drill bit to drill the
holes. Use the supplied self-tapping screws to mount the box.
WIRING
Wire Length
All of the wires of the HYFIRE
®
6A Ignition Control may be
shortened as long as quality connectors are used or soldered
in place. To lengthen the wires, use one size larger gauge wire
(12 gauge for power leads, 16 gauge for all others). Use the
proper connectors to terminate all wires. All connections must
be soldered and sealed.
Grounds
A poor ground connection can cause many frustrating problems.
When a wire is specified to go to ground, connect it to the
chassis. Always connect a ground strap between the engine and
chassis. Connect any ground wires to a clean, paint-free metal
surface.
Ballast Resistor
If your vehicle has a ballast resistor in line with the coil wiring, it
is not necessary to bypass it. This is because the HYFIRE
®
6A
Ignition Control receives its main power directly from the battery.
MISCELLANEOUS INFORMATION
Sealing
Do not attempt to seal the HYFIRE
®
6A Ignition Control. All of the
circuits of a HYFIRE
®
6A receive a conformal coating of sealant
that protects the electronics from moisture. Sealing the HYFIRE
®
6A will not allow any moisture that seeps in through the
grommets to drain and may result in corrosion.
Welding
To avoid any damage to the HYFIRE
®
6A Ignition Control when
welding on the vehicle, disconnect the positive (red) and negative
(black) power cables of the HYFIRE
®
6A Ignition Control. It is also a
good idea to disconnect the tachometer ground wire as well.
Distributor Cap and Rotor
We recommend installing a new distributor cap and rotor when
installing the HYFIRE
®
6A Ignition Control. Be sure the cap is clean
inside and out, especially the terminals and rotor tip. On vehicles
with smaller caps, it is possible for the air inside the cap to become
electrically charged causing crossfire which can result in misfire.
You can prevent this by drilling a couple of vent holes in the cap.
Drill the holes between terminals at rotor height, facing away from
the intake. If needed, place a small piece of screen over the holes
to act as a filter.
HYFIRE
®
6A Diagnostic LED
On the end panel of your Hyfire 6A ignition there is a small hole.
Behind this hole is a red LED indicator. This serves two purposes:
when you first turn on the ignition switch, the LED will flash
rapidly 3 times. This indicates that the ignition system has power,
and that the microprocessor is running properly. In addition, the
LED will flash when receiving a proper trigger signal from the
vehicle. If, after a normal power-up, the LED doesn’t flash when
cranking the engine, you should check your triggering circuit for
problems. If the LED flashes when the
engine is cranked, but there is still no
spark, the problem lies somewhere else.
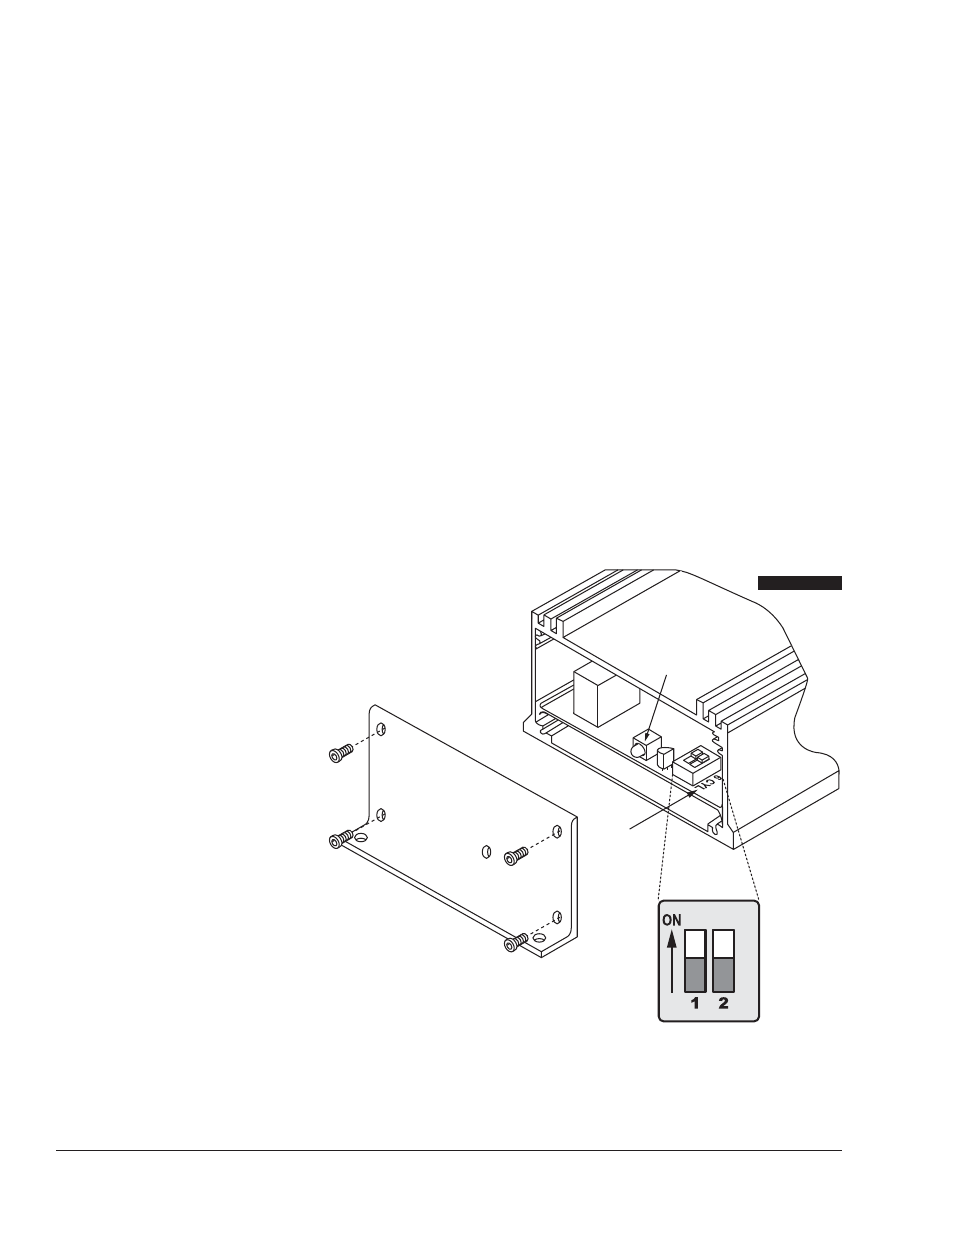
HYFIRE
®
6A Cylinder Selection
Your HYFIRE
®
6A Ignition comes from the
factory set up for 8 cylinder operation. If
you want to use this ignition with a 4 or 6
cylinder engine, you must first remove the
four screws that hold the endplate with the
LED hole. Once the endplate is removed,
you’ll see the end of the circuit board. Look
for the two-section switch. To select 4 cylinder
mode, move the switch marked “1” to the “ON”
position. To select 6 cylinder mode, move the switch
marked “2” to the “ON” position. If both switches are “OFF”,
or both are “ON”, the ignition will run in the 8 cylinder mode.
See Figure 1.
MOUNTING
The HYFIRE
®
6A Ignition Control can be mounted in any position. If
you mount it in the engine compartment, keep it away from mov-
ing objects and heat sources. Do not mount the unit in a closed
LABELS FOR
"CYLINDER SELECT"
ON CIRCUIT BOARD
DIAGNOSTIC
LED
FIGURE 1