Armasight DARDROPBB05PAL1 Drone Pro 5x Digital Night Vision Riflescopes User Manual
Page 19
19
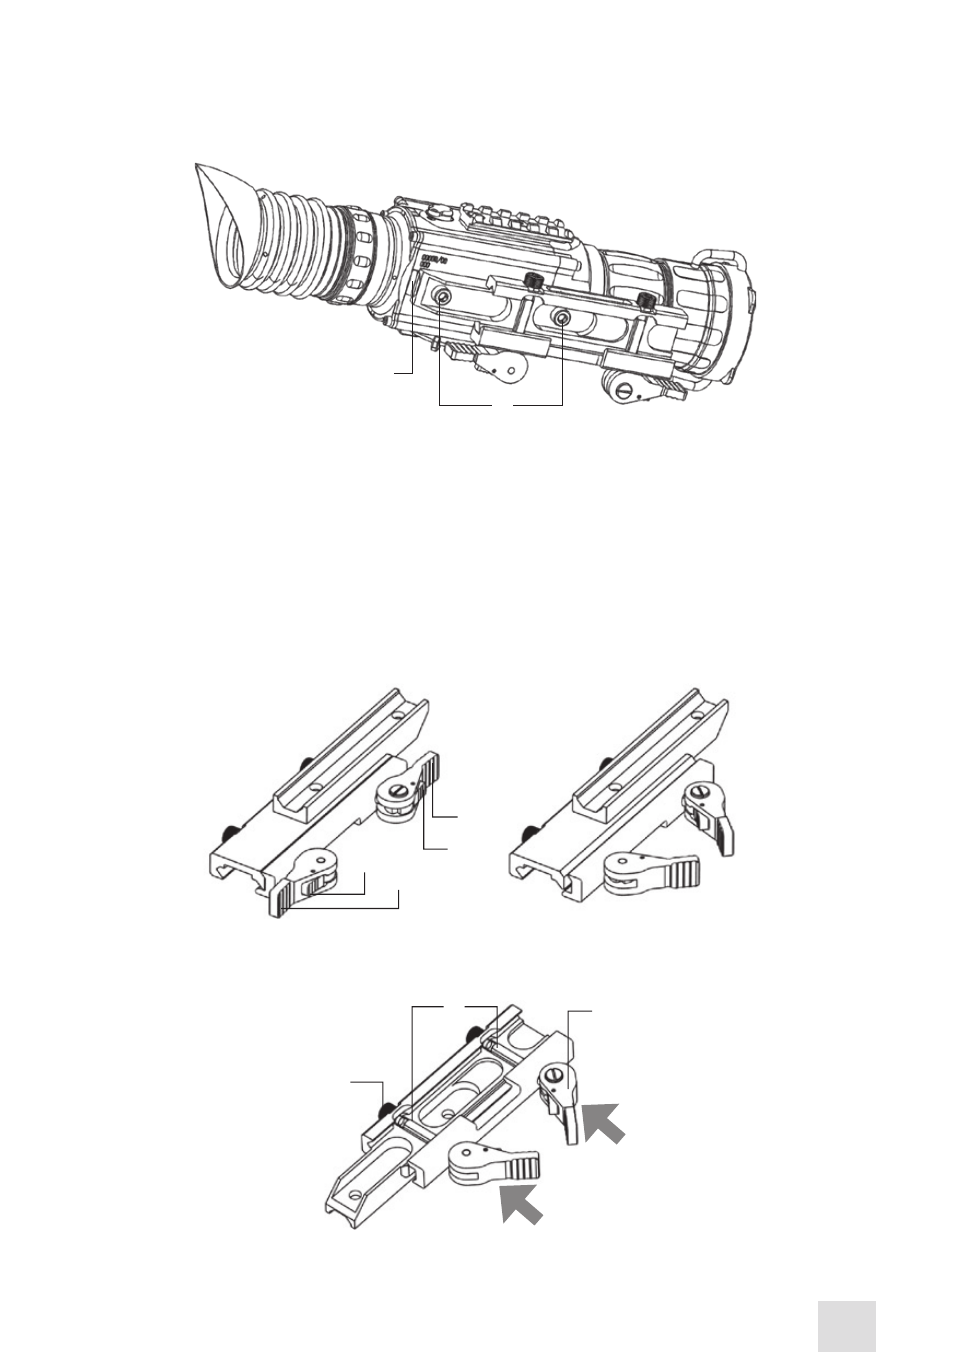
The Drone PRO comes fully-assembled with a Picatinny/Weaver mount (Figure 3-2).
The mount (A) is attached to the Drone PRO seating rail with two M4×20 flathead socket cap screws
(B).
To install the Drone PRO on a Picatinny/ Weaver rail, do the following:
1. Unlock the clamping device of the Drone PRO mount by pushing down on the lever holders (A, see
Figure 3-3) and unlocking the levers (B).
2. Install the Drone PRO on the Picatinny/ Weaver rail so that the stops (A, see Figure 3-4) slide into the
transverse slots on the rail.
3. Affix the Drone PRO to the rail by locking the levers (B, Figure 3-3).
4. Verify that the clamping device is securely holding the Drone PRO. If necessary, adjust the clamping
device’s lever-cam locks as detailed in Part 3.1.3 (Clamping Device Adjustment).
B
A
LoCKeD
poSITIon
B
A
FIGURE 3-3. MOUNT. TOP VIEW
UnLoCK
poSITIon
FIGURE 3-4. MOUNT. UNDERSIDE VIEW
A
C
B
B
A
FIGURE 3-2. THE DRONE PRO FULLY ASSEMBLED WITH THE MOUNT
- DACCIPHBB01NTS1 Cipher Digital Night Vision Clip-on System (44 pages)
- NSCCOLR001Q9DI1 CO-LR GEN 2+ QS MG Day/night vision Clip-On system (40 pages)
- NSCCOLR00129DI1 CO-LR GEN 2+ ID MG Day/night vision Clip-On system Improved Definition (40 pages)
- NSCCOMINI1Q9DI1 CO-Mini GEN 2+ QS MG Day/night vision Clip-On system (40 pages)
- NSCCOMR001QMDI1 CO-MR GEN 2+ QS MG Day/night vision Clip-On system (40 pages)
- CO-X Gen 2+ SD Night Vision Clip-On System (40 pages)
- NRWVULCAN629DS1 Vulcan 6x Gen 2+ SD MG Night Vision Riflescope (1 page)
- NRWVULCAN6Q9DI1 Vulcan 6x Gen 2+ QS MG Night Vision Riflescope (1 page)
- NRWVULCAN629DI1 Vulcan 6x Gen 2+ ID MG Night Vision Riflescope (1 page)
- NRWVULCAN4Q9DI1 Vulcan 4.5X Gen2+ QS MG - Compact Professional 4.5x Night Vision Rifle Scope (40 pages)
- NRWVULCAN3Q9DI1 Vulcan 3.5-7x Gen 2+ QS MG Night Vision Riflescope (40 pages)
- NWWSPEAR042GDI1 Spear 4X Gen 2+ ID - Night Vision Rifle Scope (12 pages)
- NRWNEMESI6QGDI1 Nemesis6x GEN 2+ QS Night vision rifle scope (12 pages)
- NRWNEMESI42GDI1 Nemesis4x GEN 2+ ID Night vision rifle scope (12 pages)
- NMWVAMPIR3CCIC1 Vampire 3X CORE IIT Night Vision Rifle Scope (12 pages)
- NWWWWZ000411I11 WWZ 4x GEN 1+ Night Vision Rifle Scope (12 pages)
- NWWORION0311I11 ORION 3x GEN 1+ Night vision rifle scope (12 pages)
- NRWVULCAN6F9DA1 Vulcan 6x FLAG MG Night Vision Riflescope (1 page)
- NLWAQUILA6F6DA1 L3 Aquila 6x (AN/PVS-12) GEN3 Night Vision Riflescope (1 page)
- NLWAQUILA4F6DA1 L3 Aquila 4x AN/PVS-12/12A GEN3 Night Vision Riflescope (2 pages)
- NRWVULCAN6P9DA1 Vulcan 6x Gen 3P MG Night Vision Riflescope (1 page)
- NRWVULCAN6G9DA1 Vulcan 6x Gen 3 Ghost MG Night Vision Riflescope (1 page)
- NRWVULCAN639DB1 Vulcan 6x Gen 3 Bravo MG Night Vision Riflescope (1 page)
- NRWVULCAN639DA1 Vulcan 6x Gen 3 Alpha MG Night Vision Riflescope (1 page)
- NSBDISCOV32QGDI1 Discovery3x GEN 2+ QS Night vision binocular (12 pages)
- DABJANBBX05PAL1 Janus 5X - High Performance Digital Night Vision Binocular (1 page)
- NSBSPARKB4CCIC1 Spark-B CORE 4x Night Vision Binocular (1 page)
- NKBDASTRI511I11 Dark Strider GEN 1+ Night vision binoculars (12 pages)
- NSBEAGLE03GGDA1 EAGLE GEN 3 Ghost Night Vision Binocular (32 pages)
- NSBDISCOV5GGDA1 Discovery5x GEN 3 Ghost Night vision binocular (1 page)
- NYX-7 PRO GEN 2+ ID Night Vision Bi-Ocular (36 pages)
- NYX-7 PRO 4.5x GEN 2+ ID Night Vision Bi-Ocular (32 pages)
- NAMPVS1401Q9DI1 PVS14 GEN 2+ QS MG Multi-Purpose Night Vision Monocular (56 pages)
- NSMNYX14P126DS1 NYX-14 Pro Gen 2+ SD Night Vision Monocular (44 pages)
- NSMNYX1401Q9DI1 NYX-14 GEN 2+ QS MG Multi-Purpose Night Vision Monocular (44 pages)
- NSMN140001Q6DI1 N-14 GEN 2+ QS Multi-Purpose Night Vision Monocular (44 pages)
- NAM601500126DS1 PVS14/6015 GEN 2+ SD Multi-purpose night vision monocular (56 pages)
- NSMSIRIUS1QMDI1 Sirius GEN 2+ QS MG Multi-Purpose Night Vision Monocular (44 pages)
- NSMAVENGE3QGDI1 AVENGER Gen 2+ QS Night Vision Monocular (12 pages)
- DKMPRIMDC060001 Prime DC 6x Digital Color Night Vision Monocular (12 pages)
- DKMPRIMDB050001 Prime D 5x Digital Night Vision Monocular (12 pages)
- DAMBIT05X05PAL1 BIT 5x Digital Night Vision Monocular (1 page)
- DAMBIT05X05PAL1 BIT 5x Digital Night Vision Monocular (36 pages)
- NSMSPARK01CCIC1 Spark CORE Multi-purpose night vision monocular (40 pages)