Lt1000 controls – RIDGID SeeSnake LT1000 User Manual
Page 16
SeeSnake® LT1000
14
Make sure that the battery locks onto the dock. See the
Battery Charger operator’s manual for more informa-
tion.
Batteries supplied for the LT1000 are rated at 2.2 / 2,2 amp-
hours. When fully charged, depending on use (recording
time, etc.) the LT1000 will run for approximately 2.5 / 2,5
to 3 hours. Battery Status LEDs above keypad indicate
battery charge level. (See Battery Status LED chart.)
NOTICE
Turn the LT1000 power OFF before chang-
ing or removing the battery. Removing the battery with
the power ON may cause loss of camera recordings.
Battery Status LEDs Chart
Outlet Power
For plug in operation, a double-insulated AC/DC power
supply is supplied to reduce wall outlet voltage to the
correct voltage for the LT1000.
NOTICE
The external power supply is intended for
indoor use only.
To power the system up with the power cord, locate
the power supply. The power supply cord has two sec-
tions, one of which plugs into a standard 110 - 120V
two-bladed outlet (US model) or standard 230V 2 pin
outlet (EU model) at one end and plugs into a power
supply at the other end. The second section runs from
the power supply to the back of the LT1000 and plugs
into the jack marked
at the far left side front pan-
el of the unit (Figure 24).
With dry hands, connect the two sections together and
insert the jack plug into the jack on the LT1000. Route
the cord along a clear path and with dry hands plug the
power supply into a matching outlet. If using an exten-
sion cord ensure it is of adequate wire gauge. For cords
of 25 feet / 7,5 m, a minimum gauge of 18 AWG / 0,8 mm
2
is required. For cords greater than 25 feet / 7,5 m, a mini-
mum gauge of 16 AWG / 1,5 mm
2
is required.
NOTICE
If external power is unreliable and produces
transient voltage spikes, the LT1000 video may freeze. In
this case simply power cycle the LT1000 off and then on.
Job data will not be lost, but current distance count may be
reset.
WARNING
If the laptop is plugged into AC and the
laptop AC adapter is not isolated, then a hot ground could
damage a laptop via the USB grounding connection.
Use only a battery or an isolated power supply to pow-
er the LT1000 and any laptop used with it.
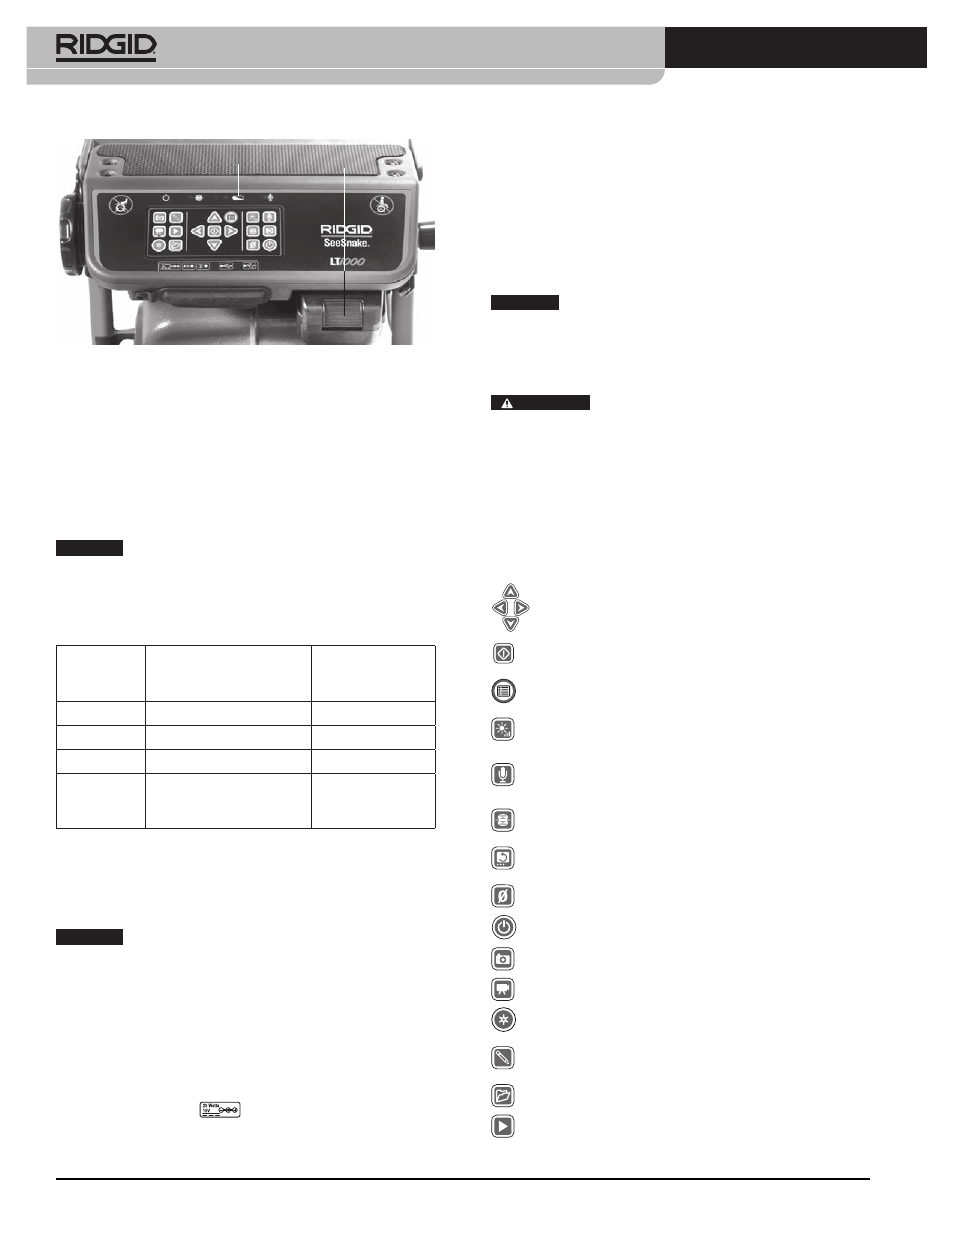
LT1000 Controls
Keypad Controls
* Some of the keypad controls will have no effect unless the HQ Soft-
ware is running.
Battery
Status
Battery
Figure 25 – LT1000 Connections
BATTERY
STATUS
EXTERNAL
POWER NOT
CONNECTED
EXTERNAL
POWER
CONNECTED
FULL
Solid green
LEDs OFF
MED
Solid green and red
LEDs OFF
LOW
Solid red, 4 beeps
LEDs OFF
DEAD
Solid red for 5 sec,
5 sec long beep and
shutdown
LEDs OFF
Arrow Keys: Used to move among menu choices and
adjust variables (such as contrast) up and down. Used to
rotate screen image.
Select Key: Used to choose options in the Units menu
(Auto, Meters and Feet).
Menu Key: Used to bring up a menu of display options
such as Color, Brightness, Contrast, Units.
Brightness Key: Used to directly control the camera LED’s
brightness up or down.
Microphone Mute Key: Used to mute the microphone
while recording or activate it to record comments during
an inspection.
Sonde Key: Used to activate the built-in Sonde for tracing
the location of the camera head.
*Image Flip Key: Used to flip the image on the display
vertically
Zero Key: Used to establish a temporary zero-point for the
distance counter for units equipped with the CountPlus.
Power Key: Used to power the LT1000 display ON or OFF.
*Photo Key: Captures a still photo of the camera image as
shown.
*Video Key: Starts or stops the capture of a video clip.
*Autolog Key: Starts Autologging capture of a series of
still photos stored with the current job.
*Photo Tag Key: Creates a new still photo and allows you
to apply custom comments or stored tags to it.
*Job Management Key: Accesses a menu of job and re-
port management options.
*Playback Key: Plays back current recording, if any.