Inst alla tion, Torquemaster, Plus reset instructions continued – Wayne-Dalton TORQUEMASTER 9800 User Manual
Page 31: Tools needed: 31, Or torquemaster, Plus operation problems
Tools Needed:
31
Please Do Not Return This Product To The Store. Contact your local Wayne-Dalton dealer.
To find your Wayne-Dalton dealer; refer to your local yellow pages / business listings or go to Find a dealer area online at
www.wayne-dalton.com
INST
ALLA
TION
If the system is engaged, follow these
steps to reset the system:
2. Disengage opener (if installed) by
pulling or placing emergency disconnect
in the manual operated position.
3. With the door in the open position,
clamp vice grips on both tracks just below
the bottom section roller.
4. Now is a good time to remove vehicles
from garage, and provide clear access to
end brackets.
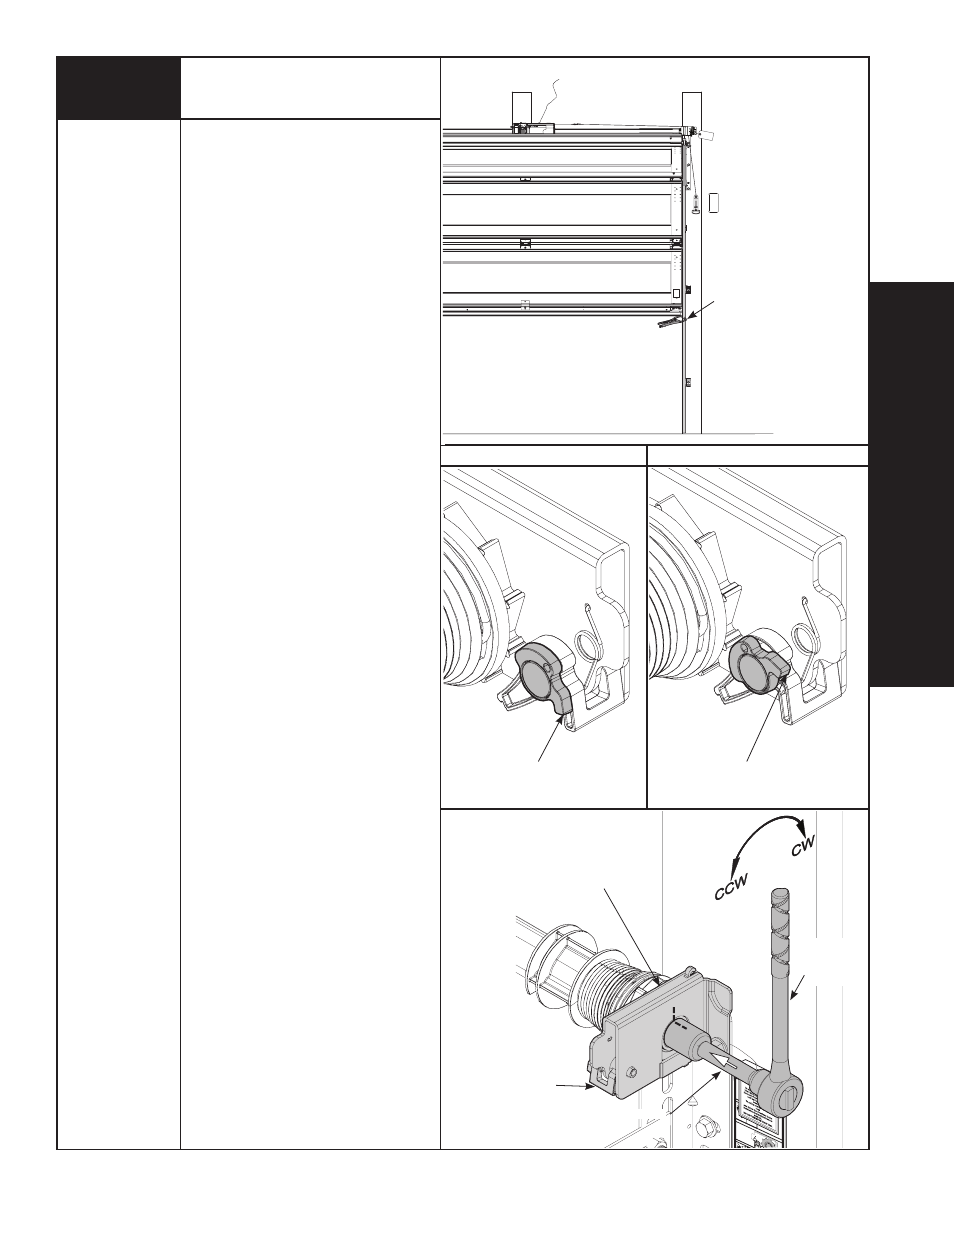
5. Flip the ratchet pawl knob on both
end brackets to the upper position (see
illustration).
6. Raise door 2”-3” and then lower door.
Repeat process until anti-drop device
resets (see disengaged illustrations on
reverse side).
IMPORTANT: BE PREPARED TO SUPPORT
ThE TOTAL wEIghT Of ThE DOOR.
7. Cautiously remove the vice clamps from
both tracks and with assistance lower the
door.
8. Check for spring tension. starting on
the right hand side, place a ratchet and
5/8” socket on the Torquemaster
®
Plus
winding shaft (see illustration in
instruction manual). Ensure ratchet is set
so that it will tighten counter clockwise on
the right hand side, and clockwise on the
left hand side (if applicable). If tension is
present, remove the ratchet and check the
left hand side (if applicable). If spring(s)
have tension, proceed to balancing Door
step 1; if no spring tension is present,
contact a qualified door installation
company to replace the spring(s).
IMPORTANT: haVE a qualIFIED DOOR
INsTallaTION COMPaNy MakE
aDjusTMENTs/REPaIRs TO CablEs,
sPRING assEMblIEs aND OThER
haRDWaRE.
BALANCINg DOOR
1. lift door and check its balance. adjust
spring(s), if door lifts by itself (hard to pull
down) or if door is difficult to lift (easy to
pull down). anytime spring adjustments
are made, ratchet pawl knob must be
in the upper position (see illustration on
reverse side). an unbalanced door such as
this can cause idrive
®
or Torquemaster
®
Plus operation problems.
PlaCE VICE ClaMPs
bElOW bOTTOM sECTION
ON bOTh VERTICal TRaCk
PaWl kNOb IN lOWER
POsITION
PaWl kNOb IN uPPER
POsITION
LOwER POSITION
UPPER POSITION
Cab
le Dr
um
No sp
ace be
tween
Ratch
et
Pawl an
d Cabl
e Dr
um
indica
tes enga
gement
Cabl
e Dr
um
Ratc
het Pa
wl
ENGA
GED SIDE
VIEW
No sp
ace bet
ween
Ratchet
Paw
l and
Cabl
e Dr
um
ENGA
GED
UNDE
RNE
ATH
VIEW
Space
betwee
n Ratc
het P
awl
and
Cable
Drum
non-in
dica
tes eng
agement
Cabl
e Dr
um
Ratche
t Paw
l
DISENG
AGE
D SIDE VI
EW
No sp
ace
betwe
en
Ratche
t Paw
l and
DISENG
AGE
D UNDE
RNE
ATH VIEW
UPP
ER POSIT
ION
LOWER POSI
TION
LOWER POSI
TION SID
E VIEW
UPP
ER POSI
TION SI
DE VIE
W
Ratche
t Pawl
in Lo
wer Posi
tion
Ratche
t Paw
l in Upper
Pos
ition
Use
these Illus
tration
, in conj
uncti
on wi
th th
e Instruction
s on
the other si
de of
this label.
WAR
NING
Rachet Bracke
t is under
EXTREME SPRING
TENS
ION.
To avoid
possible sev
ere or
fatal injury
, DO NO
T remove
fasteners
from
ratchet
bracket
until spr
ing(s)
are fu
lly
wnwound
.
To safely unwind spr
ing(s)
read
and fo
llow the d
irections in the
installati
on instructio
ns/owners
manual
.
DO NO
T REMOVE
THIS
TAG
.
RaTChET
WITh 5/8”
sOCkET
END bRaCkET
3” ExTENsION
TorqueMaster
®
Plus Reset
Instructions Continued...
PaWl