End brackets continued, Securing center bracket assembly – Wayne-Dalton TORQUEMASTER 9800 User Manual
Page 24
Tools Needed:
24
Tools Needed:
Please Do Not Return This Product To The Store. Contact your local Wayne-Dalton dealer.
To find your Wayne-Dalton dealer; refer to your local yellow pages / business listings or go to Find a dealer area online at
www.wayne-dalton.com
End Brackets Continued...
Cable
Drum
No space betw
een
Ratche
t
Paw
l and
Cable
Drum
indicates
enga
gemen
t
Cable
Drum
Ratche
t Paw
l
ENGAGED SIDE VI
EW
No s
pace bet
ween
Ratchet Pa
wl and
Cable
Drum
EN
GAGED
UND
ERNE
ATH V
IEW
Space
between
Ratch
et Pawl
and Cab
le Dru
m
non-i
ndicat
es enga
gement
Cable
Drum
Ratche
t Paw
l
DISENG
AGED
SIDE VIEW
No sp
ace bet
ween
Ratch
et Pa
wl and
DISENG
AGED
UNDE
RNE
ATH VIEW
UPP
ER POSITIO
N
LOWER PO
SITIO
N
LOWER
POSITIO
N SIDE VIEW
UPP
ER POSITION SIDE VIEW
Ratchet
Pawl in Lowe
r Posit
ion
Ratchet
Pawl in Upper
Posit
ion
Use
these Illu
strat
ion, in co
njunct
ion with th
e Inst
ruct
ions
on the
other
side of
this
labe
l.
WAR
NING
Rac
het Br
acket is un
der
EXTRE
ME SPRING
TENSIO
N.
To avoid
poss
ible se
vere
or
fata
l injury
, DO
NO
T re
move
fasten
ers
from
ratchet bracket
unt
il spring(s)
are
fully
wnw
ound.
To safely unwi
nd spr
ing(s)
read
and
follow
the
direc
tion
s in
the
install
ation
inst
ructio
ns/owne
rs
manual.
DO NOT
REM
OVE THIS
TAG
.
RIGhT END
bRaCkET
RaTChET
WhEEl
TEETh POINTING
uPWaRD
Cable D
rum
No spa
ce betw
een Ratc
het
Pawl an
d Cable
Drum
indicate
s enga
gemen
t
Cable D
rum
Ratchet
Pawl
ENGAG
ED SID
E VIEW
No spac
e betwe
en
Ratchet
Pawl an
d
Cable D
rum
ENGA
GED UN
DERNE
ATH VIE
W
Space
betwee
n Ratch
et Paw
l
and Cab
le Drum
non-ind
icates en
gagem
ent
Cable D
rum
Ratchet
Pawl
DISENG
AGED S
IDE VIE
W
No spac
e betwe
en
Ratchet
Pawl an
d
DISENG
AGED U
NDERN
EATH V
IEW
UPPER
POSITIO
N
LOWER
POSITIO
N
LOWER
POSITIO
N SIDE V
IEW
UPPER
POSITIO
N SIDE V
IEW
Ratchet
Pawl in
Lower P
osition
Ratchet
Pawl in
Upper
Position
Use
these
Illustr
ation
, in con
junc
tion with
the Instruct
ions on th
e other
side o
f
this lab
el.
WARNING
Rachet
Bracket
is under
EXT
REME
SPRING
TENS
ION
.
To avoi
d po
ssible
severe or
fatal
injury
, DO NO
T remov
e
fasten
ers from
ratchet
brac
ket
until sp
ring(s
) are f
ully
wnwo
und.
To sa
fely unwi
nd spring(s
)
read
and fol
low the
direc
tions
in the
installati
on instruc
tions
/owners
manual
.
DO NO
T RE
MOVE THIS
TAG.
5/16” x 1-5/8”
hEx hEaD laG
5/16” - 18 x 3/4”
CaRRIaGE bOlT
aND hEx NuT
RIGhT END
bRaCkET
WaRNING TaG
21
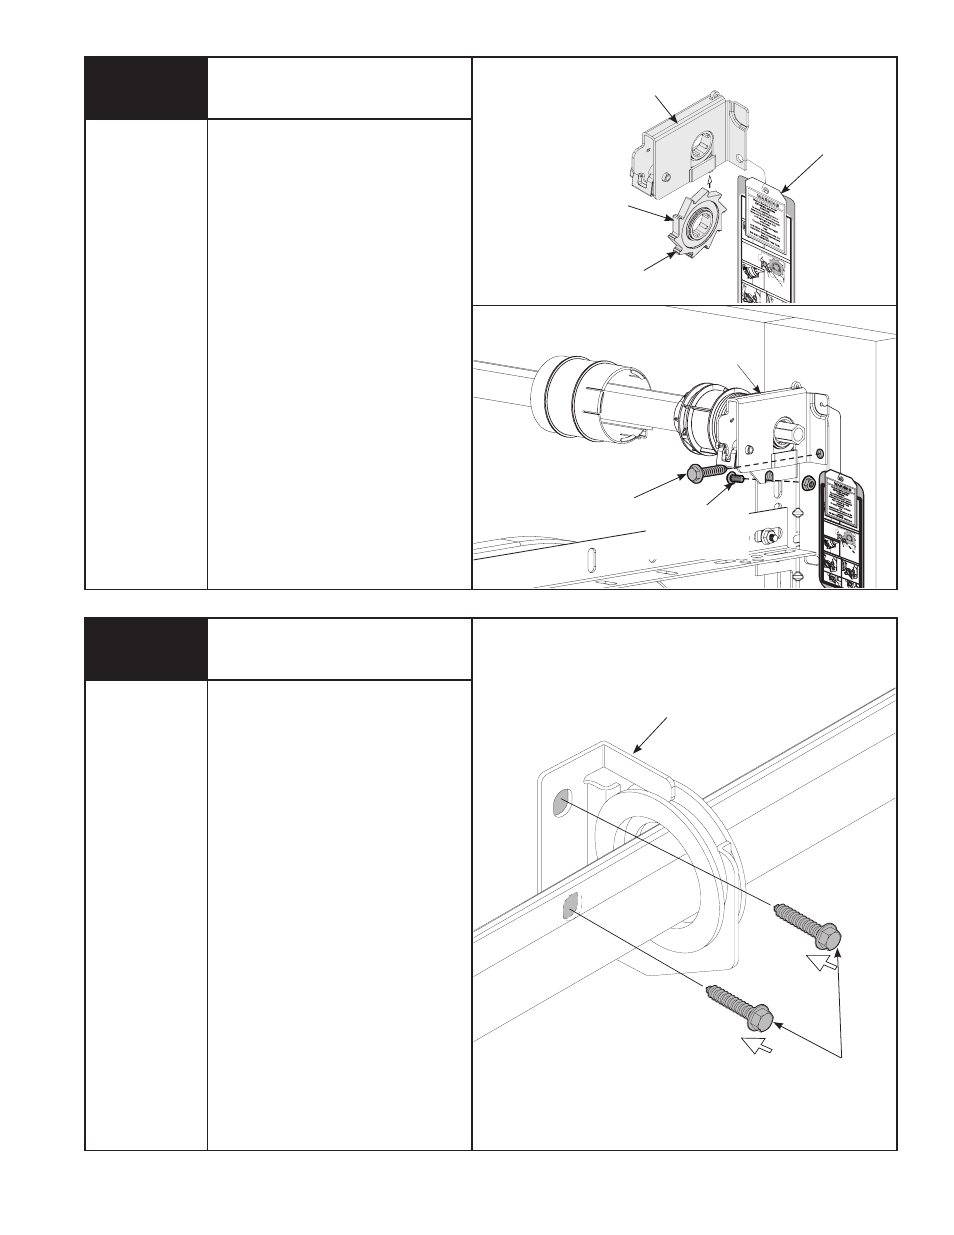
CENTER
bRaCkET
bushING
assEMbly
(2) 5/16” x 1-5/8”
hEx hEaD laG
sCREWs
NOTE: If you are installing the
idrive
®
opener with your garage door, skip this
step.
NOTE: If you are not installing the
idrive
®
opener on your garage door, you
must install the center bracket bushing
assembly. Follow these instructions for
non-
idrive
®
operated garage doors.
To locate the center bracket, mark the
header halfway between the flagangles
and level the TorqueMaster
®
spring tube.
Drill 3/16” pilot holes into header for the
lag screws. Fasten the metal bracket to
the header using (2) 5/16” x 1-5/8” lag
screws.
Securing Center Bracket
Assembly
Power Drill
3/16” Drill bit
7/16” socket
Driver
First secure end bracket to the flagangle
using (1) 5/16” - 18 x 3/4” carriage bolt
and (1) 5/16” - 18 hex nut. Now, secure
end bracket to the jamb using (1) 5/16”
x 1-5/8” hex head lag screw. Repeat for
left hand end bracket.
NOTE: Ensure the 5/16” - 18 x 3/4”
carriage bolt is going through the
flagangle first, and the 5/16” - 18 hex
nut is on the outside of the end bracket.
IMPORTANT: IF RaTChET GEaR slIPs
OuT OF END bRaCkET, ENsuRE ThE
TEETh ON RaTChET WhEEl aRE
POINTING uPWaRD IN a ClOCkWIsE
POsITION WhEN slIDING IT baCk
INsIDE ThE END bRaCkET.