Remote, How to use – JVC DR-M10 User Manual
Page 17
Masterpage:Right-No-Heading
EN
17
Filename [DR-M10U_06-1Name.fm]
Page 17
March 4, 2004 5:13 pm
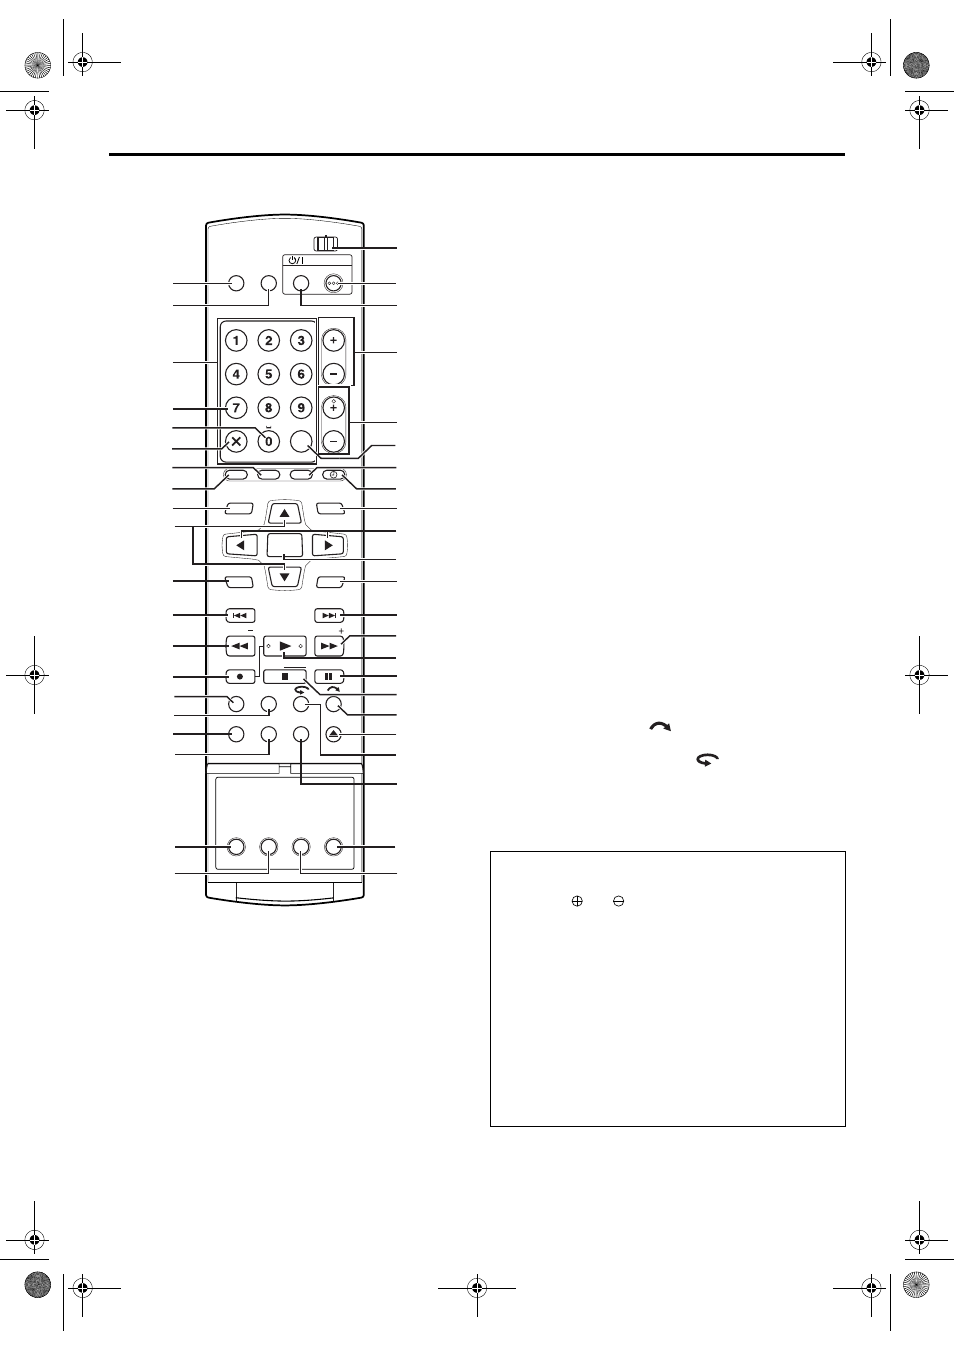
REMOTE
A TV Muting Button (TV MUTING)
B TV/VIDEO Button
C Number Keys
Character Keys
D DBS Button
E Auxiliary Button (AUX)
F Cancel Button (& (CANCEL))
G Program Check Button (PROG/CHECK)
H VCR Plus+ Button
I Top Menu Button (TOP MENU)
J rt Button ੬ pg. 28
L Reverse Skip Button (2) ੬ pg. 36, 44
Previous Button (PREVIOUS)
M Reverse Search Button (3) ੬ pg. 37, 44
N Record Button (7 (REC)) ੬ pg. 57
O Recording Mode Button (REC MODE)
P Live Check Button (LIVE CHECK)
R Display Button (DISPLAY)
S Audio Button (AUDIO)
T Subtitle Button (SUBTITLE)
U TV/CABLE/DBS/DVD switch
V DVD Standby/On Button (DVD 1 (STANDBY/
ON))
W TV/CABLE/DBS Standby/On Button (TV/CBL/DBS
1(STANDBY/ON)) ੬ pg. 92
X TV Volume Button (TV VOLUME +/–)
Y Channel Button (CH +/–)
Mark Button (MARK)
a Satellite Auto Recording Button (REC LINK)
b Timer Button (# (TIMER)) ੬ pg. 61, 65
c Navigation Button (NAVIGATION)
d w e Button ੬ pg. 22, 44
e Enter Button (ENTER)
g Forward Skip Button (6) ੬ pg. 36, 44
Next Button (NEXT)
h Forward Search Button (5) ੬ pg. 37, 44
Forward Slow Button (SLOW +)
i Play Button (4 (PLAY)) ੬ pg. 35
Select Button (SELECT)
j Pause Button (9 (PAUSE)) ੬ pg. 35, 44
k Stop Button (8) ੬ pg. 35, 44, 57, 86
Clear Button (CLEAR)
l Skip Search Button (
m Open/Close Button (x (OPEN/CLOSE)) ੬ pg. 11
n One Touch Replay Button (
o Play Set Up Button (ON SCREEN)
p Progressive Scan Button (PROGRESSIVE SCAN)
q Angle Button (ANGLE)
CABLE/DBS
DVD
TV
DVD
CH
TIMER
REC LINK
PROG/CHECK
VCR Plus+
NEXT
PREVIOUS
PAUSE
REC
REC MODE LIVE CHECK
SET UP DISPLAY ON SCREEN
OPEN/
CLOSE
AUDIO SUBTITLE ANGLE
PROGRESSIVE
SCAN
SLOW
SLOW
PLAY/SELECT
STOP/
CLEAR
NAVIGATION
TOP MENU
RETURN
ENTER
MENU
TV/CBL/DBS
STANDBY/ON
TV
MUTING
TV/
VIDEO
TV VOLUME
ABC
JKL
GHI
MNO
TUV
PQRS
WXYZ
AUX
CANCEL
MEMO/MARK
DBS
DEF
B
I
c
f
g
d
U
V
X
W
Y
C
G
H
K
L
Q
M
N
J
A
F
D
E
b
a
h
e
i
j
k
m
l
o
p
q
n
Z
R
S
T
O
P
How To Use
Before use, insert two AA size batteries into the Remote with
the polarity (
and
) matched correctly as indicated on
the battery compartment or on the lid.
The Remote can operate most of your unit’s functions, as well
as basic functions of TV sets of JVC and other brands.
(
● Point the Remote toward the remote sensor.
● The maximum operating distance of the remote control is
about 8 m. (26.25ft)
NOTES:
● When inserting the batteries, be sure to insert in the correct
directions as indicated under the battery cover.
● If the Remote doesn’t work properly, remove its batteries,
wait for approximately 5 minutes, replace the batteries and
then try operating the unit again.
DR-M10U_06-1Name.fm Page 17 Thursday, March 4, 2004 5:14 PM