Application 7: using the aes digital inputs, 105 application 7: using the aes digital inputs, Wizard – dbx DriveRack VENU360 Loudspeaker Management System User Manual
Page 107

105
Application 7: Using The AES Digital Inputs
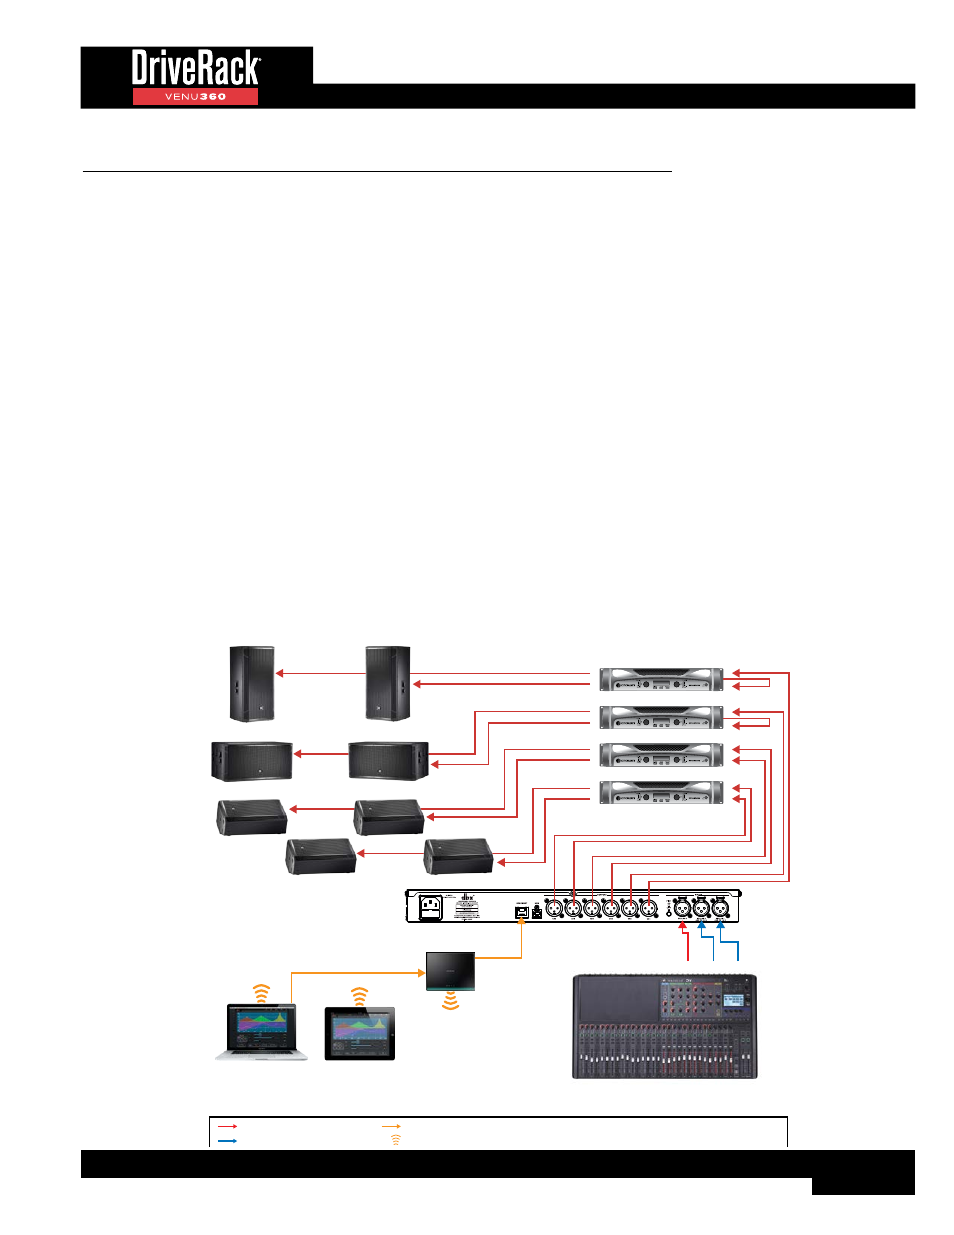
Any of the previous applications described can accommodate AES signals if you’re using a digital mixer. This application
illustrates the power and flexibility of the VENU360 and is suited for use with a digital console which has at least 2 AES
outputs, a PA system up to 2-way, and up to 4 full range stage monitors.
When you use the first two XLR inputs in the VENU360 as AES digital inputs (which provides 4 channels of AES) along with
the remaining analog input on the third XLR, the VENU360 is capable of taking in a total of 5 input signals. Although the
VENU360 only has 3 input processing chains, it does allow you to route or mix input signals directly to output processing
chains. This means that you could, for example, connect a mono FOH feed to the VENU360’s analog 3 input and 4 aux-send
monitor feeds to the AES inputs as shown in the below diagram. You would then need to determine which 3 of the 5 incoming
signals will benefit most from the VENU360’s input processing (specifically, Advanced Feedback Suppression).
In this application the FOH amplifier channels (main and sub amp channels) have been paralleled (or linked) – note that the
amplifiers must have link/parallel jacks to do this. This frees up 2 outputs so that up to 4 stage monitors can be connected to
the VENU360 outputs.
Application Notes:
• Make sure your mixer and amplifiers (or powered speakers) are turned off before making connections.
• Make connections as described in
‘Making Connections’ on page 4
then apply power to the system according
to the instructions described in
.
• Press the
WIZARD
button then run the Setup Wizard and follow the on-screen instructions. Note that the Setup Wizard
may not be able to fully configure the system depending on the application requirements. To complete the configuration,
you may need to enter Configuration mode once the Setup Wizard is complete and re-route audio signals and/or change
processing insert types, see
‘Using Configuration Mode’ on page 24
for information on manually configuring the
VENU360.
1
2
Parallel
1
1
2
Main Amp
1
2
1
2
Sub Amp
1
2
1
2
1
2
Monitor 1-2 Amp
Monitor 3-4 Amp
Mixer
or
or
Wireless Router
Windows
®
or Mac
®
Computer
iOS
®
or Android™
Tablet
or
or
LEGEND
Left Channel
L
R
Right Channel
Aux Channel
A
Channel 1
1
2
Channel 2
Ethernet Connection
Wi-Fi Signal
Analog Audio Connection
AES Digital Connection
Center Channel
C
A3-4 A1-2
Mono
Left Sub Speaker
Right Sub Speaker
Left Main Speaker
Right Main Speaker
Monitor 3
Monitor 4
Monitor 1
Monitor 2
2
Parallel
