Magnum Energy Magnum Panel (MP Series) User Manual
Page 61
Page 54
© 2011 Magnum Energy, Inc.
3.0 Installation
3.10 Removing the NEGATIVE-GROUND Busbar
The MP enclosure is shipped with the DC Negative connected to Ground to provide the single point
of ground for the DC system. This negative to ground connection is done by connecting the DC
Shunt (battery negative connection point) to the DC Ground Stud using the NEGATIVE-GROUND
busbar. If a negative to ground connection is made elsewhere in the DC system — either at the
battery terminal, inside a charge controller, or if you are installing a PV-Ground Fault Protection (PV-
GFP) device — this busbar must be removed to prevent multiple negative to ground connections.
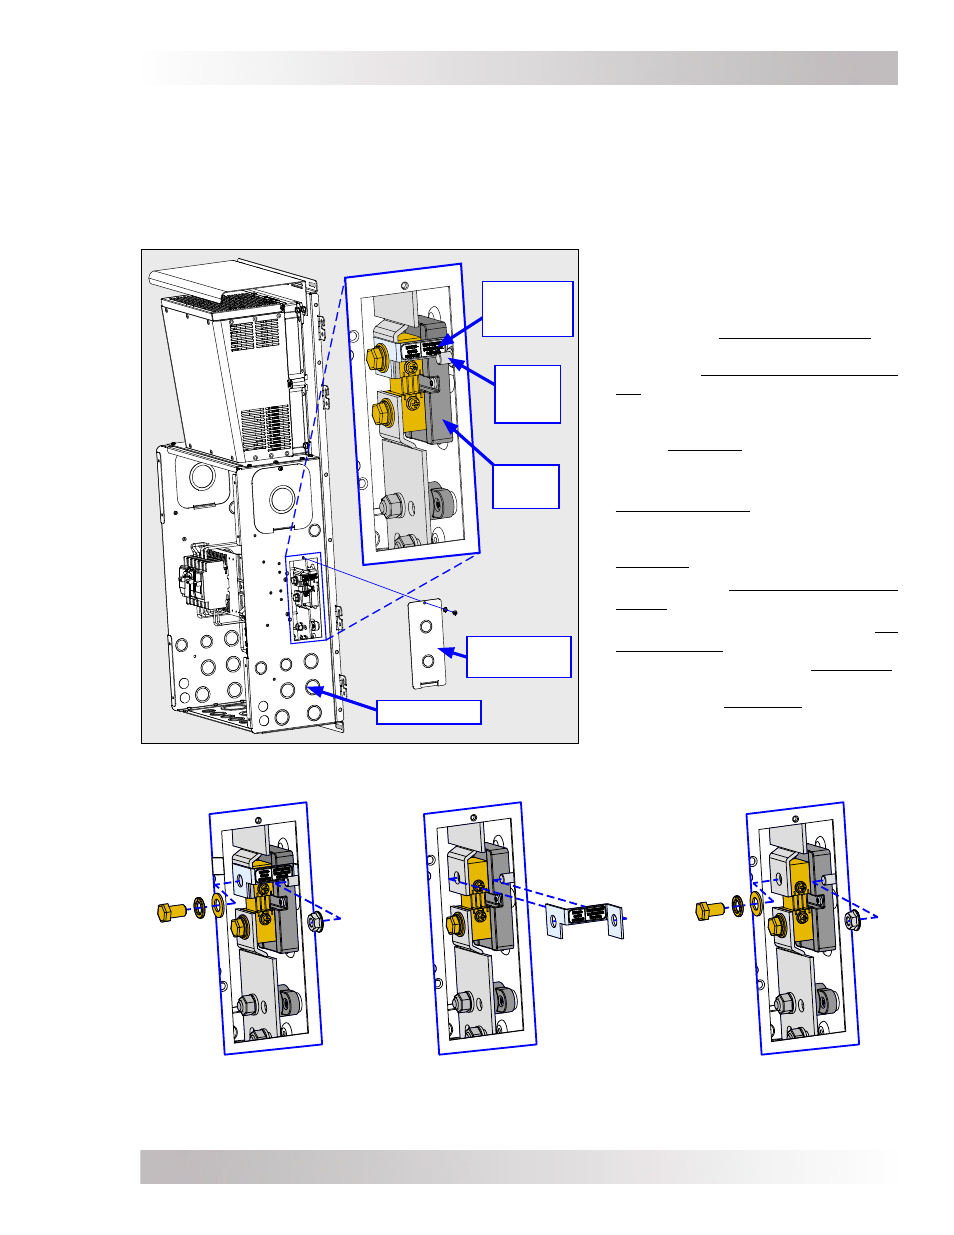
Figure 3-29, Removing the NEGATIVE-GROUND Busbar
Follow the steps below to remove the
NEGATIVE-GROUND busbar (refer to
the diagram to the left to help locate the
components discussed):
1. Remove the Shunt Access Plate on
the right side of the MP enclosure.
Locate the NEGATIVE-GROUND bus-
bar (Item 27, in Figure 2-9; or Item
29, in Figures 2-7, 2-8 or 2-10b - de-
pending on your MP model) attached
to the DC Shunt.
2. Remove the 5/16” fl ange nut (1/2”
wrench) holding the busbar to the
DC Ground Stud and then remove
the 3/8” brass bolt and washer (9/16”
wrench) from the top terminal of the
DC Shunt.
3. Remove the NEGATIVE-GROUND
busbar.
4. Reattach the fl ange nut on the DC
Ground Stud and the brass bolt/
washer back onto the DC Shunt.
Ensure the hardware on the top ter-
minal of the DC Shunt is stacked/
reattached and torqued correctly.
Note: The DC Shunt hardware is
shown correctly stacked in the Step
4 diagram below.
Step 1, Remove Plate and Locate NEG-GND Busbar
NEGATIVE-
GROUND
busbar
Shunt
Access Plate
MP Enclosure
Step 2, Remove
Shunt Hardware
Step 3, Remove the
NEGATIVE-GROUND Busbar
Step 4, Reattach
Shunt Hardware
DC
Ground
Stud
DC
Shunt