CRU RTX Secure 610-IR User Manual
Page 24
RTX220 QR - Manual
Page 24
Windows XP only), Specify Volume/Partition Size, and Assign
Drive Letter or Path dialog prompts, leaving the default settings.
f. You will now see a window that allows selection of a file
system. Choose NTFS and enter a name for the new volume.
Be sure to check the box labeled “Quick Format” unless you
want to completely erase any data on the volume and have time
to wait. A quick format should take less than a minute, while
standard formatting may take several hours.
g. Click “Next” and then “Finish” to start the format process.
When the format is complete, the Drive Properties Box will
update to show the new volume name. The new volume can
now be found by double-clicking on the My Computer icon
on the desktop (Windows XP) or by clicking on the Computer
button in the Start Menu (Windows Vista, 7, Server 2008,
Server 2008 R2).
10.1.3 Mounting and Unmounting Volumes
Mounting Volumes
First ensure that you have established a connection to the RTX
Secure using iSCSI initiator software (See Section 9). Then, if the
hard drives inside of the RTX Secure are already formatted with
the correct Security Key inserted into the Mini-USB Security Key
Port, you can begin using the volume right away. When the RTX
Secure is properly connected and turned on, a window may open
to allow you access to the volume. If no window appears, find the
volume by double-clicking on the My Computer icon on the desktop
(Windows XP) or by clicking the Computer button in the Start Menu
(Windows Vista, 7, Server 2008, Server 2008 R2).
Unmounting Volumes
Log off the volume using your iSCSI initiator software. In the
Microsoft iSCSI Initiator, you can log off from the “Targets” tab.
On Windows XP and Windows Server 2008, select the target and
click the Details button. Select the target identifier and then click
Log Off.
For Windows Vista, Windows 7, and Windows Server 2008 R2,
select the target and then click on the Disconnect button.
10.1 Usage with Mac OS X
10.1.1 Compatibility
The RTX Secure supports 3.5” SATA hard drives.
10.1.2 Formatting a Drive
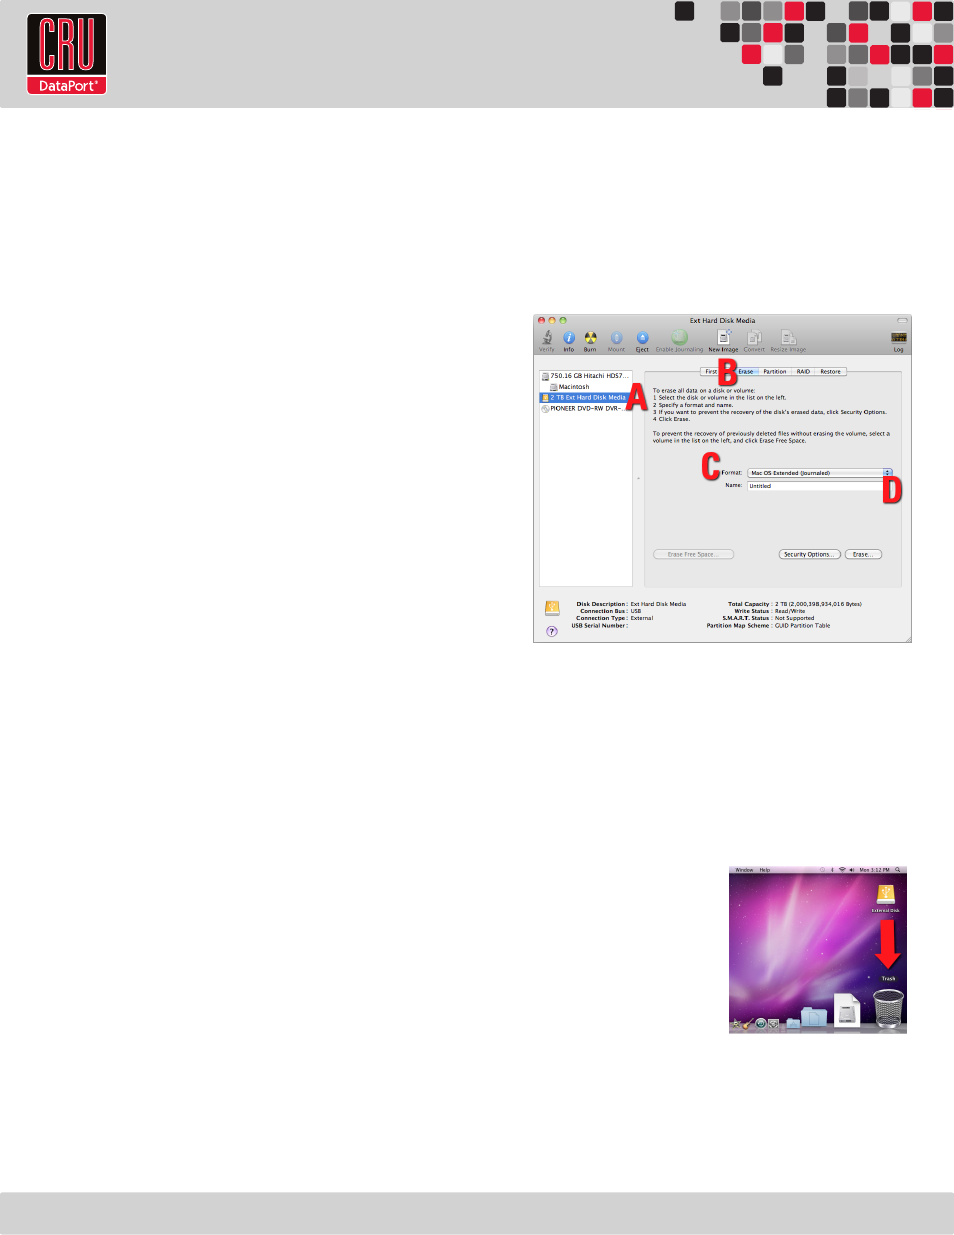
To format, use Disk Utility (pictured below), which can be found in
the Applications folder.
a. Click on the volume in the window to the left.
b. Click the Erase tab in the window to the right.
c. Select the format type. Most users prefer Mac OS Extended
with Journaling (HFS+), which is required for compatibility with
Time Machine (OS 10.5 or newer). If you need to use the RTX
Secure with both Mac and Windows computers, select MS-DOS
File System instead.
d. Enter a name for the new volume and then click “Erase” to start
the process.
10.1.3 Mounting and Unmounting Volumes
Mounting Volumes
If the hard drives installed in the RTX Secure are already formatted
with the correct Security Key inserted into the Mini-USB Security
Key Port, an icon representing the RTX Secure’s volume will appear
(mount) on the desktop. You can begin using the volume right
away. If the volume is unformatted, a message will appear on the
desktop saying that the disk is unreadable. Use OS X’s Disk Utility
to easily format the volume (see section above).
Unmounting Volumes
First, eject the data volume by
dragging the volume’s icon to the
trash bin, or by selecting the icon
then pressing Command-E. Next,
log off the volume in your iSCSI
initiator software. If you are using
the GlobalSAN Initiator, select
“Log Off” from the “Targets” tab.
Disconnecting in this way allows you to reconnect quickly later.
Another way of preventing delays is to keep your iSCSI initiator
software open at all times. You can minimize it and allow it to
run in the background. Closing the software and then reopening
it can cause a lengthy delay before access to the RTX Secure is
reestablished.