Rtx220 qr - manual – CRU RTX Secure 610-IR User Manual
Page 19
RTX220 QR - Manual
Page 19
Activate
Activate RAID Group disk roaming. This option can only be
executed when the RAID Group status is offline.
Deactivate
Deactivate the RAID Group disk roaming. This option can only be
executed when the RAID Group is online.
Confirm Parity Check
Regenerates parity for the RAID Group. This option allows
the administrator to regenerate parity when a parity/data
inconsistency is found, or to check parity/data consistency only.
Only applies to RAID sets with parity.
Delete
Deletes the RAID Group.
Set Disk Property
Enable or disable write caching, standby, readahead, and
command queuing.
More Information
Displays more details about the RAID Group.
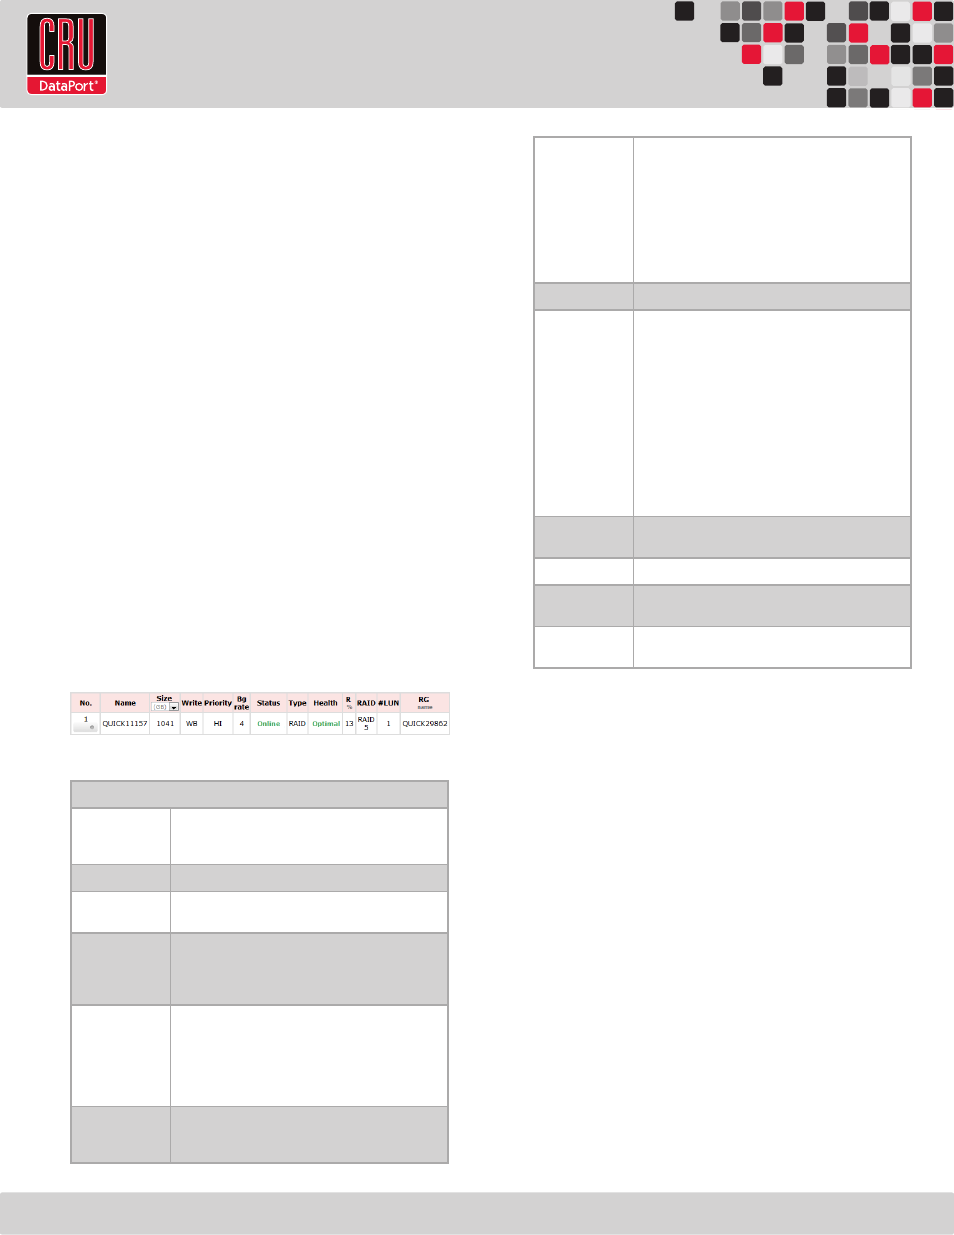
8.7.4 Virtual Disk
The Virtual Disk screen displays any existing Virtual Disks and
allows you to create and delete Virtual Disks. For instructions on
how to create a Virtual Disk, see Section 8.3.2.
The following information is displayed:
Virtual Disk Column Descriptions
No.
The Virtual Disk number. Hover your mouse cursor over
the button below the Virtual Disk number for configuration
options.
Name
The name of the Virtual Disk.
Total
The total capacity of the Virtual Disk. Can be displayed in
MB or GB.
Write
The write status of the Virtual Disk.
•
WT
→ Write Through
•
WB
→ Write Back
•
RO
→ Read Only
Priority
Displays the priority that the RTX Secure will give to RAID
activities (rebuild, initialization) versus priority given to
file transfers.
•
HI
→ High Priority
•
MD
→ Medium Priority
•
LO
→ Low Priority
BG Rate
Background Task Priority. 4 / 3 / 2 / 1 / 0
→ The default
value is 4. The higher the number, the more priority will be
given to background input/output.
Status
The status of the Virtual Disk.
•
Online
→ The Virtual Disk is online.
•
Offline
→ The Virtual Disk is offline.
•
Initiating
→ The Virtual Disk is being initialized.
•
Rebuild
→ The Virtual Disk is being rebuilt.
•
Migrate
→ The Virtual Disk is being migrated.
•
Rollback
→ The Virtual Disk is being rolled back.
•
Parity Checking
→ The Virtual Disk is undergoing
a parity check.
Type
Indicates that the Virtual Disk is part of a RAID Group.
Health
The health of the Virtual Disk.
•
Optimal
→ The Virtual Disk is working well and
there is no failed physical disk within the RAID
Group.
•
Degraded
→ At least one disk from the RAID
Group that the Virtual Disk belongs to is failed or
removed from the RTX Secure.
•
Failed
→ The RAID Group that the Virtual Disk
belongs to has failed and cannot recover from data
loss.
•
Partially Optimal
→ The Virtual Disk has experi-
enced recoverable read errors. After passing a par-
ity check, the health status will change to Optimal.
R%
Shows the percentage completed of an initialization or
RAID rebuild.
RAID
Displays the RAID level.
#LUN
The number of Logical Unit Numbers that are attached to
the Virtual Disk.
RG Name
The name of the RAID Group to which the Virtual Disk
belongs.
Modifying Virtual Disks
Hover your mouse cursor over the button below the Virtual Disk
number to bring up a series of options for that particular Virtual
Disk.
Extend
Extend the Virtual Disk capacity.
Confirm Parity Check
Regenerates parity for the RAID Group. This option allows
the administrator to regenerate parity when a parity/data
inconsistency is found, or to check parity/data consistency only.
Only applies to RAID sets with parity.
Delete
Deletes the Virtual Disk.
Set Property
Allows the administrator to change the Virtual Disk name,
change the write status, priority, background task priority, and
enable or disable Readahead.
Attach LUN
Attach a Logical Unit Number to the Virtual Disk.