Sailplane trimming chart – HITEC Eclipse 7 User Manual
Page 37
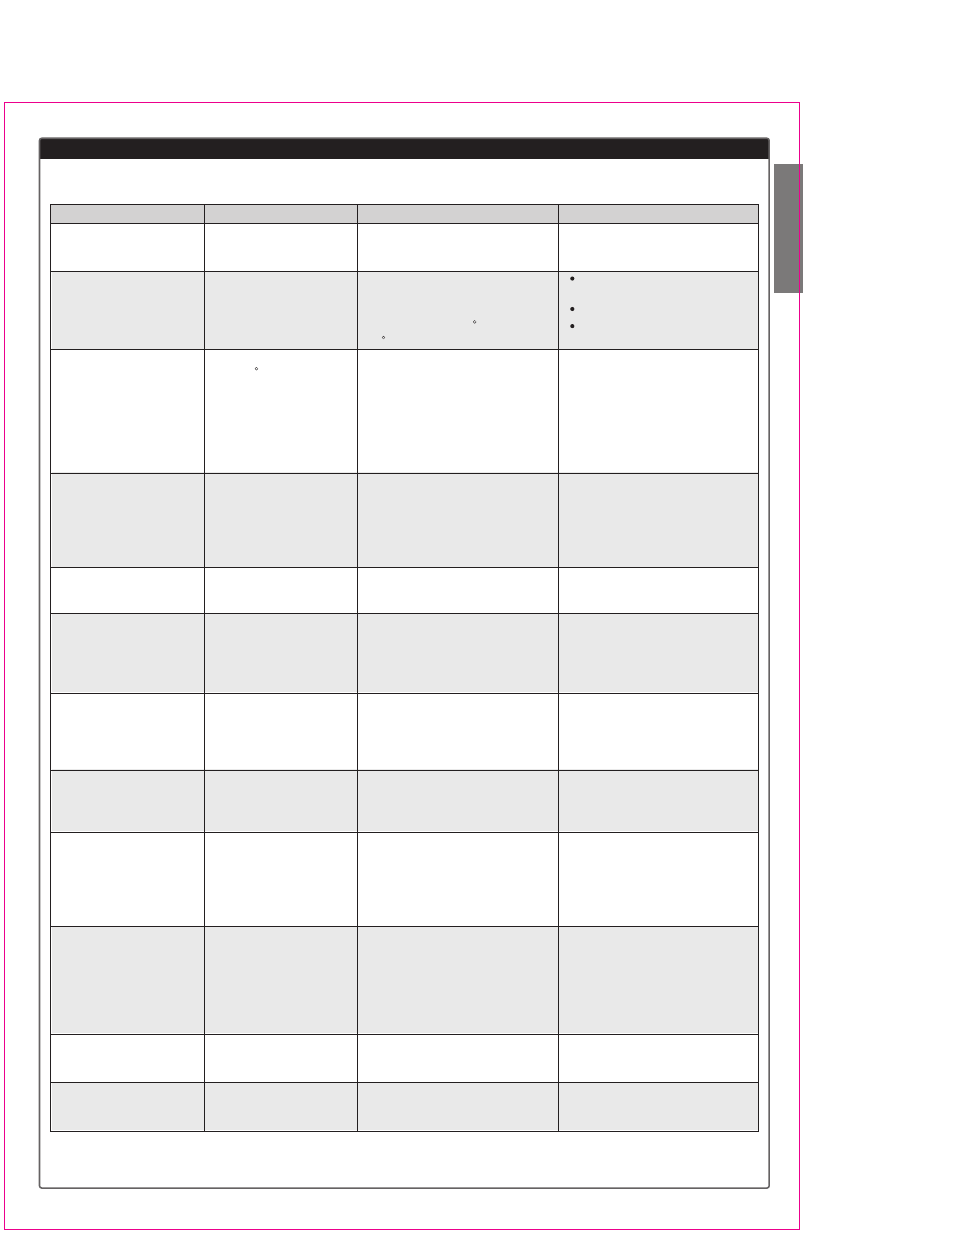
Glider(GLID) Section
37
To test for ...
1. Model Control Neutrals
2. Control Throws
Note: be sure all aileron &
flap horn pairs have
matching angles
3. Decalage & Center of
Gravity
(Note: this is a trial and
error test procedure,
depends on desired
handling characteristics.
Back CG = less stability
but better performance)
4. Glide Path Control
Settings - Pitch Trim
Note: be sure all aileron &
flap horn pairs have
matching angles.
5. Glide Path Control
Settings - Elevator Delays
6. Glide Path Control
Settings - Roll Response
7. Differential/Coupled
Rudder setting
8. Camber (full wing aileron
& flap droop or reflex)
setting
9. Launch Settings (Part 1)
10. Launch Settings (Part 2)
11. Speed Settings
12. Elevator-to-Camber
Coupling Setting
Test Procedure
Fly the model straight and
level
Fly the model and apply
full deflection of each
control in turn. Camber
control in neutral (setup
6 & 9).
Trim for level glide.
Enter 45 dive (across
wind if any) and release
controls. CAUTION:
beware of airspeed &
flutter.
Fly the model and slowly
apply full deflection of
glide path control (airbrake
stick). Observe any pitch
changes.
Rapidly apply full glide
path, observe initial
pitching response
Fly the model and apply
full glide path control.
Observe any roll motion.
Fly the model and apply
alternating left & right
aileron commands.
Observe path of fuselage
line.
Put the model in a straight
glide passing in front of you.
Apply camber control.
Switch to Launch mode.
Launch the model &
observe climb angle and
required control inputs
Switch to Launch mode.
Launch the model &
observe climb angle and
required control inputs
Switch to speed mode
(entire TE reflexed slightly,
<1/16"/1 mm)
Fly model at high speed,
bank & pull up
Observations
Adjust the transmitter trims for
hands-off straight & level flight,
no camber control.
Check the model's response to
each control input. Set flaps for
as much down flap as possible in
glide path control (90 is good)
<5 reflex needed.
A. Does the model continue its
dive without pulling out or diving?
B. Does the model start to pull out
(nose up)?
C. Does the model start to tuck
(dive more nose down)?
A. Nose drops, up elevator
required for level flight
B. No pitch change
C. Tail drops, down elevator
required to maintain level flight
A. Nose drops
B. No pitch change
C. Nose rises
A. Model rolls to right when glide
path control (airbrake stick)
activated
B. No roll motion
C. Model rolls to left
A. Model yaws to right with left
aileron and vice versa
B. Fuselage traces straight line
C. Model yaws to left with left
aileron and vice versa
A. Model slows down & stalls or
sinks rapidly
B. Model slows slightly
C. Model speed unchanged
A. Shallow climb angle; lots of up
elevator required
B. Model climbs steeply with little
control input needed
C. Too steep climb, weaves
back & forth, down elev. required
A. Model banks left on tow
B. Model climbs straight ahead with
no roll input needed
C. Model banks right on tow
D. Model tip stalls to one side
A. Nose drops
B. No pitch change
C. Tail drops
A. Model keeps speed and comes
about rapidly
B. Model slows down
Adjustments
Change electronic subtrims
and/or adjust clevises to center
transmitter trims.
Aileron & elevator rates: set for
desired authority
Rudder: set for max. throw
Set flap motions in Steps
4, 5, & 9.
A. No adjustment
B. Reduce incidence (add down
elevator) and/or reduce nose
weight
C. Increase incidence (add up
elevator or add nose weight)
A. Several options:
1) more up elevator mix;
2) reduce aileron reflex*;
3) increase flap motion*
B. No adjustment
C. Reverse of A
A. Increase elevator delay %
B. No adjustment
C. Reverse of A
A. Mix in less right & more left
aileron reflex with airbrake
motion
B. No adjustment
C. Reverse of A
A. Increase differential and/or
amount of rudder coupling
B. No adjustment
C. Reduce differential and/or
amount of rudder coupling
A. Reduce amount of droop &/or
add elevator compensation
B. No change needed
C. Reverse of A
A. Move towhook rearwards small
amount, increase up elevator
preset a little, or add camber
B. No adjustment
C. Reverse of A
A. Reduce left ail & flap droop or
increase right ail / flap droop
B. No adjustment
C. Reverse of A above
D. Check droop same on both sides.
Increase aileron or decrease flap
droop
A. Increase up elevator preset
B. No adjustment
C. Reverse of A
A. Increase down flap or leave alone
B. Reduce amount of down flap
*Note: Swept wing planeform may cause opposite reactions, so experiment until proper behavior is attained.
SAILPLANE TRIMMING CHART