HITEC Eclipse 7 User Manual
Page 10
Model Setup Functions
10
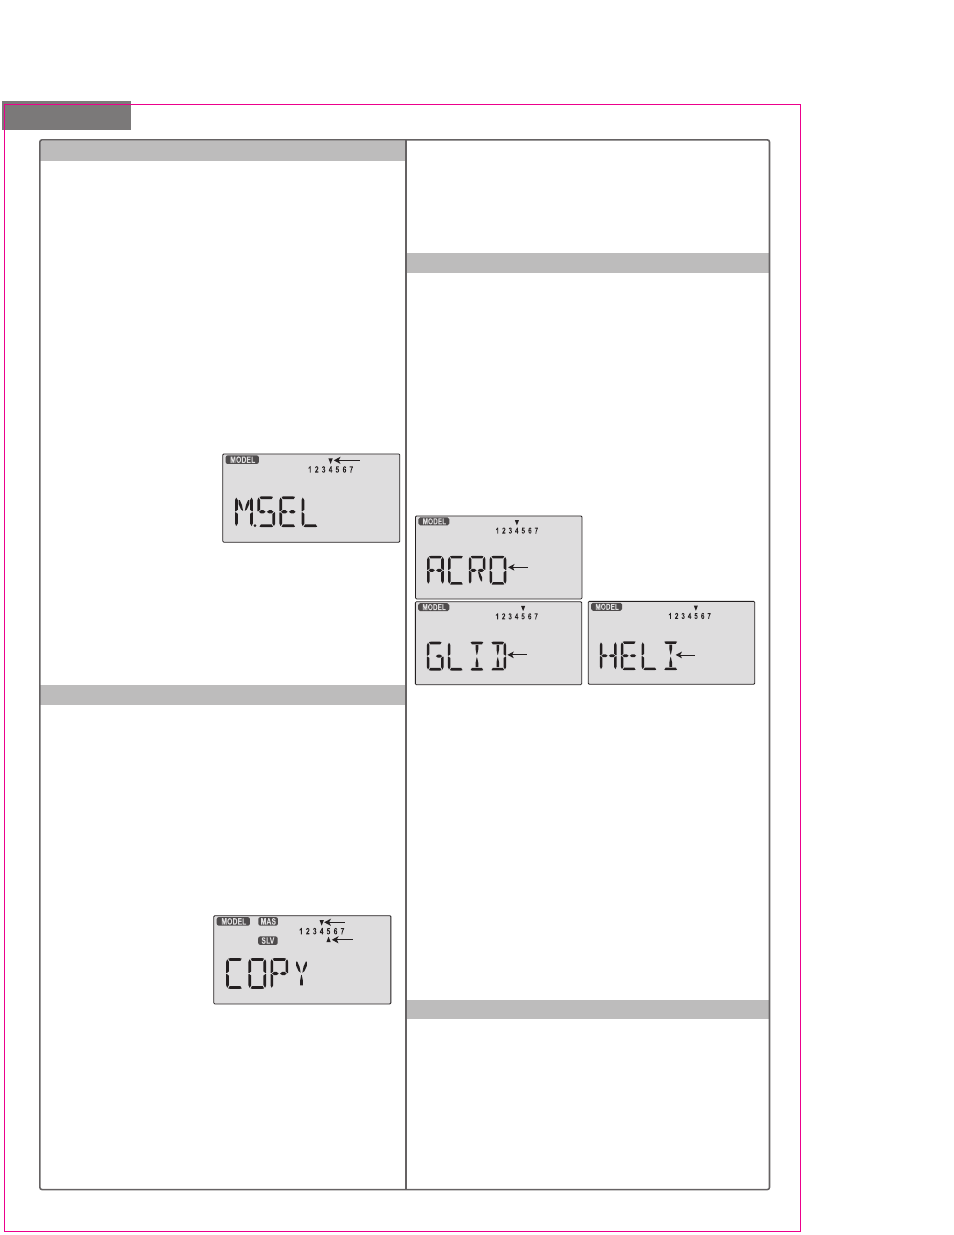
Your Eclipse 7 system can store up to seven independ-
ent sets of model data in its memory. The Model Select
(MODL) function allows you to choose from any of the
seven sets of model data.
You can assign a four-character name to each model
memory. The model names are not visible when you
wish to switch memories. There are several ways to keep
track of which model is in each memory. You may attach
a small piece of white tape to the transmitter and write
the model's name along with the model setup number
(and its channel number), or you may use a notebook,
or label the model with its memory number prominently
near its on-off switch outside the fuselage.
Choosing a model memory to load
1. Start with the transmitter switched off.
2. Turn on your transmitter
while pressing both of the
two Edit keys (the two keys
on the far left). This gets
you into the model select
(M.SEL) menu.
3. Select the desired model number by pressing the Cur-
sor Right or Left button. At this time, the small arrow
above the selected model number will blink on and off.
4. Switch power off.
5. Switch power back on. The previously-selected model
number is indicated by the arrow above the model num-
bers in the display.
COPY - Copy Model
The COPY function is used to copy the model data stored
in the current model memory into another model memory.
This function is handy to use to start a new model that's
similar to one you have already programmed, and is also
handy for copying the current model data into another
model memory as a backup.
Copying from one model memory to another
1. With the transmitter switched off, turn on your transmit-
ter while pressing both of the two Edit keys (the two keys
on the far left). The model select (M.SEL) menu will be
displayed.
2. Press the Up arrow key.
This gets you into the mo-
del copy (COPY) menu. (If
you're already in the setup
menus, you can just press
the UP or Down arrow key to get here.)
3. The source model memory (the memory that will be
duplicated) is the current one, indicated by the fixed up-
per arrow. To select your destination model number,
press the Left or Right Cursor keys. The selected des-
tination memory number is shown by the flashing triangle
under it.
4. Press the +Increase and -Decrease Data keys at the
same time. The transmitter beeps twice rapidly, indicating
the copy has been completed. THIS WILL ERASE ALL
THE OLD SETTINGS IN THE SLAVE MODEL MEMORY,
SO BE SURE YOU'RE IN THE CORRECT MODEL
BEFORE YOU COPY MODEL!
5. Switch power off.
6. Switch power back on. If you wish to go to the newly-
saved memory, repeat step 1.
ACRO, HELI, GLID - Model Type Select
This function is used to select the type of model to be
programmed in the current model memory. You may
select from aircraft (ACRO), gliders (GLID), and helicop-
ters (HELI). If you select glider or helicopter types, you
will need to set the wing type (for a glider) or the swash
type (for a helicopter). These settings are covered below.
Selecting the Model Type
1. With the transmitter switched off, turn on your transmi-
tter while pressing both of the two Edit keys (the two keys
on the far left). The model select (M.SEL) menu will be
displayed.
2. Press the Down arrow key. This gets you into the type
select menu. The current model type will be flashing on
and off. (If you're already
in the setup menus, you can
just press the Up or Down
arrow key to get here.)
3. If the model type you want is displayed, you're done.
[If you wish to change the wing type or swash type in the
GLID and HELI model settings, see the sections below.]
4. If you wish to change the model type from that display-
ed, press on the Left or Right Cursor buttons until the
model type you want, either ACRO,GLID, or HELI,
appears.
5. To select your desired model type, press both the
+Increase and -Decrease Data keys simultaneously.
Two beeps tell you that the new model type is now regis-
tered.
THIS WILL ERASE ALL THE OLD SETTINGS IN THE
MODEL MEMORY, SO BE SURE YOU'RE IN THE CORRECT
MODEL MEMORY BEFORE YOU CHANGE MODEL TYPE!
6. Press the Up or Down arrow keys to get to another
setup menu, or switch power off.
7. Switch power back on. You may now set up the details
of your model in the Edit mode.
Wing & Swashplate Type Selection
If you are using the glider (GLID) or helicopter (HELI)
setting menus, you must tell the Eclipse system what type
of model you are using. In the case of a glider, you have
to specify whether it has two (2WNG) or four (4WNG)
wing servos (most slope gliders use two wing servos, and
competition gliders use four wing servos, two each for
outboard and inboard ailerons and flaps). Helicopters may
have one servo each for blade angle, roll and pitch(NOR)
or they may use three servos in concert on the swash to
MODL - Model Select
Flashing
Flashing
Destination
(Flashing)
Flashing
Flashing
Flashing