Punto ciego, Blindstitch hems, Ourlets au point invisible – SINGER 3014 User Manual
Page 48: Dobladillos de punto ciego, Tv—/v..tv..^—tv..tv..t, Tv..^____________ a__t\__ tv..tv..t\_____/v
Attention! The text in this document has been recognized automatically. To view the original document, you can use the "Original mode".
rAA"AA—------------------------------------------------------------- SA-A/-—
>
y
|>
<;
I
5
I
>
.TV—/V..TV..^—TV..TV..T
a
..TV..^____________ A__T\__ TV..TV..T\_____/V-
I
<
I
I
I
I
<
I
I
<
I
I
<
I
I
I
I
<
I
I
<
I
<
Punto ciego
Blindstítch
Point invisibie
Blindstitching provides a durable hem Le point invisible produit une finition El punto ciego asegura un acabado de
. X
dobladillo durable casi invisible.
finish that is almost invisible.
Blindstitch Hems
• Pattern Selector: 5
• Stitch Width: 1.5-5
• Stitch Length: 1 to 2.5
• General Purpose Needle Plate
• General Purpose Foot
We recommend making a test sample
first using scraps of the material you will
be sewing the hem on.
• Select the blindstitch.
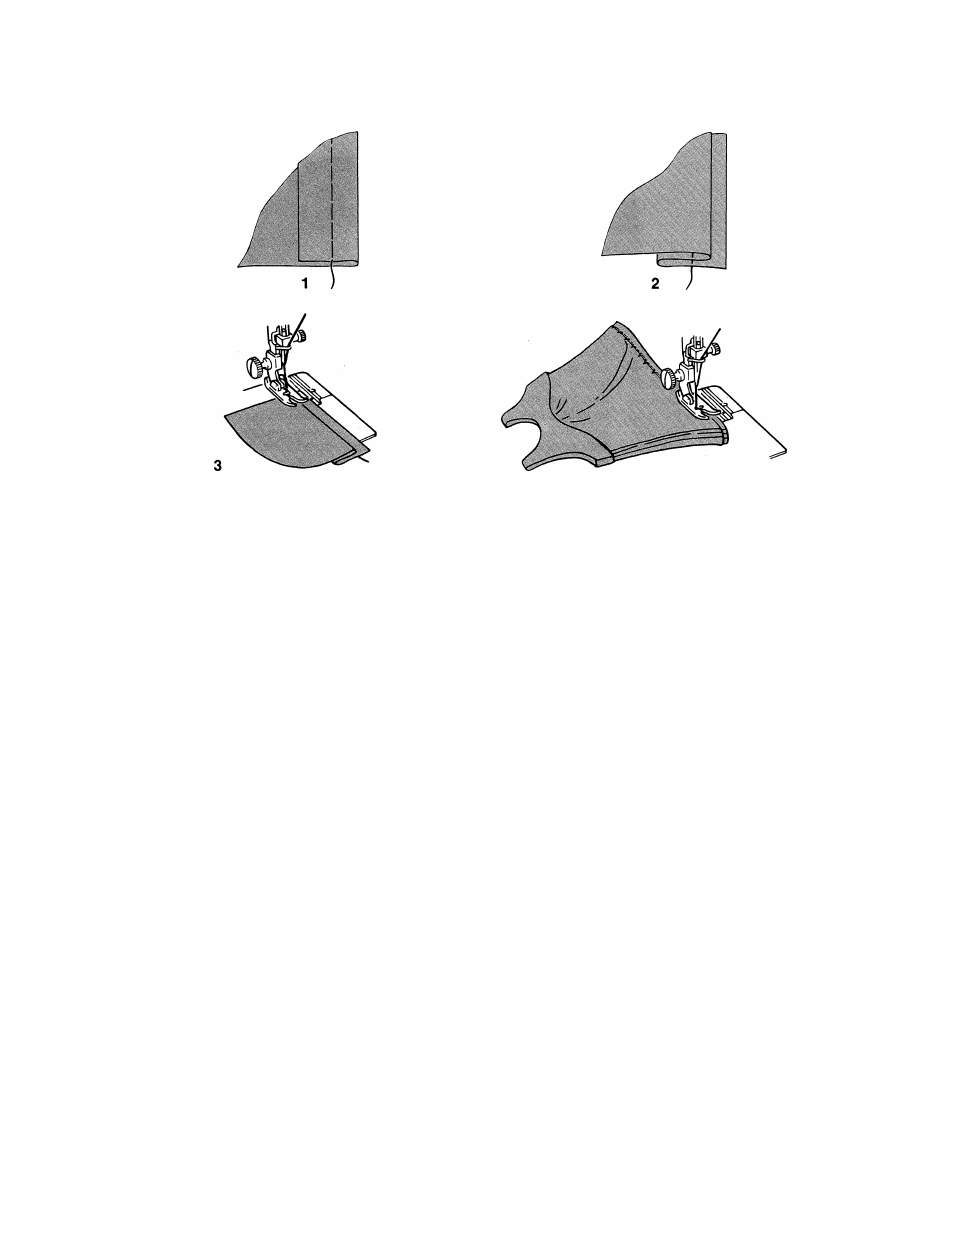
1. Prepare hem in the usual way. It is
advisable to baste the hem.
2. With the wrong side of work upper
most, turn the hem under, creating a
soft fold from the top edge of hem.
3. Position the hem under the presser
foot. Stitch so that the straight stitches
fall on the hem allowance and the
sideward stitches pierce the soft folo
of the work. Adjust stitch width, if
necessary.
d’ourlet durable et presqu’Invisible.
Ourlets au point invisible
• Cadran de points: 5
• Largeur du point: 1.5-5
• Longueur du point: 1 à 2.5
• Plaque à aiguille tout usage.
• Pied presseur tout usage
Nous recommandons d’effectuer un essai
préalable à l’aide de retailles du tissu qui
servira pour l’ourlet.
• Sélectionnez le point invisible.
1. Préparez l’ourlet de façon normale. Il
est préférable de faufiler l’ourlet.
Ayant placé l’envers du tissu sur le des
sus, repliez l’ourlet en-dessous, créant
ainsi un pli mou à partir de la lisière su
périeure de l’ourlet.
Positionnez l’ourlet sous le pied pres
seur. Piquez de façon à situer les
points droits dans la valeur de couture
et à faire passer lés points latéraux à
travers le pli mou de l’ouvrage. Réglez la
largeur du point, si besoin en est.
2
.
3.
Dobladillos de punto ciego
• Selector de puntoes: 5
• Ancho del punto: 1.5-5
• Longitud del punto: 1 a 2.5
• Plancha de aguja para uso general.
• Prénsatelas para uso general
* •
Recomendamos que haga Usted primero
una prueba en pedazos de tela en la cual
Usted realizará el dobladillo.
• Seleccione el punto ciego.
1. Prepare el dobladillo de la manera
habitual. Se recomienda hilvanarlo.
2. Con el revés de la labor arriba, doble el
dobladillo adentro, creando un doblez
suave desde el borde superior del do
bladillo.
3. Posicione el dobladillo debajo del
prénsatelas. Dé puntos de manera que
los puntos rectos caigan en el
sobrante del dobladillo y que los
puntos laterales penetren en el doblez
suave. Ajuste el ancho del punto
si hace falta.
46