Top Flite TOPA0215 User Manual
Page 23
- 23 -
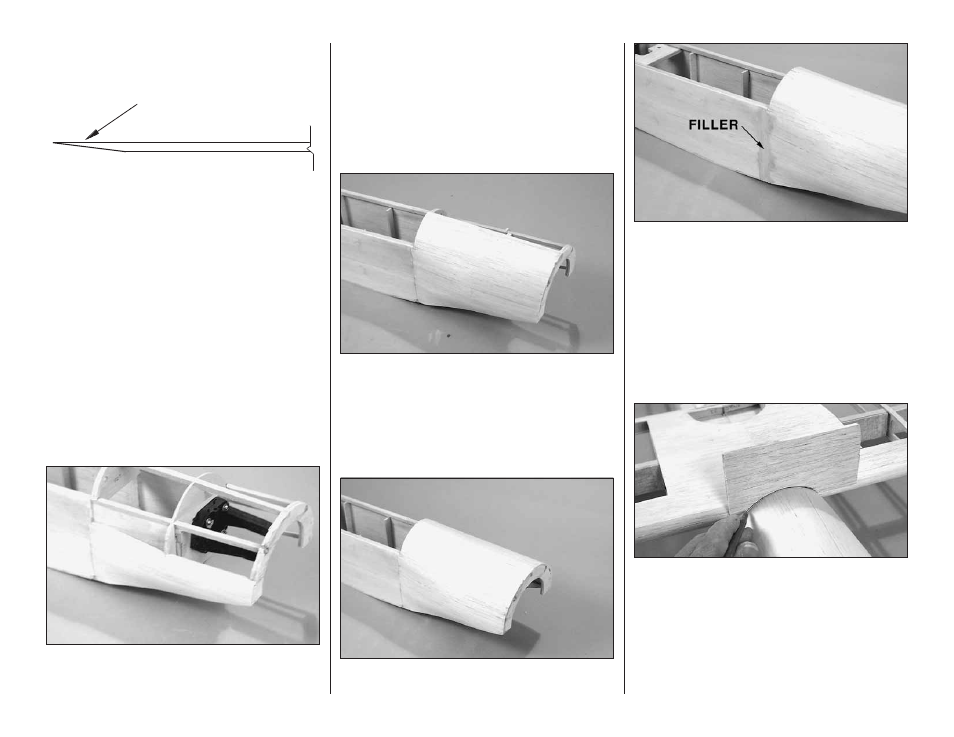
Bevel the sheeting
where it contacts the
fuselage side.
❏
❏
13. All of the sheeting is going to be cut from
the 1/8" x 3" x 30" [3 x 76 x 762mm] soft balsa
sheeting that you previously set aside when building
the fuselage. Cut a piece of sheeting to fit from the
sheeted fuselage side, forward to the nose ring.
When glued in place the top edge of the sheeting
should be aligned on the center of the middle
stringer. Bevel the end of the balsa sheeting where it
will contact the fuselage side. This will provide a
better transition from the cowl to the fuselage. Wet
the wood and allow it to soften before gluing.
❏
❏
14. When sufficiently softened to bend and fit the
fuselage, glue it in place with CA glue. Some CA
accelerator will be helpful in gluing the sheeting in place.
❏
❏
15. Cut two more pieces of sheeting long enough
to fit from the fuselage side to the front of the nose ring.
Cut one of the sheets to a width of 1-1/2" [38mm] (save
the remaining half of the sheeting to be used when
sheeting the opposite side of the fuselage). Edge glue
the full sheet to the 1-1/2" [38mm] wide sheet. This will
form a piece of sheeting wide enough to wrap around to
the center fuselage stringer.
❏
16. Wet the wood and allow it to soften. When it is
sufficiently soft, glue the sheeting in place to the
previously installed sheet and work the sheeting
towards the top of the fuselage. When the sheeting is
fully glued into place to all of the stringers trim the
sheeting down to the middle of the center stringer on
the top of the fuselage.
❏
17. Repeat steps 13-16 for the opposite side of
the fuselage.
❏
18. Blend the sheeting from the cowl to the
fuselage with a balsa filler as well as filling in any
gaps in the seams where the sheeting meets. Allow
it to dry and then sand the front portion of the cowl
and fuselage.
Adding the Wing Fairing
❏
1. Install the wing back onto the fuselage and
secure it in place with the nylon wing bolts.
❏
2. Locate a leftover piece of 1/8" thick sheeting.
Slide it in place at the wing leading edge just behind
former F2T. Use a pen or pencil to trace the shape of
the top of the fuselage onto the sheeting. Remove
the sheeting. Then cut the sheeting 3/32" [2.4mm]
inside the line you have just traced onto the sheeting.
Doing this will allow for the sheeting that will be
applied in the next couple of steps. This piece
becomes the former for the wing fairing.