Top Flite TOPA0215 User Manual
Page 12
- 12 -
Finish the Bottom of the Wing
❏
❏
1. For the right wing panel, locate a 3/32" x
1-1/8" x 30" [2.4 x 28 x 760mm] balsa bottom leading
edge sheet. Cut it to a length of 29-3/4" [756mm].
Bevel one edge of the sheet as you did with the
sheeting on the top of the wing. When you are
satisfied with the fit, glue the sheeting in place on the
bottom of the wing.
❏
❏
2. Locate a 3/32" x 1" x 30" [2.4 x 25 x 760mm]
balsa bottom trailing edge sheet. Cut it to a length of
29-3/4" [756mm]. Glue it in place on the trailing edge
of the bottom of the wing.
❏
❏
3. Sheet the center section of the bottom wing
following the same procedure you used for sheeting
the center section on the top of the wing.
❏
❏
4. From 3/32" x 1/4" x 36" [2.4 x 6.4 x 914mm]
balsa sticks, cut nine cap strips. Cut each one to fit
between the leading edge sheeting and the trailing
edge sheeting on each rib.
You now need to make a decision. When the Elder
was originally introduced it had flying and landing
wires on it. Though these wires are not a structural
part of this model, they do add a great “Vintage” look
to the model. If you have ever installed wires and
turnbuckles you know there is some additional work
and cost to do this. For our model we used elastic
cord to simulate the flying wires. This was much
easier and less expensive than using actual wire. We
will give complete instructions for installing wire or
elastic flying wires as we get further into the building
process. If you choose not to install any of the wires
skip steps 5 & 6.
❏
❏
5. On the wing plan there are four locations
shown for 3/8” x 3/8” [9.5 x9.5mm] basswood blocks.
The blocks are provided in the kit and are cut to the
lengths shown on the plan. If you plan to install wire
and turnbuckles on your model, proceed with
installing the basswood blocks as shown on the plan.
If you choose to use the elastic cord as we did on our
model then you can substitute balsa blocks for the
basswood. The balsa is a little easier to work with
than the basswood and will retain the elastic cord
better than the basswood. Locate the 3/8” x 3/8” x 18”
[9.5 x 9.5 x 457mm] balsa stick and cut it to the
length specified on the plan for each of the four
blocks. Glue the blocks on the positions shown on
the plan.
❏
❏
6. Whether you have installed the balsa or
basswood blocks, drill a 1/16" [1.6mm] hole through
the center of the entire length of the block.
❏
❏
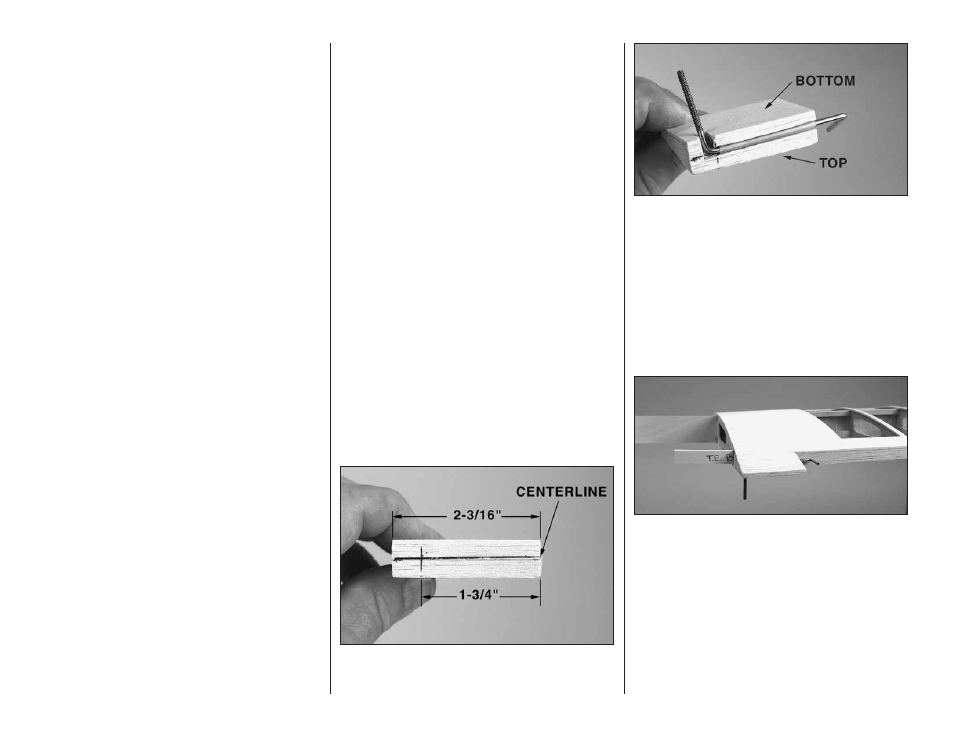
7. Locate the 30" [762mm] shaped balsa
aileron. From one end of the aileron cut a piece
2-3/16" [55.8mm] in length.
❏
❏
8. Mark a centerline on this piece of aileron
stock. Make another mark 1-3/4" [44mm] from the
end of the block.
❏
❏
9. Cut a slot as shown in the photo along the
centerline starting at the end. The slot needs to be
1/8" [ 3mm] wide to accommodate the torque rod.
The slot can be cut easily with the Great Planes®
Groove Tube™ (GPMR8140) or the slot can be cut
with your hobby knife. Notice that these blocks are
not symmetrical so make the one for the left wing the
mirror image of this one.
❏
❏
10. Cut another slot perpendicular to the slot you
just cut to accommodate the arm of the torque rod.
❏
❏
11. Glue the block with the torque rod in place
in the slot, being careful not to get any glue onto the
metal wire. Tip – Apply a small amount of petroleum
jelly to the end of the plastic bearing. This will prevent
glue from getting onto the wire. Important! Before
gluing the block in place be sure that you have the
correct torque rod in place in the block. The
un-threaded arm of the torque rod should protrude
into the area where the aileron will be attached. The
threaded end of the arm will protrude towards the
bottom of the wing. Make sure that you install the
correct rod for each wing half.