Top Flite TOPA0215 User Manual
Page 18
- 18 -
❏
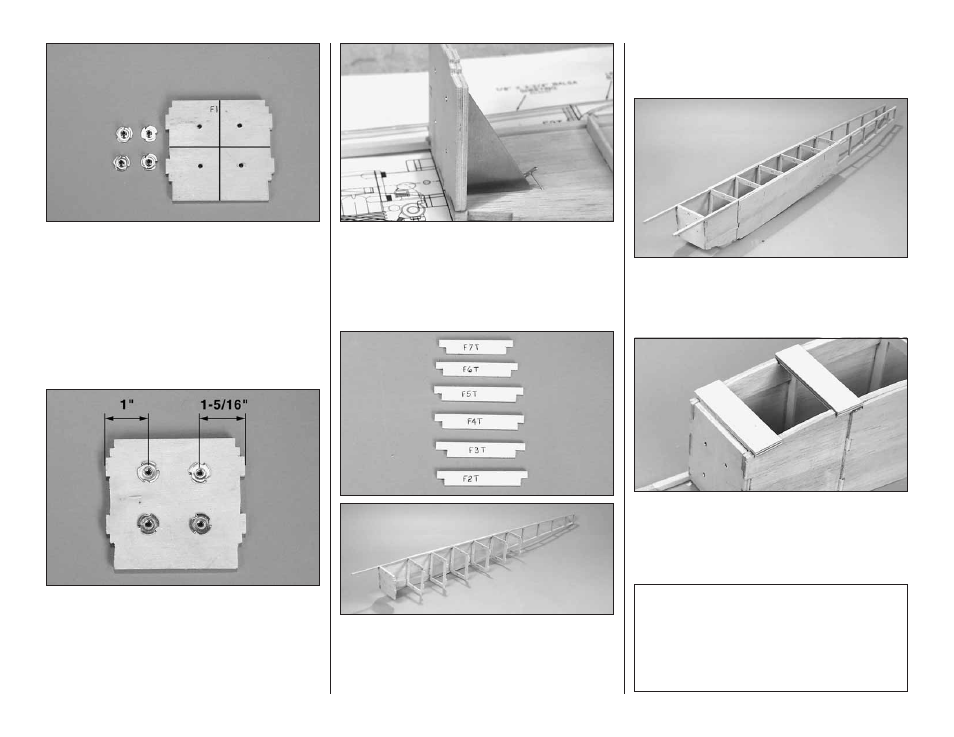
18. The firewall has eight punch marks. Draw two
reference lines for mounting the engine to the firewall
as shown. If you are using the O.S. FS 52 or O.S. 46
FX, the remaining four punch marks are exactly
where you need to drill the engine mounting holes. If
you are using a different engine you may find that
you have to adjust the location of the mounting holes
for your particular engine and muffler combination.
Drill four 5/32" [4mm] holes on the engine mount
punch marks for the 6-32 blind nuts.
❏
19. Use a small hammer and tap the four 6/32
blind nuts into the holes you just drilled. After they
are in place, put a few drops of thin CA on the blind
nut being careful not to get any glue onto the threads.
Note: The blind nuts are installed on the rear of F1.
Pay special attention to the orientation of the firewall
as shown above.
❏
20. Locate the firewall mounting gauge. This
gauge will set the proper amount of right thrust
required for the engine. Glue the F1 firewall to the
fuselage side with 6-minute epoxy. Be sure to use the
gauge when gluing it in place. Do not glue the gauge
to the firewall or fuse.
❏
21. Locate die-cut 1/8" [3mm] parts F2T through
F7T. Glue them in place on top of the formers. F3T
and F4T only need to be tack glued in place as they
will be removed later in the building process. The
others are a permanent part of the structure.
FOR STEPS 22-27 USE THE TOP VIEW OF THE
FUSELAGE PLAN AS AN AID IN KEEPING THE
FUSELAGE STRAIGHT.
❏
22. Glue the left side of the fuselage to the formers.
Be careful to maintain the proper angle for the firewall.
Use the firewall mounting gauge to verify the firewall is
correct as you glue the fuselage side in place.
❏
23. Lay the fuselage upside down on the bench.
Locate the two 1/4" x 1" x 3-7/8" [6 x 25 x 98mm]
plywood landing gear mounting plates and glue
them in place in the bottom of the fuselage with
6-minute epoxy.
Important! The kit contains two of 1/8" x 3" x 30"
[3 x 76 x 762mm] soft balsa sheets. These two
sheets are soft balsa and should be set aside.
They will be used later for the cowl construction.
There are two sheets of 1/8" x 3" x 24" [3 x 76 x
610mm] medium balsa. The medium balsa
sheets are to be used in the following steps.