Application rate sensor calibration, Calibrating the liquid application, Application rate sensor calibration -3 – TeeJet ARC-6000 User Manual
Page 13: Calibrating the liquid application -3
2-3
98-0501
Rev.- 1
ARC 6000
CE & S
TANDARD
V
ERSION
A. Set the console to the following positions;
Power
ON
Mode Selector
SET- UP
Display Selector
IMPL. WIDTH
All Boom Solenoid Switches (external)
OFF
The display will cycle through each boom position (1 through 9) and display its current width in inches.
B. As each boom position appears on the display, use the INC/DEC switch to set the display to the number of inches
covered by that boom. Repeat for each section.
NOTE: Individual boom widths are entered in inches. For example; for a liquid boom with 7 nozzles on
30" spacings, enter 180 for that boom. There is no need to convert to feet, the control console does that
automatically when it is switched back to the OPERATE MODE.
C. Set all unused boom sections to a width of zero “0” inches. This will insure that an accidental boom switch ON will not
affect the control console.
D. The boom width is now set. Turn all boom switches to the ON position and return to the OPERATE Mode, the new
total boom width will be displayed in feet. If this does not agree with your total applicator width, check the individual
boom widths, (steps B and C).
2.6. APPLICATION RATE SENSOR CALIBRATION
The control console must be calibrated for the flowmeter, pressure sensor, or rate sensor being used. The calibration number
required by the control console is the actual number of electrical pulses per unit volume generated by the sensor, or, for the pressure
sensor, the gallons per acre rating of the nozzles being used. If you have any doubts as to the accuracy of the flow sensor
readings, a field calibration/catch test should be performed using the actual product solution. (see section 2.6.1.4)
2.6.1. CALIBRATING THE LIQUID APPLICATION
Verify that the correct application program has been selected (see section 2.1.)!
If in the Psi mode, check the correction factor. It should be set to 1.0 during the calibration routine. To check the correction
factor, set the Display Selector to APPLICATION RATE, set the Mode Selector switch to SETUP. Use the INC/DEC
switch to set the correction factor if necessary.
2.6.1.1. DETERMINING THE FLOWMETER INITIAL CALIBRATION NUMBER
FLOWMETERS are calibrated for water at the factory. This number is accurate enough for most applications. However, the
actual flow characteristics may differ due to plumbing or other factors.
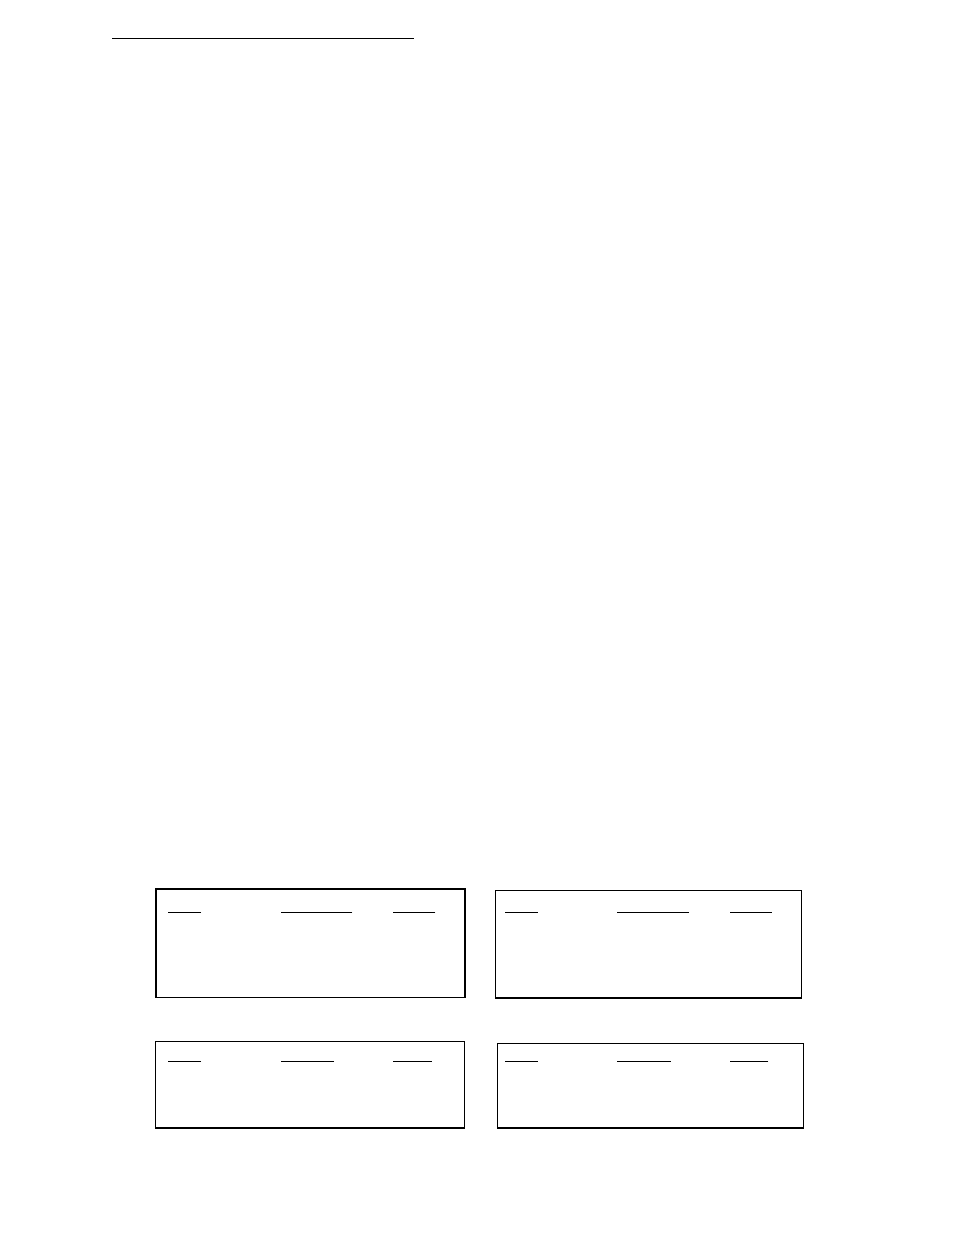
Standard Flowmeters
SIZE
SUPPLIER
CAL.#
SIZE
SUPPLIER
CAL.#
.75 inch
(Mid-Tech)
396.9
3.00 inch
(Mid-Tech)
5.0
1.00 inch
(Mid-Tech)
153.1
1.50 inch
(Mid-Tech)
38.8
1.25 inch
(Raven)
75.0*
2.00 inch
(Mid-Tech)
23.8
3.00 inch
(Raven)
16.4*
Mid-Tech Rapid Check Flowmeters
SIZE
RANGE
CAL#
SIZE
RANGE
CAL#
1.00 inch
0.75 - 5 gpm
3200
1.50 inch
2.5 - 25 gpm
612.4
1.00 inch
2.5 - 16 gpm
800
1.50 inch
2.6 - 53 gpm
361.9
2.00 inch
20.0 - 195 gpm
94.5
* Raven flow meters, use the factory calibration number divided by 10. All other flowmeters use the manufacturers'
supplied information regarding the pulses per gallon (usually provided on a tag on the flowmeter).