Service and maintenance – Reznor BE Unit Installation Manual User Manual
Page 24
Form RZ-NA-I-FE/BE, Mfg P/N 98807 Rev 10, Page 23
Figure 23 - Optional Field-Installed Blower/Filter Cabinet
Blower Cabinet
without Filters
(Option CW1)
31. Optional Blower/Filter Cabinet -
Options CW1, CW2, or CW3
(Blower Models Only)
The blower/filter cabinet option is available for all sizes. The blower/filter
cabinet is shipped separately for field assembly and installation. The cabinet is
adaptable for use with either 1" or 2" filters and may be connected to a return
air duct (includes 3/4" duct flange). Option CW1 does not include filters; CW2
includes 1" permanent aluminum filters; and CW3 includes 2" permanent alu-
minum filters.
Blower Cabinet
with Filters
(Option CW2 or
CW3) -- side panel
removed to
illustrate interior
of cabinet
Model
Filter
Replacement P/N
S i z e
Qty
S i z e
1" Filter 2" Filter
25-125
1
20 x 20
101608
101621
165-200
1
16 x 25
101609
101622
1
20 x 25
101610
101623
250-300
2
16 x 20
101607
101620
2
20 x 20
101608
101621
400
2
16 x 25
101609
101622
2
20 x 25
101610
101623
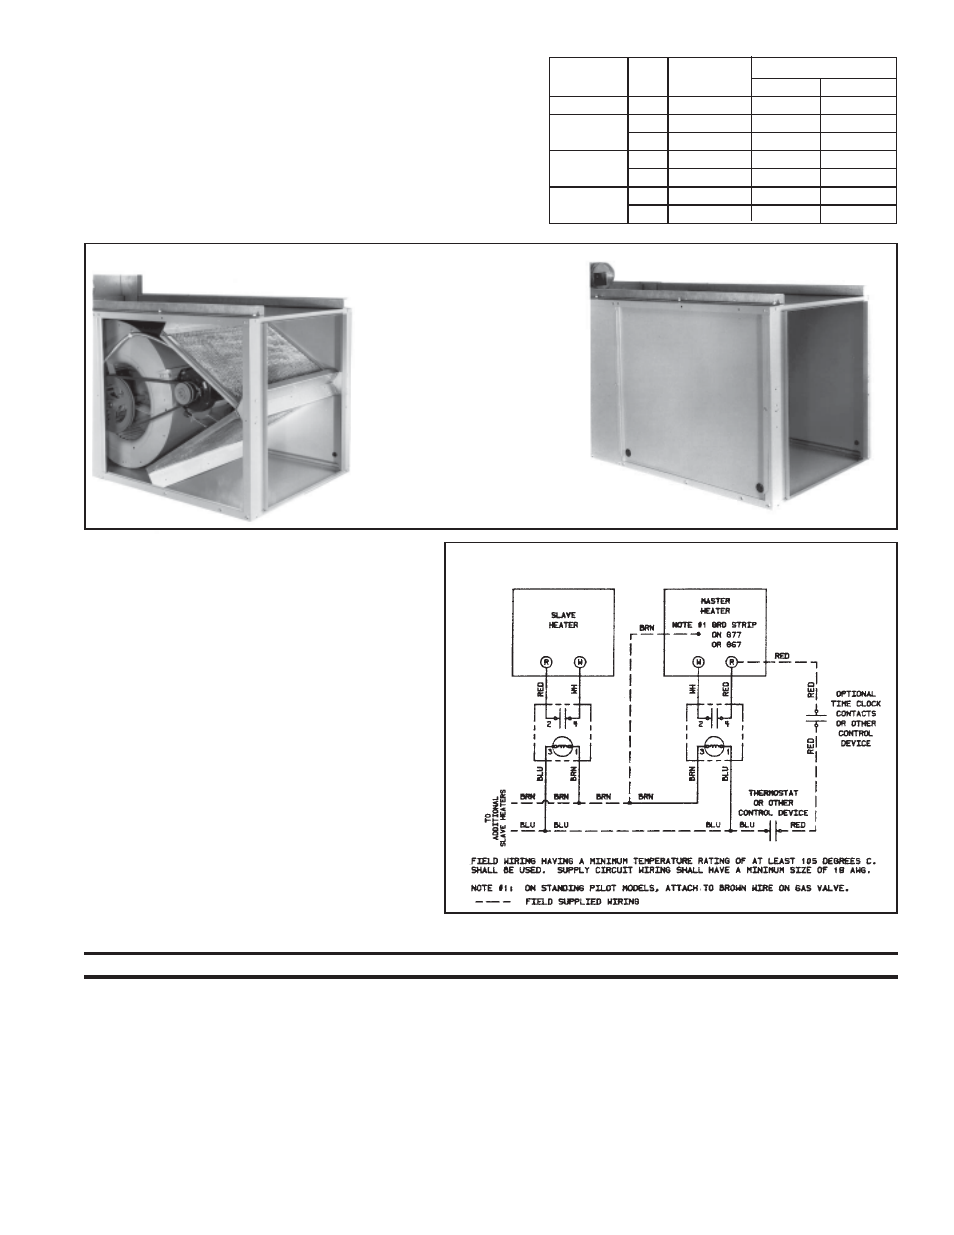
32. Optional Multiple
Heater Control -
Options CL31 & CL32
The multiple heater control options are designed to per-
mit the control of up to six heaters (one master and five
slave units) with a single thermostat or a time clock and
single/multiple thermostats.
For maximum safety, the multiple control is one in the
low voltage circuit. These multiple heater control op-
tions may not be used with two-stage gas valves.
Figure 24 - Multiple Heater Control Wiring with Options CL31 and/
or CL32
SERVICE AND MAINTENANCE
WARNING: If you turn off the power supply, turn off the gas. See Hazard Levels, page 2.
3. Blower Models - Clean the blower, the belt guard, the inlet guard,
and motor of all dirt and grease. Check the blower belt for tension
and wear. Replace a worn belt that may fail before the next sched-
uled maintenance check.
4. Clean the heat exchanger both internally and externally.
5. Check the pilot burner and main burners for scale, dust, or lint
accumulation. Clean as needed.
6. Check the vent system for soundness. Replace any parts that do
not appear sound.
7. Check the wiring for any damaged wire. Replace damaged wiring.
(See Paragraph 12 for replacement wiring requirements.)
This unit will operate with a minimum of maintenance. To ensure
long life and satisfactory performance, a heater that is operated under
normal conditions should be inspected and cleaned at the start of each
heating season. If the heater is operating in an area where an unusual
amount of dust or soot or other impurities are present in the air, more
frequent maintenance is recommended.
The following procedures should be carried out at least annually (See
Paragraphs 33-42 for specific instructions.):
1. Clean all dirt and grease from the primary and secondary combus-
tion air openings.
2. Fan Models - Clean the fan blade, fan guard, and motor.