Figure 1a - assembly steps, Front view side views, Models rdh, reh, rhh, and rxh – Reznor RBL Option - Installation - Weather Hood Assembly User Manual
Page 3
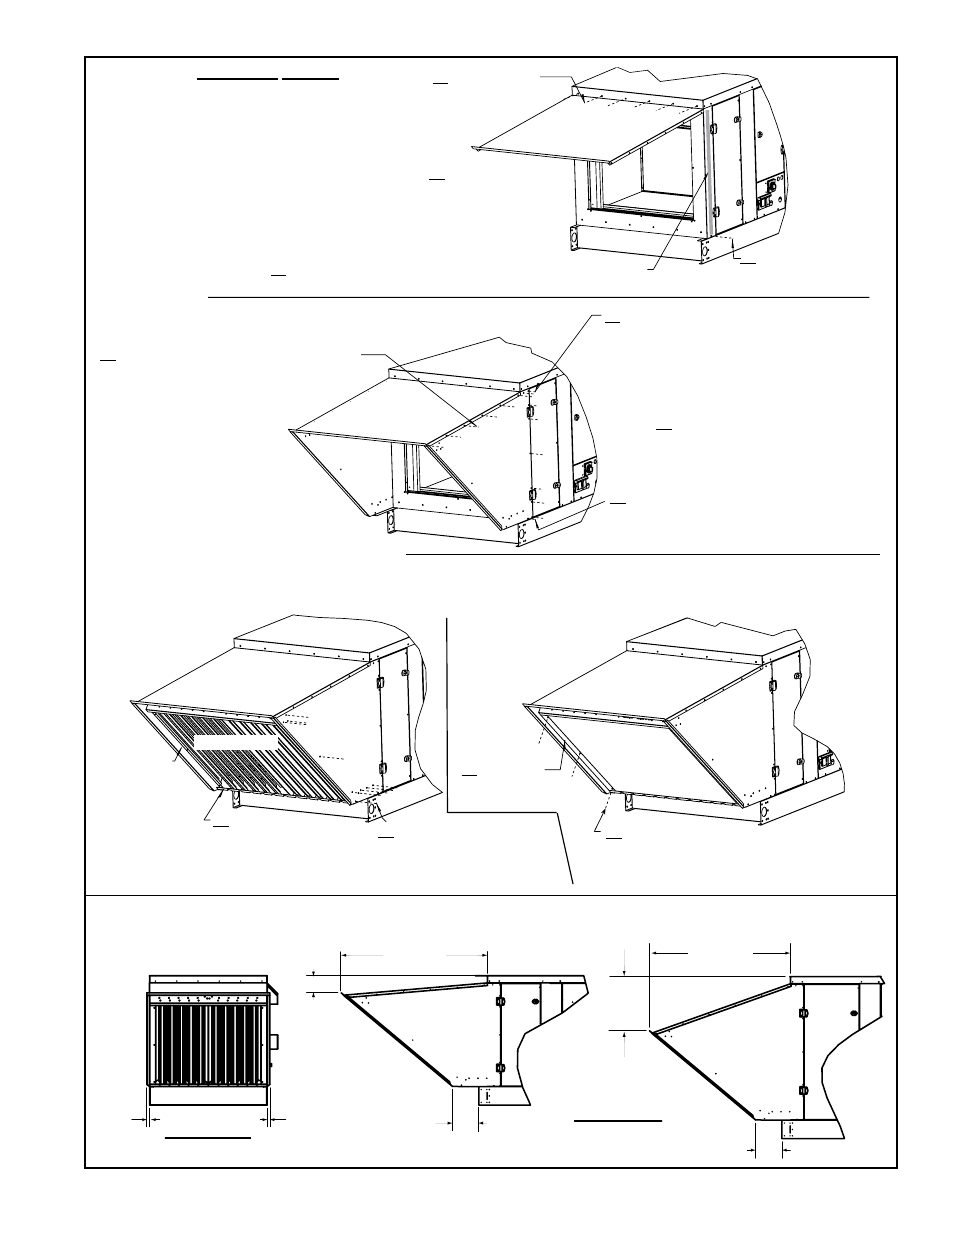
Form I-OPT-WH, P/N 132901 R13, Page 3
STEP 1 - Attach top of outside
air hood.
Prepare to attach
sides.
1a) Remove row
of screws across
cabinet top.
Hood Top
(Edge must go under
cabinet top.)
1b) Slide the edge of
the hood top under
the edge of the cabinet
top and re-insert the
screws.
1c) On both sides of the unit, run a bead of silicone down
the cabinet post behind the rear of the hinges.
1d) On both sides,
remove this screw.
(Save the screws.)
STEP 2 - Attach sides of outside air hood.
NOTE: Select screws carefully.
Hood Top
(attached in STEP 1)
Right
Side
2a) Position the side, and reinsert the
screw removed in STEP 1d). Continuing
to support the side panel, go to STEP 2b).
2c) Attach the side of the hood to
the cabinet with self-tapping screws.
Use the 1/2 hex head/no slot screws
with the drill point. Use all the holes
(each side requires eight screws).
2d) Repeat the
procedure to install
the other side.
2b) Position side panel over the cabinet
and inside the hood top. Attach the side
of the hood to the top with sheetmetal
screws. Use the 1/2 screws with the
slotted head and standard point.
Left Side
(Top of side
panel must
be inside
the top.)
FIGURE 1A - Assembly STEPS
INSTALLATION NOTE: If the installation
includes damper control Option GE21 or GE22 that requires field installation of a sensor in the outside air inlet,
attach the sensor and connect the wires before STEP 3. Follow the instructions in the system installation manual.
STEP 3 - Install
the louver rack.
Screen
Retainer
(part of
assembled
louver rack)
3a) Position
the louver rack in
the hood opening.
3b) Attach the louver
rack as shown with
sheetmetal screws.
Repeat on the other side.
STEP 4 - Install the
screen.
4b) Attach screen clamp with three sheet-
metal screws. Repeat procedure on the
other side to install second screen clamp.
Outside air hood installation is complete.
Louver Rack
4a) Position
the screen and
the screen clamp.
Screen
13/16”
21mm
13/16”
21mm
4-13/16”
123mm
42”
1,066mm
7-9/16”
192mm
40-1/2”
1,029mm
15-5/16”
389mm
7-9/16”
192mm
Front View
Side Views
RDH 75-150;
REH 10A/
20A/30A/15B/
30B/60B;
RXH
000A/000B
RDH 175-400A;
REH 30D/60D/90D/
120D/40E/80E120E;
RXH 000C/
000D/000E
FIGURE 1B - Side Dimensions of Installed Option AS2, Outside Air Hood on PreevA
®
Models
RDH, REH, RHH, and RXH
- RPBL Option - Installation - Weather Hood Assembly RPB Option - Installation - Weather Hood Assembly REDC Option - Installation - Weather Hood Assembly RECC Option - Installation - Weather Hood Assembly RDDC Option - Installation - Weather Hood Assembly RDCC Option - Installation - Weather Hood Assembly RDC Option - Installation - Weather Hood Assembly RCC Option - Installation - Weather Hood Assembly REDB Option - Installation - Weather Hood Assembly RECB Option - Installation - Weather Hood Assembly RDDB Option - Installation - Weather Hood Assembly RDCB Option - Installation - Weather Hood Assembly RDB Option - Installation - Weather Hood Assembly RCB Option - Installation - Weather Hood Assembly ADFH Option - Installation - Weather Hood Assembly ADF Option - Installation - Weather Hood Assembly