3 option as16 for maps, Iii cabinet d (cont'd), 3 installation instructions (cont'd) – Reznor RBL Option - Installation - Weather Hood Assembly User Manual
Page 10
Form-I-OPT-WH, Page 10
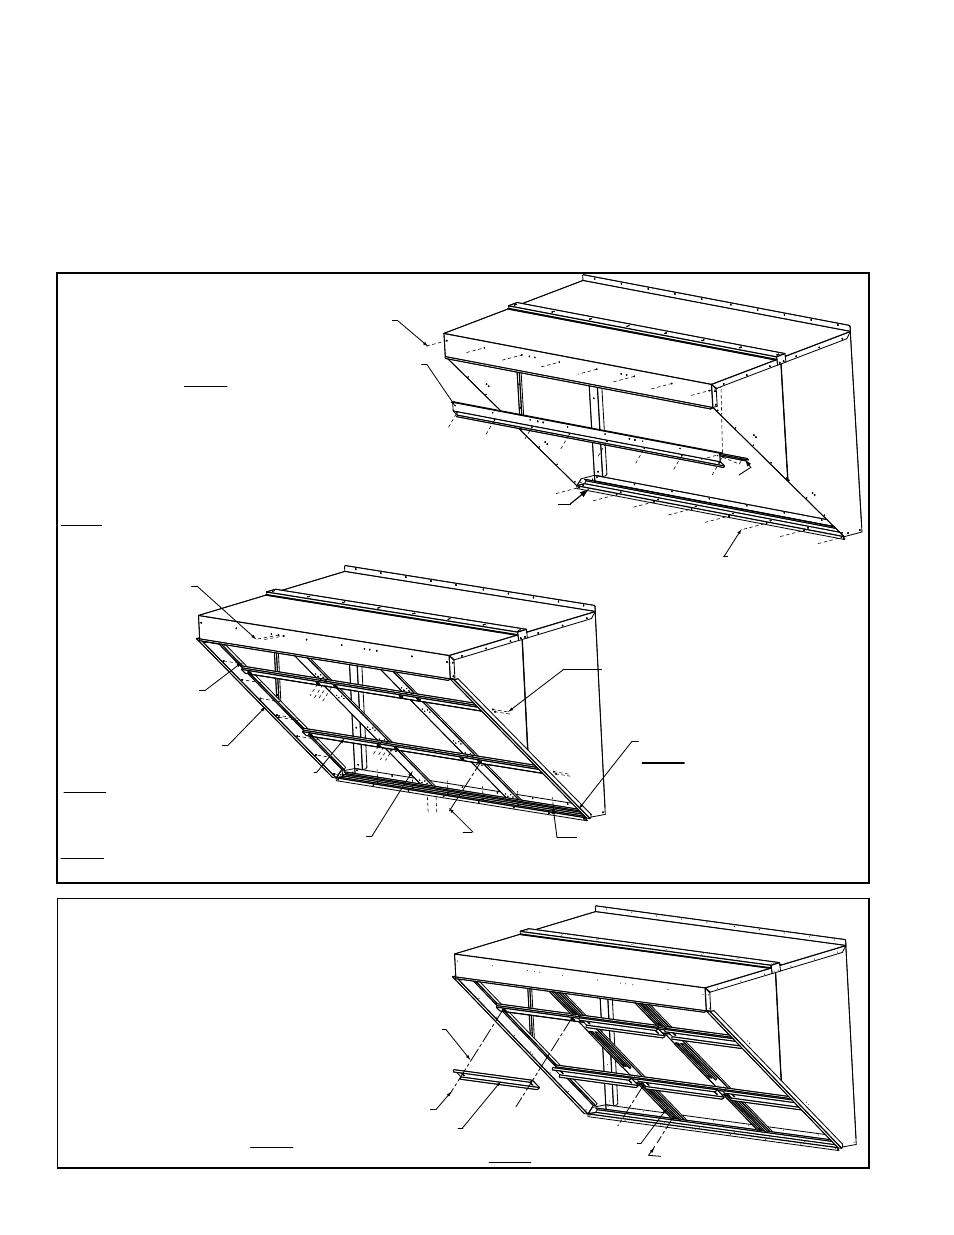
Left Side Gutter, P/N 222698
STEP 3c) Position the left side gutter as
illustrated, lineup the holes, and attach
with sheetmetal screws.
Repeat with the right side gutter.
Right Side Gutter,
P/N 222695
Use sheetmetal
screws to attach
gutters.
(2) Vertical Filter Supports, P/N 222700
STEP 3d) Position each vertical filter support as illustrated.
Attach with sheetmetal screws at the top and bottom.
(2) Horizontal Center Filter Supports, P/N 222699
Use sheetmetal screws to
attach horizontal supports.
Use sheetmetal
screws to attach
vertical supports.
Attach (12)
clip-on receptacles,
P/N 205708, to the
horizontal filter supports.
STEP 3e) Position each horizontal filter support as
illustrated. Attach to sides and vertical supports with
sheetmetal screws. Attach clip-on receptacle as illustrated.
Bottom Filter Support, P/N 222703
STEP 3b) Position the bottom filter support, line up the holes, and attach with sheetmetal screws.
Position bottom filter clip (see below) on top of the filter support,line up the holes,
and attach with sheetmetal screws.
Use sheetmetal
screws to attach
top filter support.
Top Filter Support, P/N 222701
STEP 3a) Position the filter support inside the
top edge and attach with sheetmetal screws.
Position filter clip with open side down
across the top filter support. Line up the holes
and attach with sheetmetal screws.
Top Filter Clip,
P/N 222702
Use sheetmetal
screws to attach
bottom filter support.
Bottom Filter Clip, P/N 222704
Attach with sheetmetal
screws (See STEP 3b above).
FIGURE 6C -
STEP 3, Install Gutters
and Filter Supports
(12) Nylon Retainers,
P/N 205709
(12) Wing Head Screws,
P/N 205707
(6) Filter Retainers, P/N 222706
STEP 4b) - Install filters. Attach retainers
with wing head screws and nylon retainers.
(12) Filter Stops, P/N 222705
STEP 4a) - Attach filter stops.
Attach stops with sheetmetal screws.
FIGURE 6D - STEP 4, Install
Stops, Filters, and Retainers
3. Components, Dimensions, and Installation Instructions (cont'd)
3.3.3 Installation
Instructions (cont'd)
3.3 OPTION AS16 for MAPS
®
III Cabinet D (cont'd)
d) Install Two Vertical Filter Supports - Position a vertical support as illustrated so
that it is lined up with two holes in the top edge and two in the bottom. Attach with
sheetmetal screws. Repeat with the second support.
e) Install Two Horizontal Filter Supports - Position a horizontal support as
illustrated so that it is lined up with two holes on each side. Attach to the sides
and the gutters with sheetmetal screws. Where the horizontal support crosses
the vertical supports, attach with sheetmetal screws. Repeat with the second
horizontal filter support.
- RPBL Option - Installation - Weather Hood Assembly RPB Option - Installation - Weather Hood Assembly REDC Option - Installation - Weather Hood Assembly RECC Option - Installation - Weather Hood Assembly RDDC Option - Installation - Weather Hood Assembly RDCC Option - Installation - Weather Hood Assembly RDC Option - Installation - Weather Hood Assembly RCC Option - Installation - Weather Hood Assembly REDB Option - Installation - Weather Hood Assembly RECB Option - Installation - Weather Hood Assembly RDDB Option - Installation - Weather Hood Assembly RDCB Option - Installation - Weather Hood Assembly RDB Option - Installation - Weather Hood Assembly RCB Option - Installation - Weather Hood Assembly ADFH Option - Installation - Weather Hood Assembly ADF Option - Installation - Weather Hood Assembly