Great Planes Edge 540 1.60-43cc Performance Series ARF - GPMA1414 User Manual
Page 34
34
them with the slots for the rudder cables. Mark the location
for the screw holes. Drill through the marks you made with
a 3/32" [2.4mm] drill bit.
Be sure you are drilling through
the plate only! Do not drill all the way through the rudder.
Using a #4 x 5/8" [16mm] self-tapping screw, install and then
remove a screw into each of the holes. Harden the holes with
thin CA. Install the control horns with eight #4 x 5/8" [16mm]
self-tapping screws.
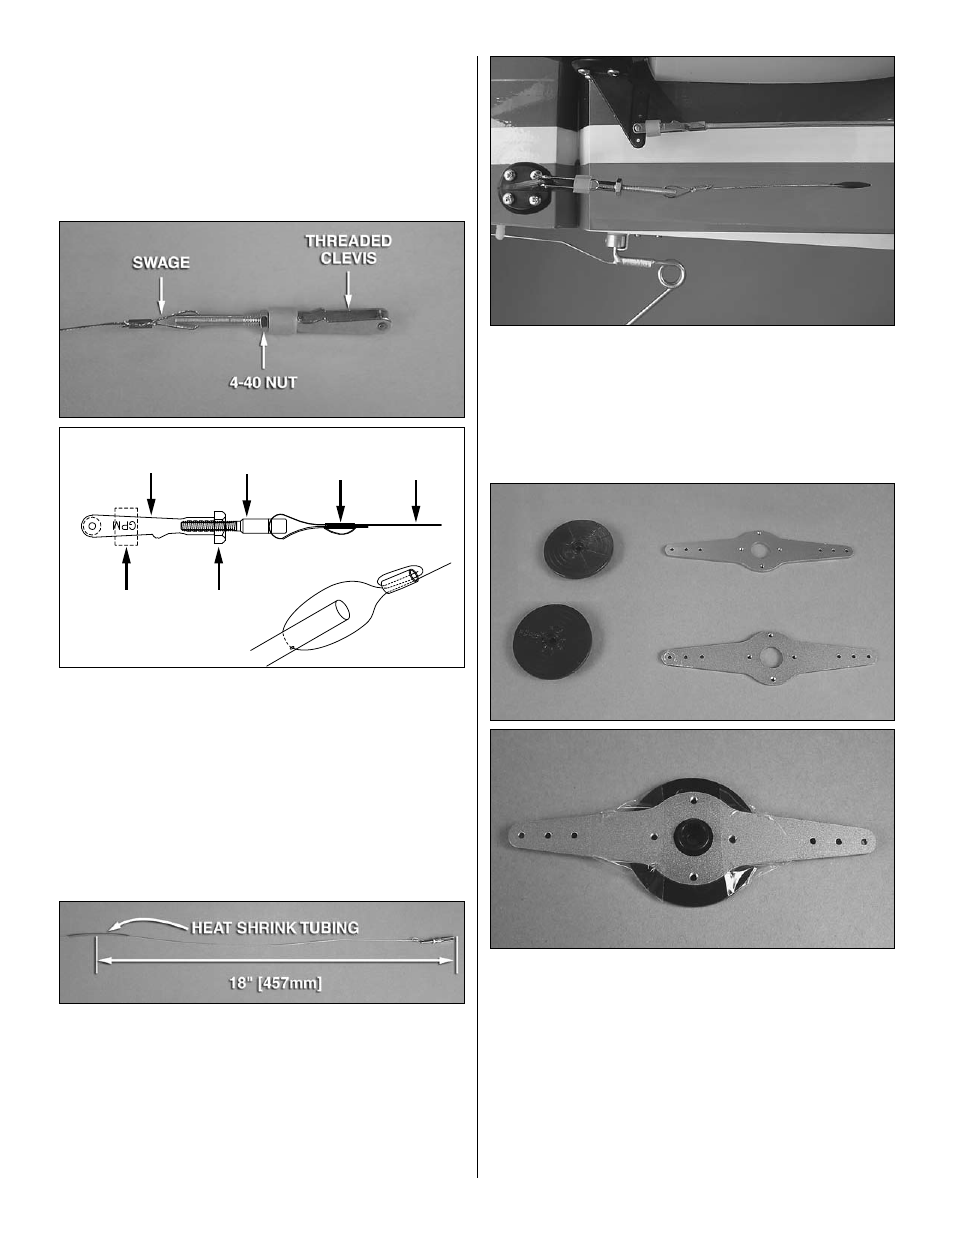
CLEVIS
RETAINER
CLEVIS
SWAGE
CABLE
THREADED
COUPLER
4-40
NUT
o
4. Cut the provided pull-pull cable into two equal lengths.
Thread on a 4-40 nut and a silicone clevis retainer onto
each of the four brass pull-pull couplers and then thread the
couplers into four 4-40 metal clevises twelve complete turns.
Feed only one end of each cable through the hole in a brass
coupler 1-1/4" [32mm] and fold it back onto itself. Slide a
swage onto the cable and over the short end, loop the short
end around through the swage again and crimp the swage
onto the cables using heavy-duty pliers. The other ends
of the cables will be connected to the clevises after being
installed into the fuselage.
o
5. Slide a 3" [76mm] piece of 1/16" [1.6mm] heat-shrink
tubing onto each pull-pull cable. Use heat to shrink the
tubing onto the cable. Slide the heat-shrink tubing down the
cable so that the center of the tubing is 18" [457mm] from
the
clevis pin. Apply a drop of medium CA glue to both ends
of each piece of tubing to secure it in place. The heat shrink
tubing will prevent the metal cables from directly contacting
each other where
they cross inside the fuselage which
could cause radio interference.
o
6. Feed the pull-pull cables through the slots in the
fuselage. Be sure that the other ends make it through the
fuselage to the rudder servos and do not interfere with the
elevator servo leads. Turning the airplane up on its nose and
feeding the cable ends into the fuse makes this task easier.
Connect the clevises on the cables to the outer holes in the
rudder control horns.
o
7. Two 3-7/8" [98mm]
double aluminum servo arm
extensions are included for the rudder pull-pull system.
Locate the large servo wheels included with the rudder
servos. (Different model servos may come with servo wheels
that are larger or smaller than the ones shown in the picture.
The actual size of the servo wheels being used is not critical.)
Fit the aluminum servo extensions to the undersides of the
servo wheels centered over the spline holes and tape them
in place. Use a 1/16" [1.6mm] drill bit to drill through the four
mounting holes in the servo extensions into the plastic servo
wheels. Remove the servo wheels from the extensions and
enlarge the holes with a 3/32" [2.4mm] drill bit.