Great Planes CAP 232 40 Kit - GPMA0232 User Manual
Page 38
Do not confuse this procedure with "checking the
C.G." which will be discussed later in the manual.
Now that the model is covered and nearly competed, this is
the time to balance it laterally (side-to-side). Here's how:
❏
1. With the wing level and attached to the model (and
the engine and muffler installed), lift the model by the
propeller shaft and the fin. This may require an assistant.
Do this several times.
❏
2. The wing that consistently drops indicates the heavy
side. Balance the model by adding weight to the other
wing tip.
An airplane that is laterally balanced will track better during
aerobatic maneuvers.
After the model is covered, use fuelproof model paint,
30-minute epoxy thinned with alcohol or finishing resin to
coat areas that may be exposed to raw fuel or exhaust
residue. These are areas such as the firewall, front and
back of the fuse openings for the wing and wing saddle
doubler, fuel compartment hatch and the fuse top forward
of the sheeting.
Top Flite LustreKote
™
fuel-proof paint is recommended for
painting all the ABS plastic parts and the aluminum landing
gear. The wheel pants should be removed from the landing
gear for painting. Use a file to round the corners of the
aluminum landing gear before you paint it. At least one coat
of LustreKote primer is highly recommended to fill all the
small scratches left from sanding as well as small pin holes
in the Bondo filler. Wet sand between coats with 400-grit
sandpaper and apply a second coat of primer if necessary.
Before painting the canopy, use scissors or a hobby knife to
trim it along the molded-in cut lines, then true the edges
with your bar sander and 220-grit sandpaper. Use 400-grit
sandpaper to scuff the frame portion of the canopy so the
paint will stick. We recommend you paint the canopy frame
with Pactra Formula-U or Chevron Perfect Paint. Use
masking tape to cover the portion of the canopy that is not
to be painted. If you are not sure that the paint is
compatible with the clear canopy, test the paint on a scrap
piece of canopy material.
For painting the pilot, we have discovered that acrylic water
base paints such as the types found at craft stores work
great. The acrylic paints look realistic on the pilot because
they are not glossy, and best of all, they clean up with water.
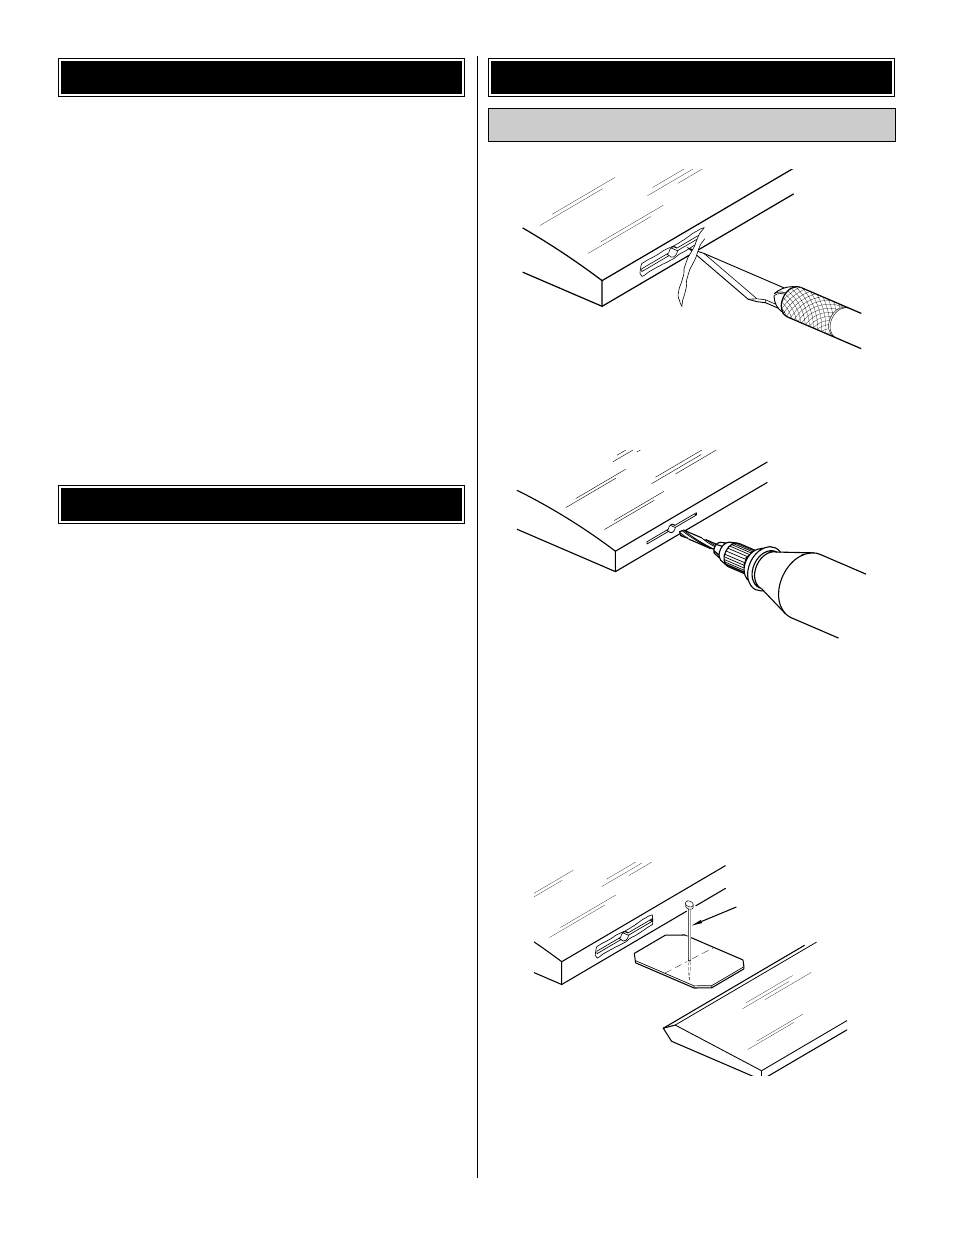
❏
1. Start with the elevators and stab. Cut the covering
from the hinge slots–don't just
slit the covering but remove
a small strip the size of the hinge slot.
❏
2. Drill a 3/32" hole 1/2" deep in the center of each hinge
slot. A high speed moto-tool works best for this. If you use a
regular drill, clean out the hinge slots with your #11 blade.
❏
3. Clean the aileron torque rod arms and the tail gear wire
with rubbing alcohol to remove residue that may keep the
glue from sticking. Use coarse sandpaper to scuff the tail
gear wire and the aileron torque rods so the glue will stick.
❏
4. Without using any glue, fit the hinges in the elevators
or stab. Do not glue the hinges yet. As you join the
elevators to the stab, confirm that the hinges are equally
inserted in the elevators and the stab. Insert a small pin in
the center of the hinges to keep them centered.
TEMPORARY PIN
TO KEEP HINGE
CENTERED
DRILL A 3/32" HOLE
1/2" DEEP, IN CENTER
OF HINGE SLOT
AWAY FROM THE SLOT
CUT THE COVERING
Join the Control Surfaces
FINAL HOOKUPS & CHECKS
PAINTING
BALANCE THE MODEL LATERALLY
38