Assemble the cowl – Great Planes CAP 232 40 Kit - GPMA0232 User Manual
Page 36
❏
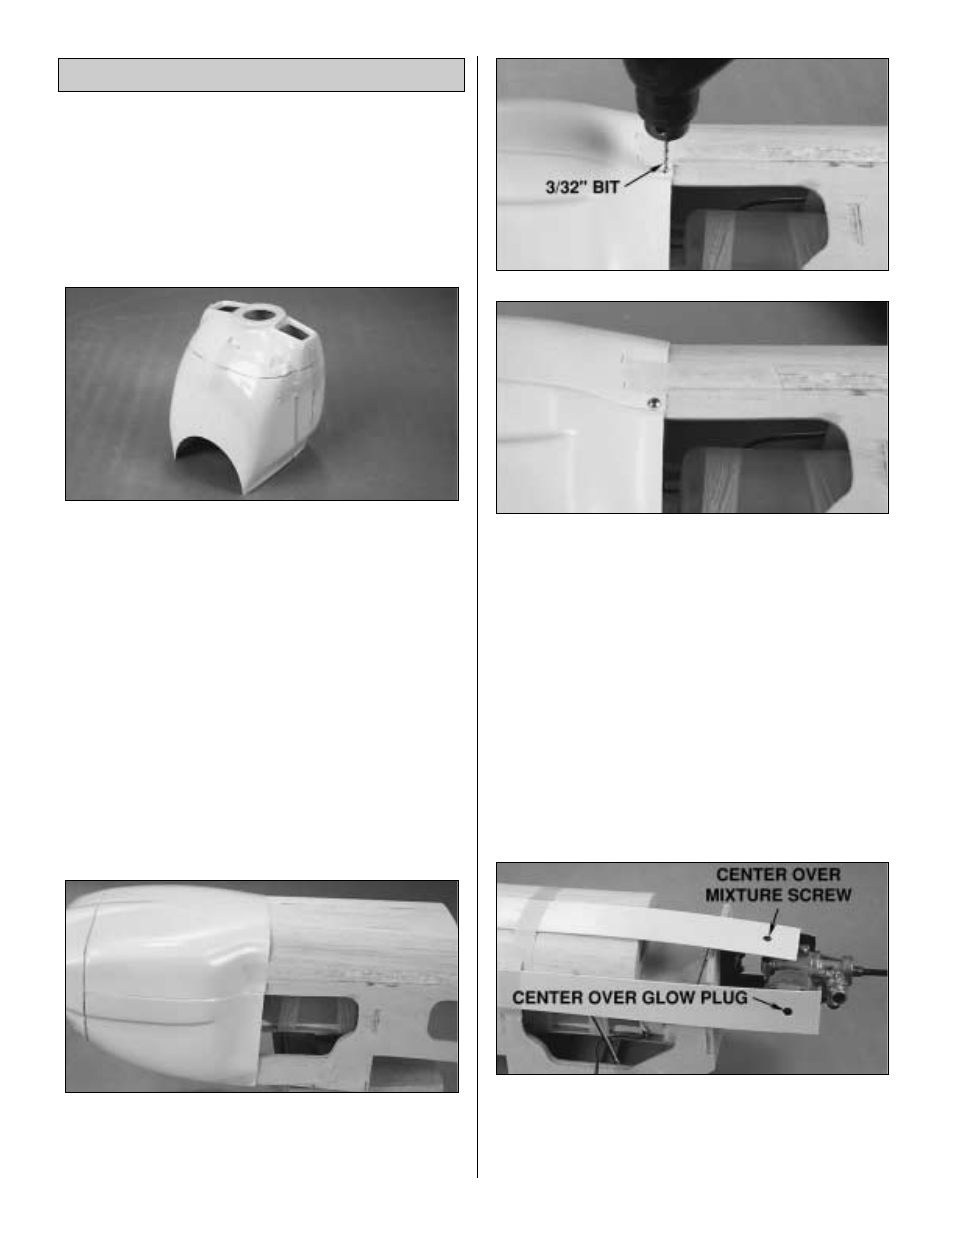
1. The cowl is assembled in a manner similar to the
wheel pants. Cut the cowl along the cut lines, then use your
bar sander to true all the edges. For now, the opening in the
front cowl piece only needs to be roughly cut out. Use
coarse sandpaper to roughen all the overlapping areas so
the glue will stick.
❏
2. Tape the three pieces together, then wick a small
amount of thin CA along the seams of the overlapping
joints. After the CA has cured, remove the tape and make
sure you have thoroughly glued the two pieces together by
inspecting the glue joints and adding thin CA if necessary.
❏
3. Use a sharp hobby knife (or a Moto-Tool with a sanding
drum) to accurately cut the air openings at the front of the
cowl and the air exit at the bottom rear of the cowl.
❏
4. Use 30-minute epoxy to glue a 1" strip of fiberglass
cloth across the glue joint inside the front of the cowl.
❏
5. Fit the cowl over the engine, then mount the spinner
backplate on the engine. Align the cowl so there is
approximately a 1/8" gap between the backplate of the
spinner and the cowl. Tape the cowl to the fuse.
❏
6. Making one hole at a time and checking to be sure the
cowl still lines up with the spinner back plate, drill one 3/32"
hole through the cowl and the fuse side at one of the locations
shown on the plan. Using a #4 x 1/2" screw attach the cowl to
the fuse. Do the same for the other three cowl mounting
screws, checking alignment before drilling each one.
❏
7. Remove the spinner backplate and the cowl from the
fuselage. Use a drop of thin CA to harden the screw holes
in the fuse.
❏
8. Use thin cardboard or plastic to make templates for
the cutouts in the cowl for the glow plug driver and the
needle valve. Tape the templates to the fuselage behind
where the cowl will mount to the fuse, accurately indicating
the position of the glow plug and needle valve.
Assemble the Cowl
36