Connecting the unit to sensor amplifiers – KEYENCE DL-RS1A/IL User Manual
Page 6
4
Connecting the Unit to Sensor Amplifiers
Connecting the Unit to Sensor Amplifiers
You use DL-RS1A by connecting it to sensor amplifiers. The connection method varies according to
the mounting type of the sensor amplifiers.
Before connecting DL-RS1A, you must install the main unit and expansion units of the sensor
amplifiers. For installation method, see the operating instructions for the IL Series.
Available sensor amplifiers
Make sure that the sensor amplifiers are turned off before connecting the RS-
232C communication unit DL-RS1A to them. Connecting the unit while the
sensor amplifiers are turned on may damage the unit.
Name
Type of amplifier
Main unit
Expansion unit
Max. connectable number
IL Series
DIN-rail mount
IL-1000
IL-1050
8 units
(Main: 1, Expansion: 7)
Panel mount
IL-1500
IL-1550
8 units
(Main: 1, Expansion: 7)
NOTICE
Connecting the Unit to Sensor Amplifiers
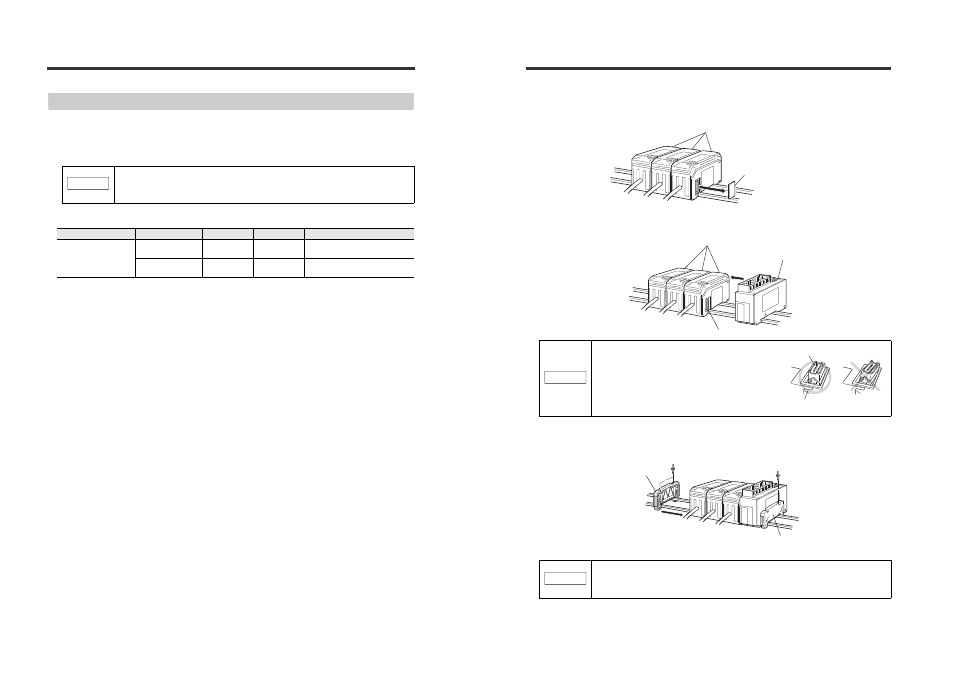
Connecting the DL-RS1A to DIN rail mount sensor amplifiers
1
Remove the expansion protective cover from the sensor amplifier that you want to connect to
the DL-RS1A.
2
Mount the DL-RS1A on the DIN rail and connect it to the sensor amplifier.
Make sure there is no space between the unit and the sensor amplifier.
3
Mount the end units (OP-26751, two units included) on either side of the sensor amplifier and
DL-RS1A unit and tighten the two screws on the top of each end unit.
(You can mount the end units in the same way you mount DL-RS1A.)
Sensor amplifier
Expansion protective cover
Sensor amplifier
DL-RS1A
Connector
Check that the sensor amplifier connector (for DIN
rail mounting) located on the side of DL-RS1A is
not installed at an angle as shown in the
illustration to the right. Connecting the unit with
its connector installed at an angle to a sensor
amplifier may damage the unit.
NOTICE
Sensor amplifier connector
RS-232C communication unit DL-RS1A
End unit
End unit
Make sure you firmly insert DL-RS1A all the way into the sensor amplifier.
Turning the power on when the unit is not inserted straight or firmly connected
may damage the unit.
NOTICE