Setting each type of function, Basic settings menu detection settings menu – KEYENCE PX-10 User Manual
Page 6
6
Setting Each Type of Function
Normally, only standard settings can be used.
Display each type of menu and change the settings as required.
• Press and hold
for at least three seconds to return to the basic menu.
• Select a function with the
buttons and press the
button to set the
value.
• Select END for each menu and press the
button to set the value.
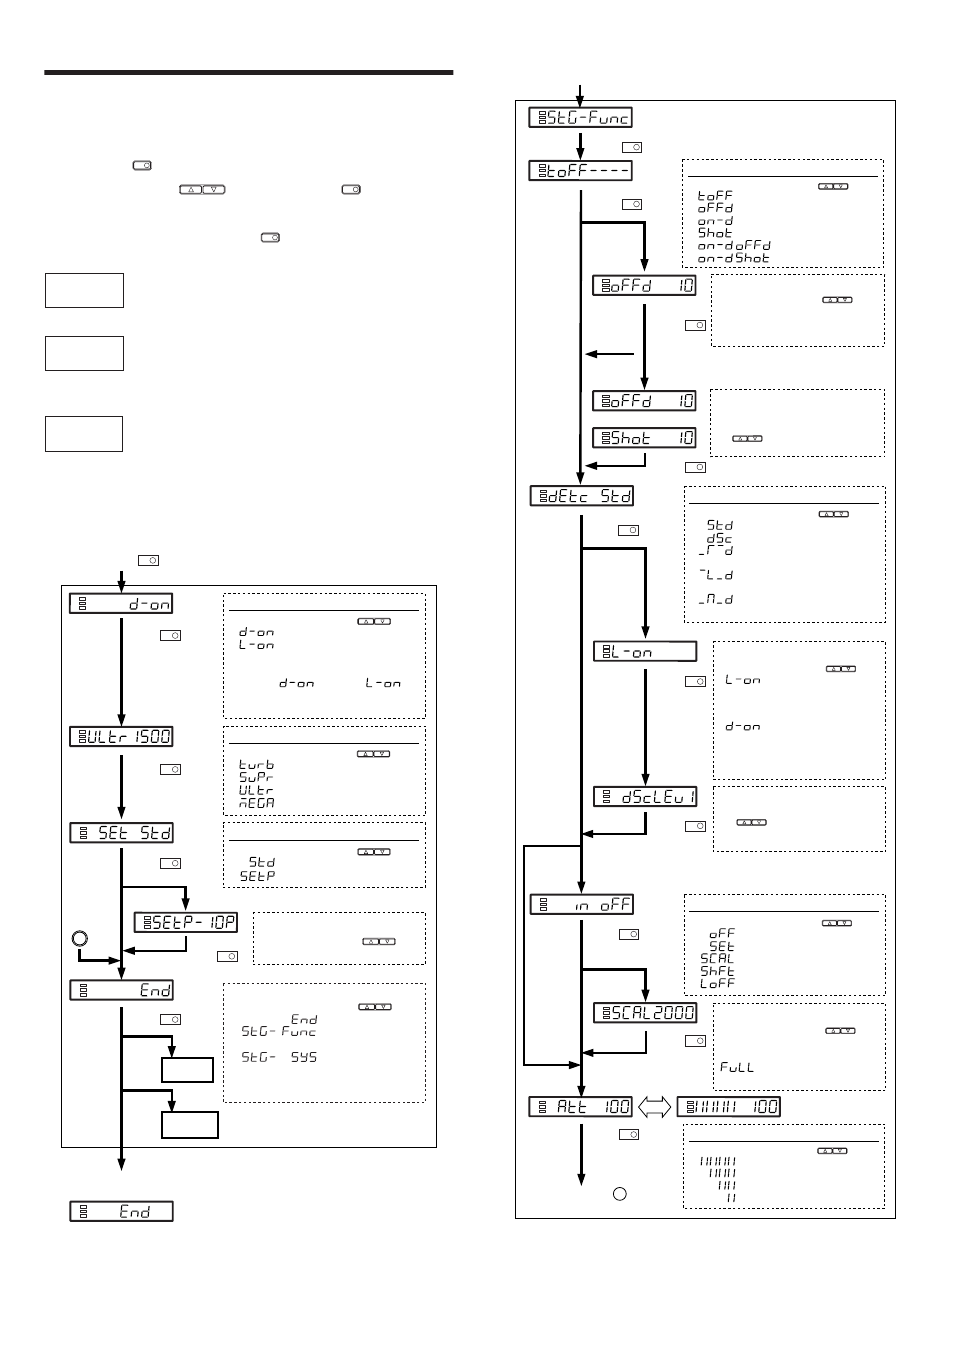
Basic Settings Menu
Detection Settings Menu
MODE
UP/DOWN
MODE
MODE
Basic
Settings Menu
1
Detection output selection
2
Power mode selection
3
Sensitivity setting method selection
4
Timer mode selection
5
Detection mode selection
6
External input function selection (PX-10/10P only)
7
Light emission power selection
8
Display value correction function selection
9
Alarm output setting
10
Display selection during detection
11
Display reverse selection
12
Power save mode setting
Detection
Settings Menu
System
Settings Menu
End of basic menu display
Select the setting by pressing the buttons.
.
TURBO : 500s
.
SUPER : 1ms
.
ULTRA : 4ms
.
MEGA : 16ms
Select the setting by pressing the buttons.
.
Normal sensitivity setting method
.
Percent (%) calibration
Setting target value for percent calibration
Select the setting by pressing the buttons.
Can be set between -99 and +99%.
When End
is selected
When
StG-Func
is selected
When SEtP
is selected
When Std
is selected
2
Power mode (response time) selection
3
Sensitivity setting method selection (See page 3.)
Select the setting by pressing the buttons.
.
ON during emission
.
ON during reception
The following values are the initial settings
when the power is turned on.
Thrubeam:
Reflective:
Perform this setting again after changing the
sensor head.
1
Detection output selection
Menu end/continue selection
Select the setting by pressing the buttons.
.
The menu ends.
.
Configures detection settings
(timer, external input, etc).
.
Configures system settings
(display, power save, etc).
To Detection
Settings Menu
When
StG-SYS
is selected
To System
Settings Menu
A
Press for 3 seconds or longer
MODE
UP/DOWN
UP/DOWN
UP/DOWN
UP/DOWN
UP/DOWN
Press
MODE
Press
MODE
Press
MODE
Press
MODE
Press
MODE
7
Light emission power selection
Select the setting by pressing the buttons.
.
Normal (light intensity) detection mode
.
Dynamic Sensitivity Correction mode
.
Detects the rising edge of the received
light intensity (Edge Detection mode)
.
Detects the falling edge of the received
light intensity (Edge Detection mode)
.
Detects both the rising and falling edges of
the received light intensity (Edge Detection mode)
Timer setting
Select the setting by pressing the buttons.
Can be set between 1 and 9999 ms.
* When 1 is selected, ON-delay timer
is set.
Timer setting 2
Sets the time of OFF-delay (One-shot).
Select the setting by pressing
the buttons.
Can be set between 1 and 9999 ms.
For Timer mode selection,
* 1 is not selected a
* 1 is selected b
When
other than
Timer OFF
is selected
When
dSc is
selected
When
Timer OFF
is selected
When other
than dSc
is selected
When other
than SCAL
is selected
5
Detection mode selection (See page 4)
Select the setting by pressing the buttons.
.
Not using external input
.
External calibration
.
Display scaling function
.
Zero-shift function
.
Light mission stop
6
External input function selection
4
Timer mode selection
Detection operation selection
Select the setting by pressing the buttons.
.
Mainly reflective
[Light intensity with workpiece >
Light intensity without workpiece]
(The output is ON when the light enters.)
.
Mainly thrubeam
[Light intensity with workpiece <
Light intensity without workpiece]
(The output is ON when the
light is blocked.)
Correction speed selection
Select the setting by pressing
the buttons.
1 to 3 The correction becomes faster as the
number becomes larger.(Select 1 in normal cases.)
Display scaling target value setting
Select the setting by pressing the buttons.
The value can be set between 100
and 9900 in units of 100.
displays for the maximum
possible value.
When
SCAL is
selected
Select the setting by pressing the buttons.
.
Timer OFF
.
OFF-delay
.
One-shot
.
One-shot
.
ON-delay + OFF-delay *1
.
ON-delay + One-shot *1
Return to section A
on the basic menu
Select the setting by pressing the buttons.
.
Normal light emission power
.
Approx. 20% of the normal time
.
Approx. 15% of the normal time
.
Approx. 3% of the normal time
UP/DOWN
UP/DOWN
UP/DOWN
UP/DOWN
UP/DOWN
UP/DOWN
UP/DOWN
UP/DOWN
When
PX-10C/
PX-10CP
are used
When PX-10/PX-10P
are used
From the Basic Settings Menu
Press
MODE
Press
MODE
Press
MODE
Press
MODE
Press
MODE
Press
MODE
Press
MODE
Press
MODE
Press
MODE
Press
MODE
UP/DOWN