Controls and functions – Panasonic NV-S99A User Manual
Page 4
Attention! The text in this document has been recognized automatically. To view the original document, you can use the "Original mode".
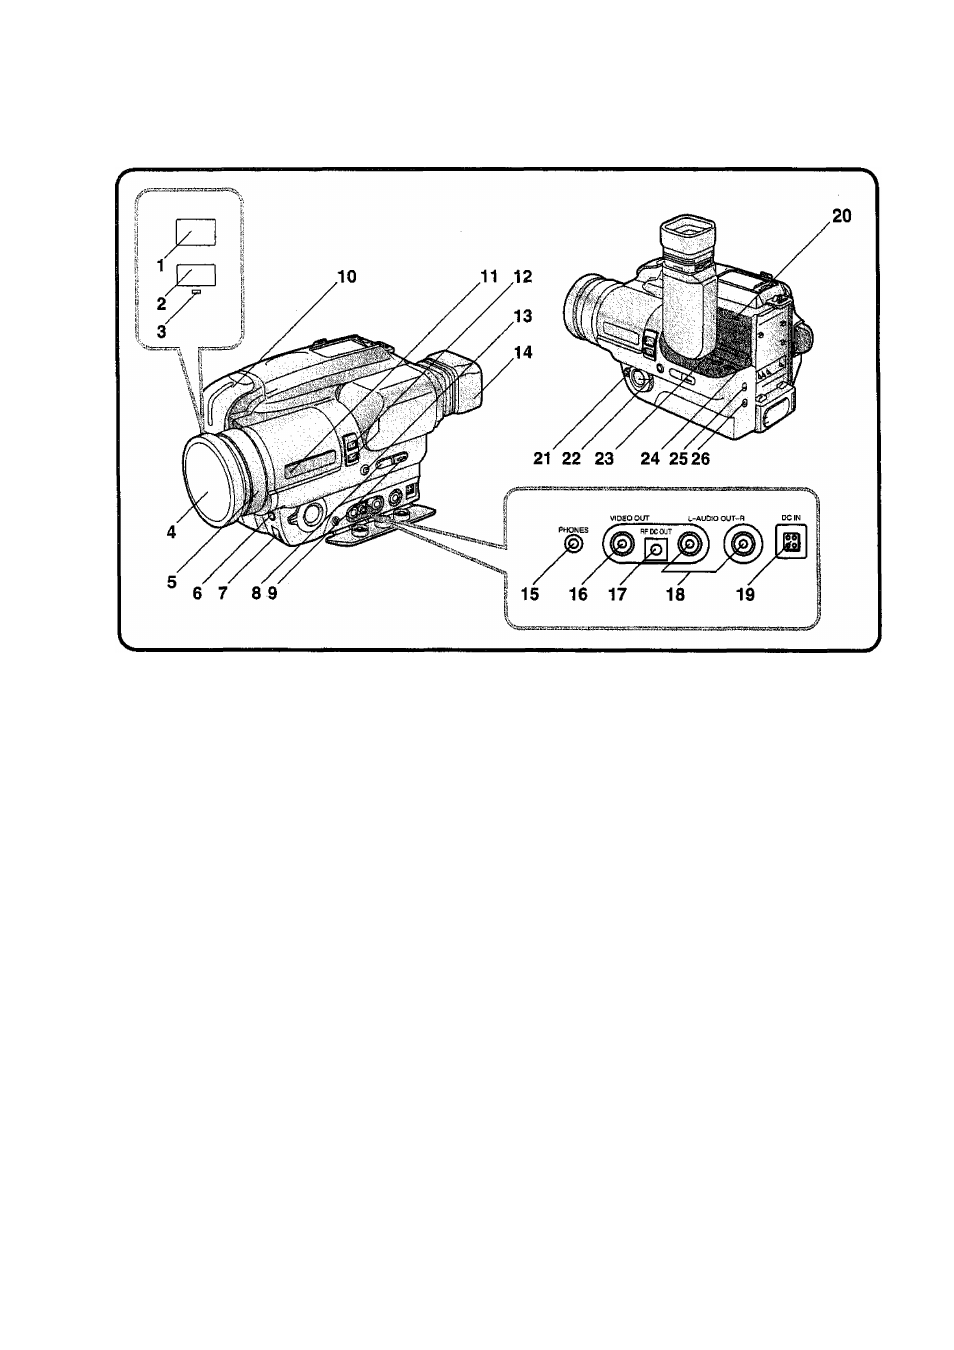
Controls and Functions
For more details, see the pages indicated in brackets.
1 White Balance Sensor (p. 32)
2 Remote Control Receiver Window (p. 7)
3 Recording indicating Lamp
This Lamp lights during recording.
4 Lens Cap (p. 12,32,58)
5 Focus Ring (p. 29)
6 [FOCUS] Button (p. 28)
7 [SHUTTER/IRIS]Controi(p.41)
8 [FADE] Button (p. 40)
9 [DATEH'IME] Button (p. 14)
10 Microphone
11 Digital Mode Indication Window (p. 43,44)
12 Digital Buttons (p. 43,44)
Press these buttons to select the desired
digital function.
13 [W.B] Button (p. 33)
Manual White Balance Button
14 Eyecup(p. 59)
15 [PHONES] Socket (p. 24)
16 [VIDEO OUT] Socket (p. 8,52)
17 [RF DC OUT] Socket
To playback via a TV Set without AV Input
Socket, connect this Socket to the RF IN
Socket of the TV Set using an RF Adaptor
(optional).
18 [AUDIO OUT L/R] Sockets (p. 8, 52)
19 [DCIN]Socket(p. 8, 51)
20 Dew Sensor Slot
Through this slot, the Movie Camera detects
condensation. Take care not to let this slot
gets clogged with dirt and not to cover it with
your fingers, etc.
21 [AE] Selector (p. 17,28,32,39,40)
Use this selector to select the desired AE
mode.
22 [SHUTTER/IRIS] Button (p. 41)
23 [DATE/TIME/SHIFT.TRACKING] Button
(P-14,47)
Press this button to adjust the tracking in
order to eliminate distortions in the playback
picture (p. 47), or press it to advance to the
next item during the setting of the date and
time (p. 14).
24 [DATE/TIME/SET*TRACKING]Button
(p.14, 47)
Press this button to adjust the tracking in
order to eliminate distortions in the playback
picture (p. 47), or press it to set the correct
date and time (p. 14).
25 [POWER SAVE] Switch (p. 48)
Setting this switch to “ON” activates the
Power Save Function.
26 [AUDIO SELECT] Switch (p. 55)