Bag b (continued) – Losi XXX-S Sport User Manual
Page 10
26
36
23
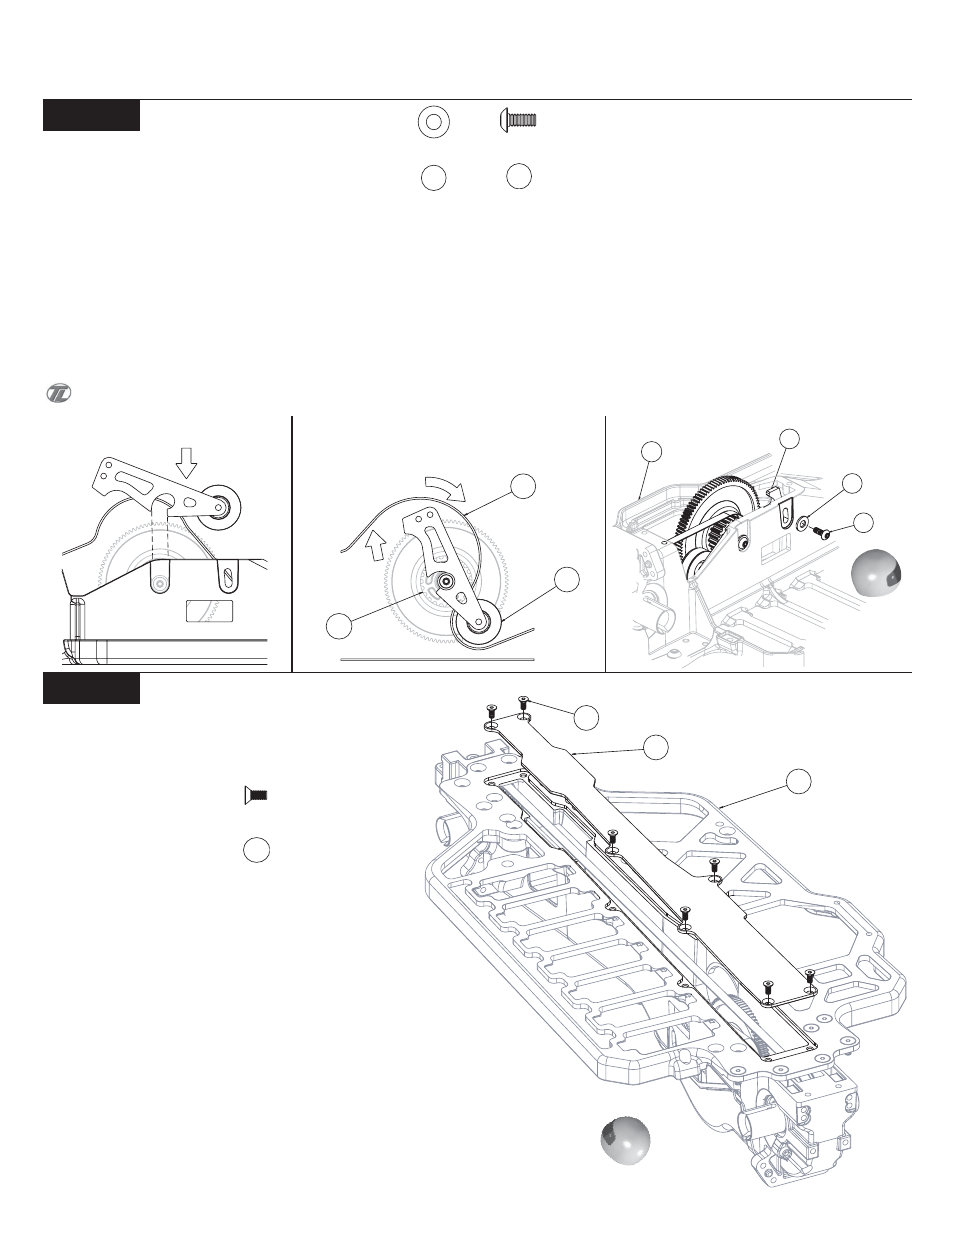
BAG B (Continued)
Step B-8
Figure 16A
Step B-7
7
40
q
1. Seal the drive train by placing the Bottom Chassis Cover (39)
with the flat side towards the bottom of the Chassis (27). Secure the
Bottom Chassis Cover with seven 2-56 x 1/4" Flat Head Screws (40).
Figure 16B
Figure 16C
q
1. Slide the Tensioner Arm assembly down over the Belt (26) and connect the slot in the Tensioner Arm (21) with the Tensioner Arm Bushing
(34) as indicated in Figure 16A.
q
2. Slowly start rotating the Tensioner Arm around the Tensioner Bushing in a clockwise direction as shown in Figure 16B. While rotating
the Tensioner Arm assembly, slightly pull upward to keep the Tensioner Arm locked and rotating on the Tensioner Bushing. The Belt must be
positioned between the Drive Pulley (36) and the Tensioner Arm.
q
3. Place a #4 Hardened Washer (37) over a 4-40 x 1/4" Button Head Screw (38).
q
4. Once you have the Belt wrapped around the Drive Pulley, and Belt Tensioner in position, as shown in Figure 16C, secure the Tensioner
assembly by threading the 4-40 x 1/4" Button Head Screw, with Washer, through the Chassis (27) into the bottom hole in the Tensioner Arm.
With the 4-40 x 1/4" Screw about one turn loose, push down on the flat part of the Tensioner and set the desired Belt tension, tighten the Screw.
The Belt should move 1/4" (6mm) to 3/8" (9.5mm) up and down for the ideal tension.
37
38
Belt Tensioner Arm Install
Chassis Bottom Cover Install
40
27
39
Figure 17
21
27
37
38