Step 12.1, Tighten – Copernicus IR400 User Manual
Page 23
Epson_CART - Version 2012_A - May 8 2012 - Copernicus Educational Products Inc.
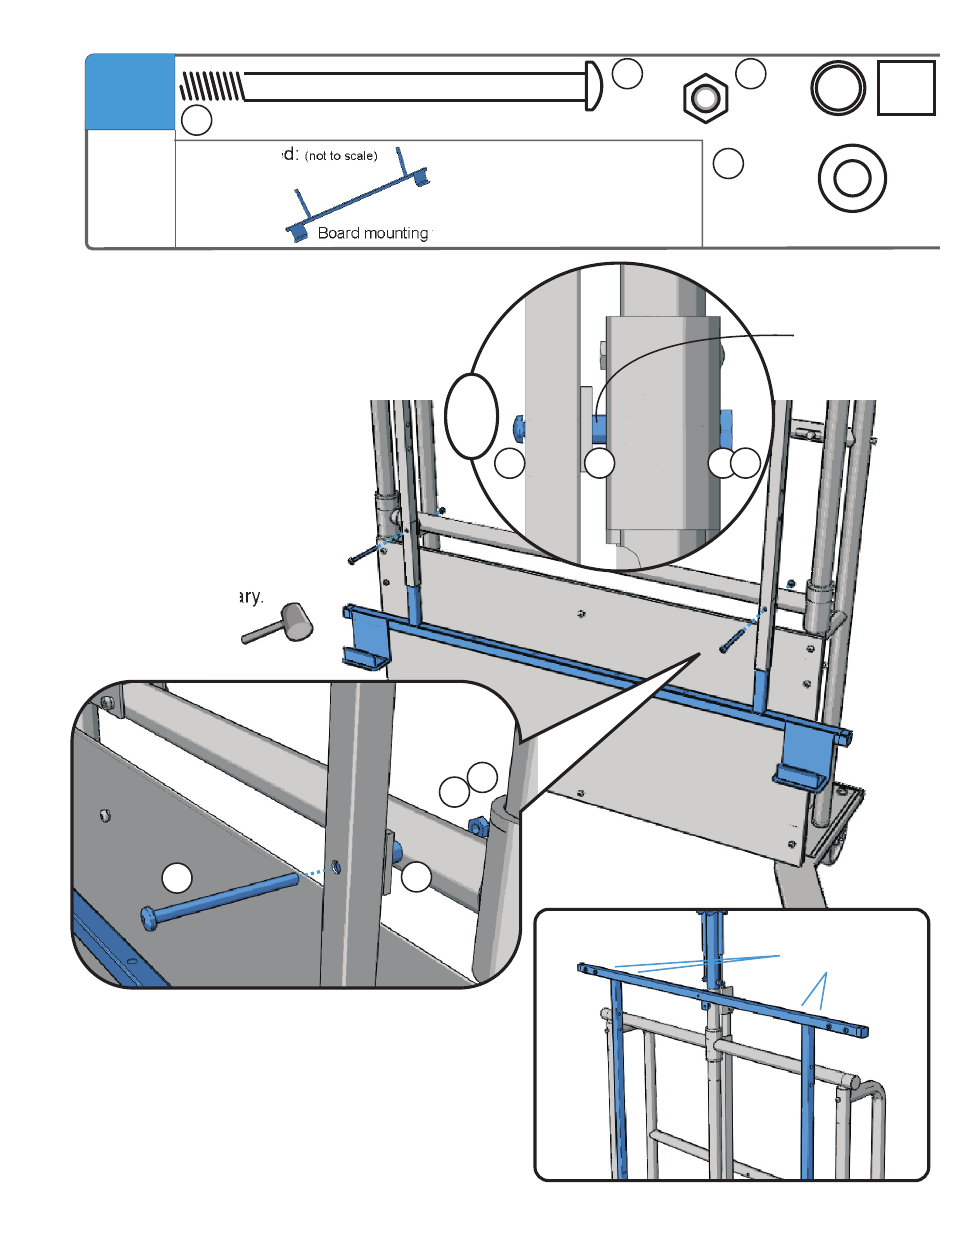
You will need:
(not to scale)
12
M6 x 90mm bolt
2x
G
M6 lock nut
2x
S
Install Board Mounting Frame - Bottom
!!
Side
Using the hole you selected on the
previous page, slide the bottom mount
frame into the top mount frame
and fasten through your
chosen hole and through
the sliding frame as
shown.
Spacer -
item T
!
Board mounting frame - bottom x 1
front
side
Large spacer
2x
T
U
T
G
G
T
U
Tap in with rubber
mallet if necessary.
Work from side
to side as you
tap it in.
TIGHTEN
4 positions
M8 flat washer
2x
U
S
S
TIGHTEN!
23
See also other documents in the category Copernicus Products for children:
- AC401 (1 page)
- AUD1 (9 pages)
- AUD5 (13 pages)
- BC300 (1 page)
- BTHC1 (9 pages)
- BTHC2 (11 pages)
- CD400 (1 page)
- DCS1 (12 pages)
- DCS2A (14 pages)
- E3IN1 (19 pages)
- ELS1 (3 pages)
- GR220 (2 pages)
- IPT102 (14 pages)
- IS2 (16 pages)
- IS602 (40 pages)
- LLS300 (19 pages)
- LW430 (5 pages)
- PDR11 (12 pages)
- PDR20 (1 page)
- RC005 (7 pages)
- RC108 (4 pages)
- RC105 (11 pages)
- RC106 (9 pages)
- RC107 (11 pages)
- SOSE1 (15 pages)
- SRC1 (10 pages)
- STEM100 (18 pages)
- SWT (8 pages)
- TAG2 (19 pages)
- TD5000 (12 pages)
- TEC500 (13 pages)
- TEC500C (12 pages)
- TEC510 (17 pages)
- TEC520 (18 pages)
- TEC57 (8 pages)
- TEC700 (12 pages)
- TEC707 (14 pages)
- VBC5600 (2 pages)
- VE550 (2 pages)
- XS005 (4 pages)