Edge Lighting Micro Grazer Light Channel 2.3W, 12V User Manual
Micro grazer light channel, Install the light channel, Installation instructions for
Installation Instructions for
Micro Grazer Light Channel
904-LCMG-02
Install the Light Channel
1
1718 W. Fullerton Ave
Chicago, IL 60614
Tel: 773-770-1195
Fax: 773-935-5613
www.edgelighting.com
© 2012 Edge Lighting. All Rights Reserved.
SAVE THESE INSTRUCTIONS!
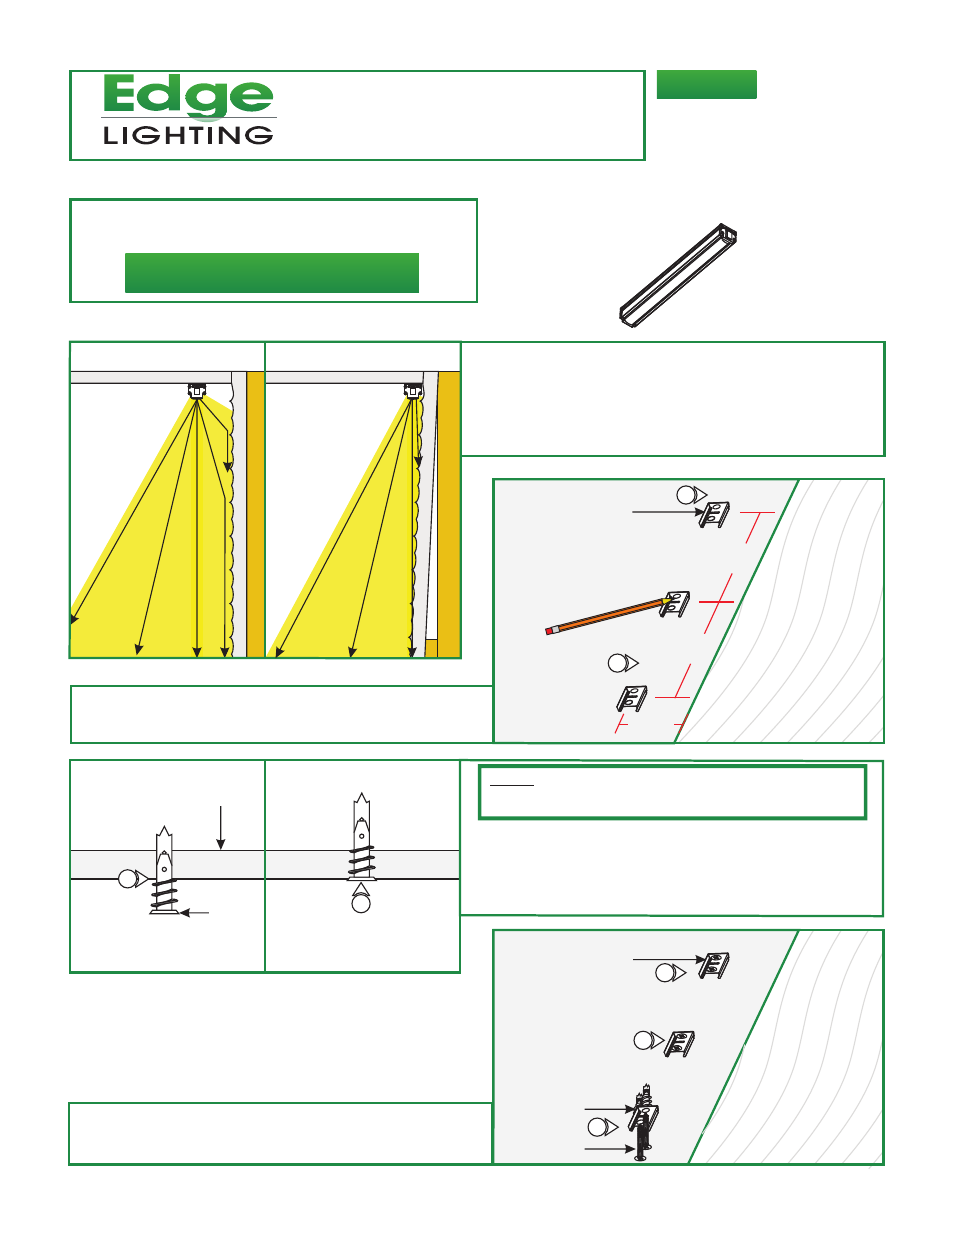
- This instruction shows a typical installation.
IMPORTANT INFORMATION
D
3: Tap the anchors onto the marked points up to the threaded
portion with a hammer.
4: Screw in the threaded portion of the anchors with a Phillips
screwdriver.
SURFACE
3
4
ANCHOR
LCMG-12V-_
2: Place the clips on the surface every 1' (measure from the
the center slot of the mounting clip) and mark the screw
locations.
NOTE:
mounting the clips to a wood surface directly. ANCHORS ARE
NOT PROVIDED.
Steps 4 to 6 are for drywall mounting. Omit these steps if
C
MOUNTING
CLIP
CEILING
2
2
1FT
1FT
3IN-6IN
TEXTURED WALL
TEXTURED W
ALL
STUD
CEILING
LIGHT
BEAMS
TEXTURED W
ALL ON A
11°
STUD
CEILING
LIGHT
BEAMS
A
1: Choose one of the two options to install the Micro Grazer to
properly graze the textured wall.
Option A: Mount the Micro Grazer 3" to 6" away from
the straight textured wall.
Option B: Mount the Micro Grazer next to the textured wall
that is installed at a 11° angle.
B
E
MOUNTING
CLIP
CEILING
TEXTURED WALL
5: Line up the mounting clips to the anchors and secure it to
the anchors by tightening the two #8-32 screws to each
clip.
#8 SCREW
ANCHOR
5
5
5