Pre-hung venting unit installation – Therma-Tru Doors Installation User Manual
Page 13
Installation
SITE 1
2014
1.13
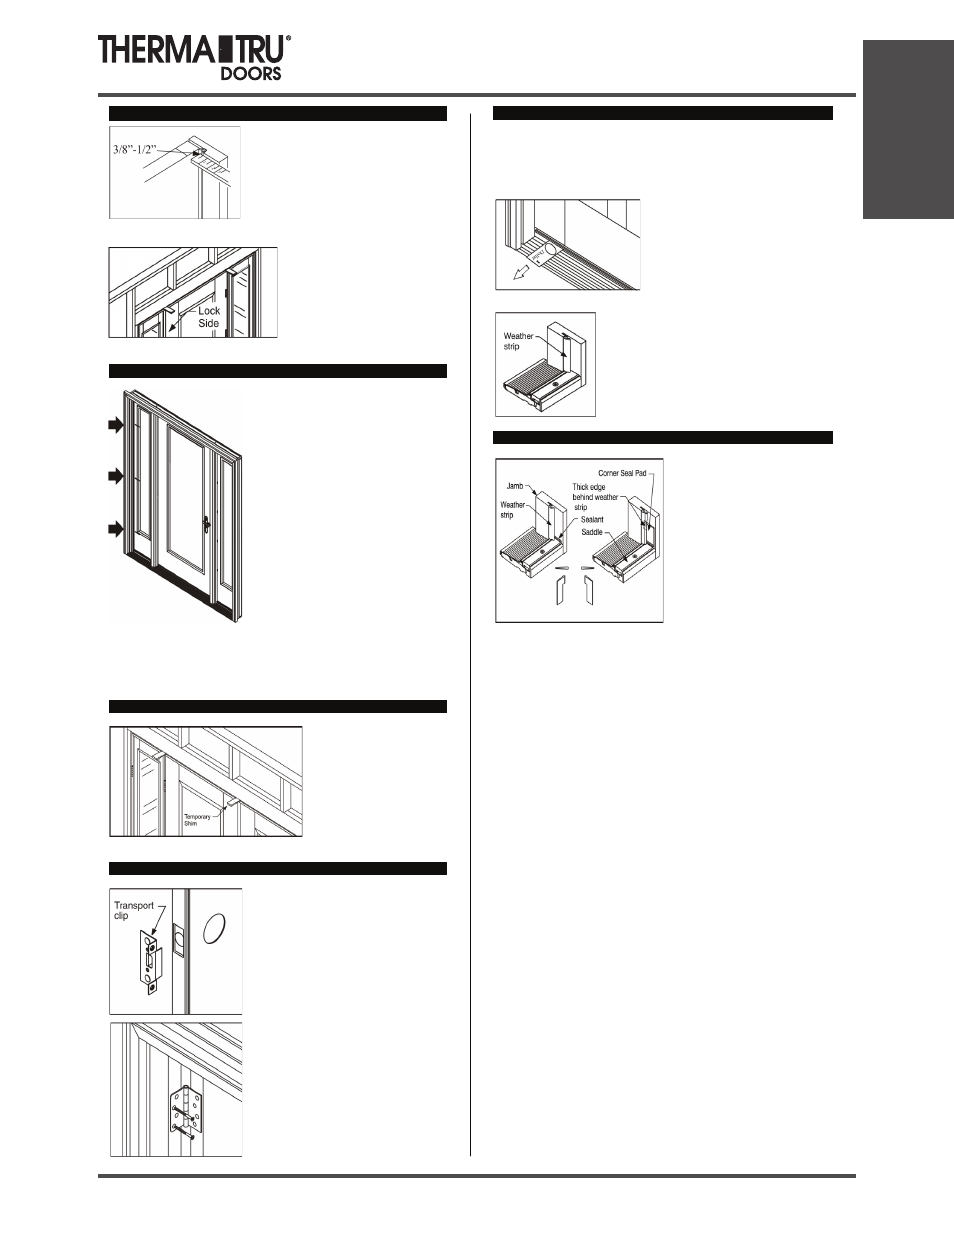
Step 6: Adjust and Fasten Lock Side Mull Post.
Adjust lock side mull post so that the
weatherstrip contacts the door surface
equally at the top, middle, and bottom, an
even 3/8” – 1/2” when fully closed. Place a
screw through the pre-drilled hole in the
head jamb at the lock side mullion.
Do Not drive the screw completely in at this time.
Shim directly over lock side mull
post. Recheck lock mull post to
ensure weatherstrip contact is even
top to bottom. Finish driving screw
tight.
Step 7: Adjust and Secure Side Jambs.
Adjust the sidelite hinge jamb on the hinge
mull side of the unit to obtain even
weatherstrip contact top to bottom at the
lock side of the sidelite. Place a screw
through the hinge side jamb, into the stud, at
each remaining hinge location.
Do not drive the screws completely in at this
time.
Shim above the screws behind each hinge
location between the opening and the jamb
and make adjustment so the margin between
the sidelite and mullion are even top to
bottom. This margin will be slightly larger
than the margin at the door. Recheck
sidelite hinge jamb to ensure weatherstrip
contact is even top to bottom. Finish driving
screws tight.
Repeat the previous step on the sidelite hinge jamb on the lock mull side of
the unit.
Step 8: (French Door) Temporary Shim at Head Jamb.
When installing a French door
with active sidelites, place
temporary shims above the
center of the head frame,
where doors meet. Pre-drill
and insert a screw through
frame into header, then
remove the temporary shims.
Step 9: Remove Transport Clip and Open Door.
Remove transport clips. Confirm door and
sidelites operate properly.
Make adjustments as needed.
With sidelites open, drill 1/8” diameter pilot
holes and install the long hinge screws in the
hinge locations closest to the weatherstrip.
Do this for all hinges.
Step 10: Adjust Sill.
Your door unit has adjustable threshold caps. When properly adjusted, it
should be snug and slightly difficult to pull a dollar bill out from under the
door and sidelites when fully closed. The dollar bill should be able to be
removed without tearing.
This check should be performed at each
adjustment screw location on each active
threshold cap.
After adjusting the threshold cap, ensure that the
weatherstrip is flush with the top of the threshold
cap. Trim as necessary.
Step 11: Install Corner Seal Pads – Inswing units Only.
Apply sealant (Polyurethane or
Elastomeric) at the joint where the
threshold cap meets the jambs and
mull posts.
Remove the self-stick paper from
the corner seal pads and apply to the
jamb or mull post, with the bottom
lined up evenly with the top of the
threshold cap. When the pad is
correctly installed, the tab is on top
and the narrow part is on the
bottom.
The bottom of the pad is the same width of the threshold cap to help with
alignment during installation. Corner pads must be installed on both sides of
each active opening.
Pre-Hung Venting Unit Installation