Vertical seam, 11" r – Metal Sales Vertical Seam Installation User Manual
Page 30
800.406.7387 • www.metalsales.us.com
© Metal Sales Manufacturing Corporation Subject to change without notice Effective Date 5/13
VERTICAL SEAM
30
11" r
Idge
/h
Ip
o
ver
d
eckIng
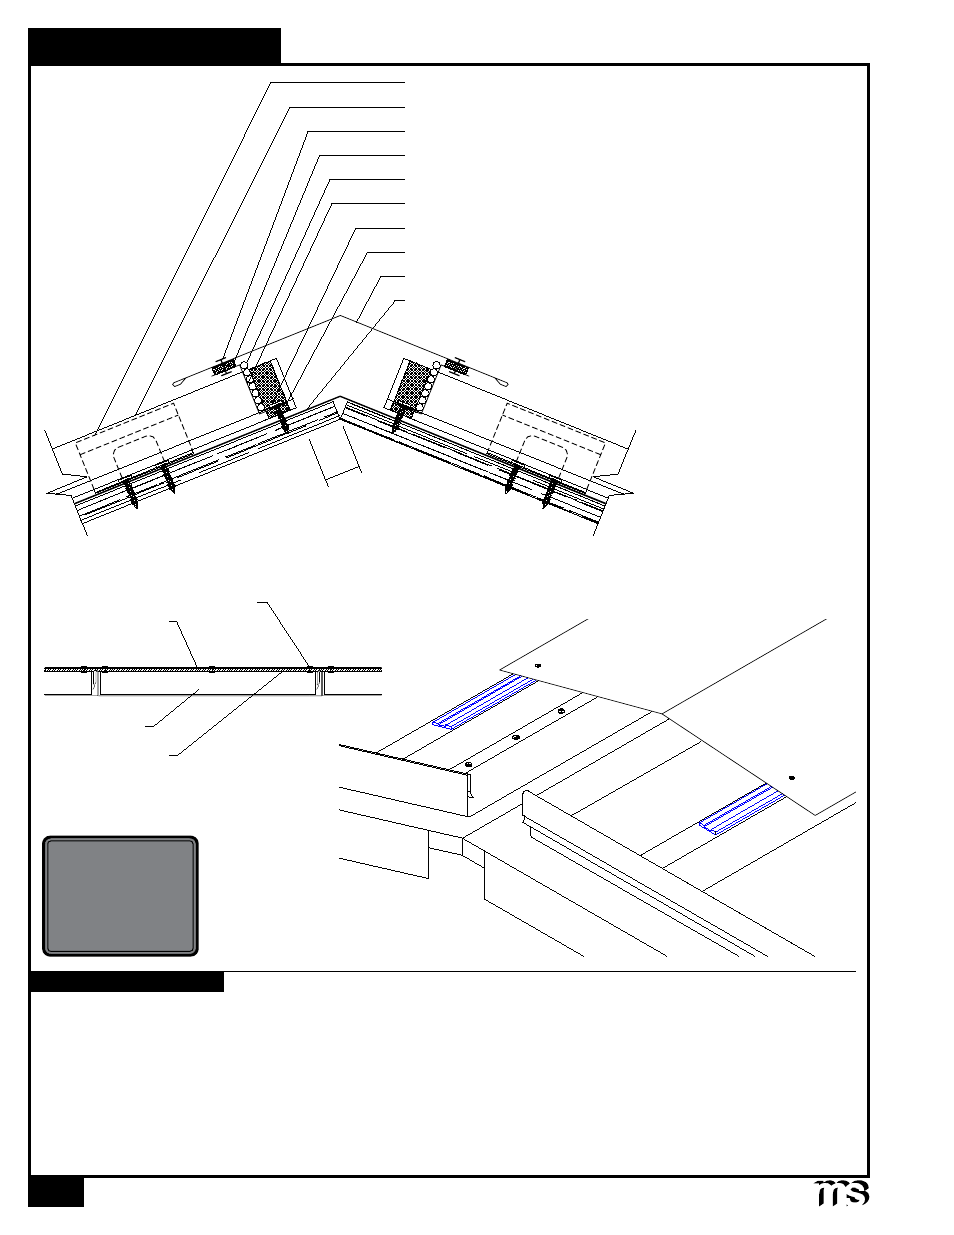
1. Once panels have been installed, field cut the Vertical Seam Z-Closure (see page 47) to fit between the panel ribs.
2. Place a row of Double Bead Tape Sealant across panel and over each panel rib approximately 2" from panel end. Before
proceeding make sure Z-Closure placement will accommodate 11" Ridge/Hip cover.
3. Install field cut Z-Closure (as shown on page 47).
4. Fasten Z-Closure through panel with #10-12 x 1" Pancake Head Woodscrews (4 per panel).
5. Apply a row of Double Bead Tape Sealant across top leg of Z-Closure filling any gaps or openings around panel ribs.
6. Position and install 11" Ridge/Hip Cover flashing to Z-Closure with
1
/
8
" x
3
/
16
" Pop Rivets (as shown).
7. If two or more flashings are required, lap the flashing over the previously installed flashing by a minimum of 2" placing a bead
of Tube Sealant between the flashings and securing with pop rivets 2
1
/
2
" o.c.
Double Bead Tape Sealant
1
/
8
"
x
3
/
16
" Pop Rivet (see below)
Vertical Seam Clip
Moisture Barrier (by others)
Vertical Seam Panel
Vertical Seam Z-Closure
#10-12 x 1" PHW (4 per panel)
Tube Sealant
11" Ridge/Hip Cover
Double Bead Tape Sealant
1
1
/
2
"
CAUTION
Additional screws
may be required for
high snow loading
and steep slopes.
INSTALLATION NOTES
Pop Rivet
Flashing
Z-Closure
Tape Sealant
1:12 Slope
Minimum
over Solid
Substrate