Caution, Tire bead positioning before inflation of pax tire – COATS 9024 E-PAX and 9024E PAX Adapter User Manual
Page 20
20 •
Important: Always read and follow the operating instructions.
537. Rotate the tire/rim about
180 degrees and stop and observe
the bead mounting; if OK, apply
more downward force to the rim.
538. Rotate the tire/rim another
90 degrees and stop, this gives the
bead time to relax and began to roll
into place. Rotate the tire/rim
about another 45 degrees and the
bead should snap into location.
539. Once the bead is in posi-
tion, twist the manual bead lock
device from the rim.
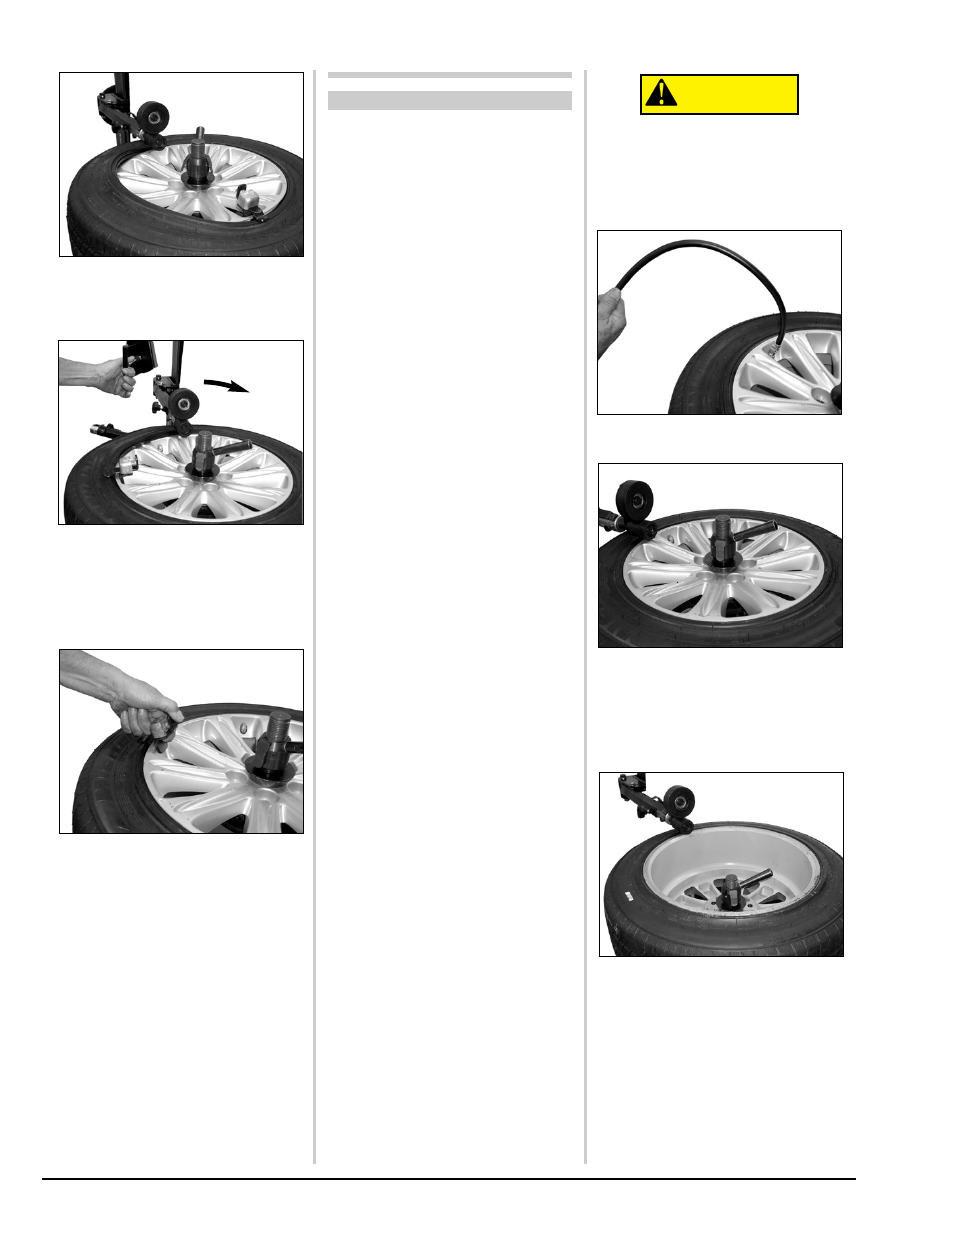
600. Tire Bead
Positioning Before
Inflation Of PAX Tire
Once the tire is completely
mounted, bead positioning is
very important to assure the
tire balance remains consis-
tent and does not reposition
after mounting on a vehicle.
601. Begin by introducing 10 PSI
of air pressure into the tire.
602. Bring the small roller down
to the edge of the rim and apply a
small amount of pressure. Rotate
the tire/wheel two complete revo-
lutions. This should position the tire
bead to be concentric with the rim.
603. Flip the tire over and repeat
the above (two complete revolu-
tions).
CAUTION
Slow
- 16 Bit PCB & Metal Arm Temporary (4 pages)
- 520 Wheel Lift (12 pages)
- 700 Decal Location (1 page)
- AirNut (12 pages)
- Application Chart, Balancing Solutions (12 pages)
- Autoflate Nitrogen (1 page)
- Balancer Adapter Wall Storage Board Kit (1 page)
- Balancer Adapter, 5 lug x 135mm Bolt Pattern (1 page)
- Balancer Adapter, 5 lug x 150mm Bolt Pattern (1 page)
- Balancer Adapter, 5 lug x 4.750 Bolt Pattern (1 page)
- Balancer Adapter, 5 lug x 5.5 Bolt Pattern (1 page)
- Balancer Adapter, 6 lug x 150mm Bolt Pattern (1 page)
- Balancer Adapter, 6 lug x 5.5 Bolt Pattern (1 page)
- Balancer Adapter, 8 lug x 170mm Bolt Pattern (1 page)
- Balancer Adapter, 8 lug x 180mm Bolt Pattern (1 page)
- Balancer Adapter, 8 lug x 6.5 Bolt Pattern (1 page)
- Conversion Instructions (1 page)
- Extended Balancer Stub Shaft (1 page)
- Fixed Finger Plates (2 pages)
- Hood Installation (1 page)
- Hood Installation Instruction (1 page)
- Hood Installation Sheet (1 page)
- Hood Installation Tip (1 page)
- Hubnut Removal (1 page)
- Side Accessory Tray (1 page)
- Kit 1.125-inch, Kit 40 mm, Light Truck Cone (1 page)
- Kit 1.125-inch, Kit 40 mm, XL Pressure Drum (1 page)
- Kit 8111177 Three Phase to Single Phase Conversion (1 page)
- Kit 8111864 Motorcycle Wheel Adapter (4 pages)
- Kit 8111935 Light Truck Back Cone Spacer (1 page)
- Kit 8112877 Touch Panel Replacement (2 pages)
- Kit 8113082 40mm Conversion Shaft (1 page)
- Kit 8113223 (1.125-inch), Kit 8113228 (40 mm), VW/Porsche Adapter (1 page)
- Kit 8113592, Wheel Lift Link (1 page)
- Kit 8113645 Radial Runout Sensor Adjustment Kit (2 pages)
- Kit 8113860 Splash Guard (1 page)
- Kit 8113881 Printer Serive (1 page)
- Kit 8113883 Printer Bracket Serive (1 page)
- Kit 8113887 XR 1800 Upgrade to XR 1850 (2 pages)
- Kit 8113893 Lateral Run Out Service (1 page)
- Kit 8113900 Monitor Replacement (1 page)
- Kit 8113932 16 Bit PCB & Metal Arm (1 page)
- Kit 8114025 PCB Assembly (1 page)
- Kit 8114105 PCB Assembly Kit (1 page)
- Kit 8114155 Serial Loader (4 pages)