On-wall mounting, 3 on-wall mounting, Figure 10 – Staub Electronics AN-100-SERIES ARAKNIS - 100-SERIES 8-PORT UNMANAGED GIGABIT SWITCH WITH REAR PORTS User Manual
Page 14: An-100-sw-r-8/16/24 wall mounting option
© 2013 Araknis Networks
®
14
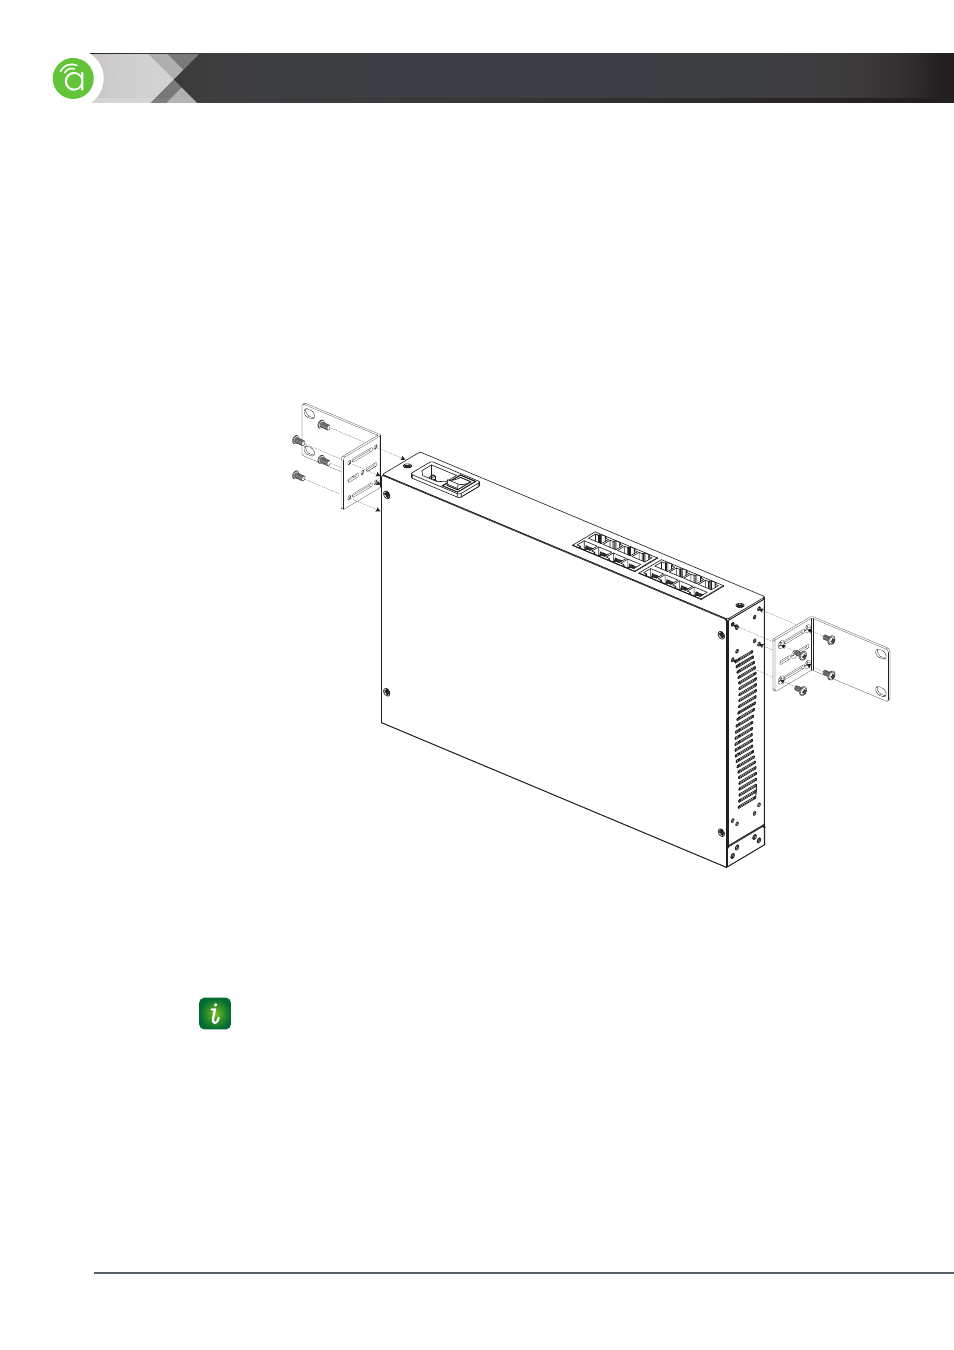
2.2.3.3 On-Wall Mounting
The AN-100-SW-R is designed to be mounted on-wall if desired by using the same parts
meant for rack-mounting. This allows for a low-profile installation for the switch, eliminating
the need for extra shelving or racks when providing a network switch solution. To wall-
mount the switch:
4. Locate the included wall-mounting ears and screws from the packaging and a #2
Philips screwdriver.
5. Attach the ears to each side of the switch as shown:
6. After attaching the ears, mount the switch on the wall in the desired location as shown
using drywall screws or fasteners suitable for the wall surface material (not included).
O N1
0 0-2
4 0VA
C
O FF5
0 -60
H z
1
3
5
7
9
1 1
1 3
1 5
2
4
6
8
1 0
1 2
1 4
1 6
Figure 10.
AN-100-SW-R-8/16/24 Wall Mounting Option
2
|
INSTALLATION
For wall mounting, we recommend using 4 drywall screws, minimum of 1-1/4” X 8 GA with
anchors
- SM-ADJPOLE-S STRONG - SMALL ADJUSTABLE EXTENSION POLE FOR STRONG - PROJECTOR MOUNTS (9-12) (2 pages)
- SM-ADP-M-400X400 STRONG - VESA ADAPTER PLATE (1 page)
- SM-ART1-M STRONG - ARTICULATING MOUNT FOR 22 - 40 FLAT PANEL TVS (2 pages)
- SM-ART1-S STRONG - ARTICULATING MOUNT FOR 13 - 27 FLAT PANEL TVS (1 page)
- SM-CEILING-CA-WH STRONG - CATHEDRAL CEILING ADAPTER FOR CEILING MOUNTS WITH 1-1_2 IN. NPT THREADING (1 page)
- SM-CEILING-CT-2X2-WH STRONG - 2X2 SUSPENDED CEILING TILE REPLACEMENT (2 pages)
- SM-CEILING-DT-L STRONG - LARGE DUAL CEILING MOUNT FOR 36-60 FLAT PANEL DISPLAYS (2 pages)
- SM-CEILING-DT-M STRONG - MEDIUM DUAL CEILING MOUNT FOR 22-40 FLAT PANEL DISPLAYS (2 pages)
- SM-CEILING-SCA-WH STRONG - SUSPENDED CEILING TILE ADAPTER PLATE (2 pages)
- SM-CEILING-TM STRONG - TRUSS MOUNT ADAPTER FOR CEILING MOUNTS (1 page)
- SM-CM-T-L STRONG - LARGE CEILING MOUNT FOR 36-60 FLAT PANEL TVS (2 pages)
- SM-CS-ART1-M STRONG - CONTRACTOR SERIES ARTICULATING MOUNT FOR 26 - 47 FLAT PANEL TVS (2 pages)
- SM-CS-ART2-L STRONG - CONTRACTOR SERIES ARTICULATING MOUNT FOR 42 - 63 FLAT PANEL TVS (2 pages)
- SM-CS-ART2-XL STRONG - CONTRACTOR SERIES ARTICULATING MOUNT FOR 47 - 90 FLAT PANEL TVS (8 pages)
- SM-F-L STRONG - LARGE FIXED MOUNT FOR 36-60 FLAT-PANEL TVS (2 pages)
- SM-FLAT-M STRONG - MEDIUM LOW PROFILE FLAT MOUNT FOR 22-40 DISPLAYS (2 pages)
- SM-FLAT-S STRONG - SMALL LOW PROFILE FLAT MOUNT FOR 13-26 DISPLAYS (2 pages)
- SM-LP-F-M STRONG - LOW-PROFILE FIXED MOUNT FOR 23-37 FLAT PANEL TVS (1 page)
- SM-PROJ-COUPLERS STRONG - 1 1_2 NPT COUPLERS FOR SM-PROJ-M-BLK (3 pages)
- SM-RAZOR-F-L STRONG - LARGE RAZOR FIXED MOUNT FOR 37-55 IN. FLAT PANEL TVS (8 pages)
- SM-RAZOR-L STRONG - LARGE FIXED ZERO CLEARANCE MOUNT FOR 37-63 (2 pages)
- SM-RAZOR-T-L STRONG - LARGE RAZOR TILT MOUNT FOR 37-60 IN. FLAT-PANEL TVS (12 pages)
- SM-SWIVEL-M STRONG - SWIVEL MOUNT FOR 22-40 FLAT PANEL TVS (2 pages)
- SR-CS-RACK-16U STRONG - CONTRACTOR SERIES 16U WITH SIDE PANELS AND FINES FLOOR CASTERS (2 pages)
- EP-400-UPS-8HTR-2200 EPISODE - SURGE RACK MOUNT, 20AMP 8-OUTLET 2U UPS AVR (2 pages)
- WB-100-VPS WATTBOX - VERTICAL MOUNT POWER STRIP (2 pages)
- ZVPRO820 ZEEVEE - DUAL CHANNEL DIGITAL VIA UNENCRYPTED HDMI (8 pages)
- ZVPRO620 ZEEVEE - DUAL CHANNEL ANALOG HD DISTRIBUTION OVER COAX (8 pages)
- HD-2CAT-1080P-130 BINARY - CAT5 HDMI EXTENDER (8 pages)
- B-500-RX-230-IR BINARY - HD BASE T RECEIVER WITH BI-DIRECTIONAL IR FOR B-500 HDBASET MATRIX SWITCHERS (12 pages)
- B-300-HDMATRIX-RCVR BINARY - HDMI SINGLE CAT5E_6 RECEIVER FOR B-300 MATRIX (8 pages)
- B-220-HDSWTCH-5X1 BINARY - HDMI 5X1 SWITCHER (2 pages)
- B-220-HDSWTCH-3X1 BINARY - HDMI 3X1 SWITCHER (2 pages)
- B-220-HDSPLTR-1X8 BINARY - 1X8 HDMI SPLITTER SUPPORTS 3D AND DEEP COLOR (2 pages)
- B-220-HDSPLTR-1X4 BINARY - 1X4 HDMI SPLITTER SUPPORTS 3D AND DEEP COLOR (2 pages)
- B-220-HDSPLTR-1X2 BINARY - 1X2 HDMI SPLITTER SUPPORTS 3D AND DEEP COLOR (2 pages)
- B-100-HDMATRIX-8X8 BINARY - HDMI 8X8 MATRIX SWITCH WITH HDMI OUTPUTS (21 pages)
- B-500-MTRX-230-16X16 BINARY - HDMI 16X16 MATRIX SWITCH WITH HDMI AND HDBASET OUTPUTS (32 pages)
- B-500-MTRX-230-8X8 BINARY - HDMI 8X8 MATRIX SWITCH WITH HDMI AND HDBASET OUTPUTS (28 pages)
- DF-SL-100-AW DRAGONFLY - 100 IN. ACOUSTIWEAVE FILM SCREEN W_BLACK VELVET FRAME (16:9) (2 pages)
- DF-SL-100-HC DRAGONFLY - 100 IN. HIGH CONTRAST FILM SCREEN W_BLACK VELVET FRAME (HDTV) (2 pages)
- EE-IR-RCVR-TABLE EPISODE - ELECTRONICS TABLETOP PLASMA_LED-PROOF IR SENSOR WITH LED FEEDBACK (6 pages)
- WPS-300-DVR-9CH WIREPATH - 9 CHANNEL DVR WITH 500GB HDD (115 pages)
- WPS-100-DVR-8CH WIREPATH - 8 CHANNEL DVR W_500GB HDD (115 pages)
- WPS-100-DVR-4CH WIREPATH - 4 CHANNEL DVR W_500GB HDD (84 pages)