An-100-sw-r-5 placement options, Shelf mounting, On-wall mounting – Staub Electronics AN-100-SERIES ARAKNIS - 100-SERIES 8-PORT UNMANAGED GIGABIT SWITCH WITH REAR PORTS User Manual
Page 11: 1 shelf mounting, 2 an-100-sw-r-5 placement options, 2 on-wall mounting, Figure 6, An-100-sw-r-5 on-wall mounting, Figure 5, An-100-sw-r-5 rubber foot installation
11
www.araknisnetworks.com
|
Support: 866.838.5052
2.2.2 —
AN-100-SW-R-5
Placement Options
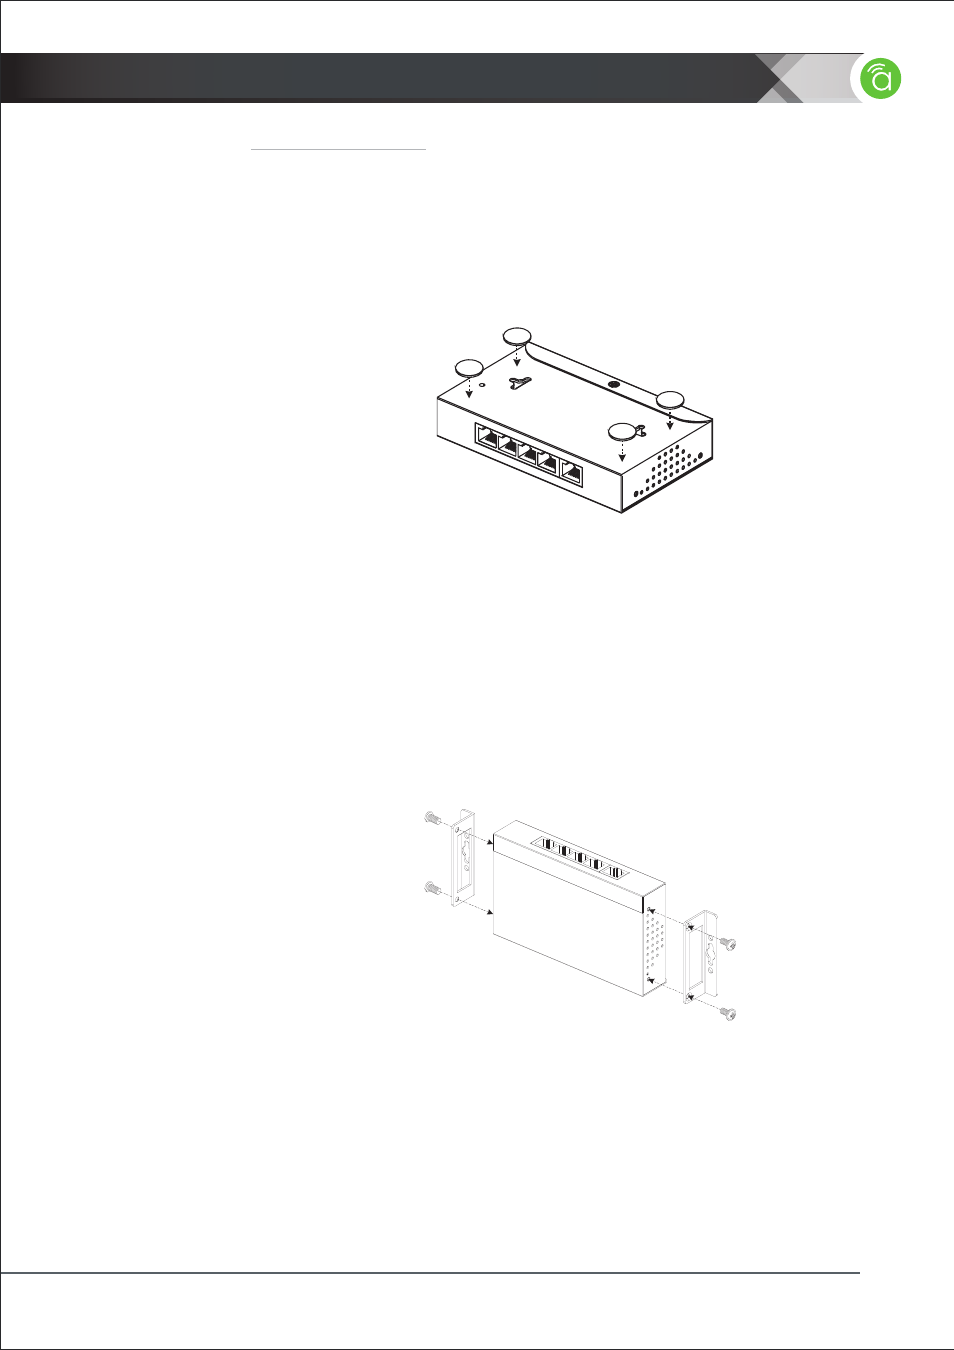
2.2.2.1 Shelf Mounting
To shelf-mount the network switch, first place the included adhesive feet on the bottom
of the unit as shown below. Then, place the switch in the desired position. Make sure
the shelf or surface used is flat and stable.
2.2.2.2 On-Wall Mounting
The switch may be mounted on a wall or any other surface by using the included
mounting ears. This allows for a low-profile installation for the switch, eliminating the
need for extra shelving or racks when providing a network switch solution. To wall-
mount the switch:
1. Locate the included wall-mounting ears and screws from the packaging and a
#2 Philips screwdriver.
2. Attach the ears to each side of the switch as shown:
3. After attaching the ears, mount the switch on the wall in the desired location as shown
using screws or fasteners (not included) rated for use in the surface material, and
capable of supporting the weight of the switch.
Figure 5.
AN-100-SW-R-5 Rubber Foot Installation
Figure 6.
AN-100-SW-R-5 On-Wall Mounting
2
|
INSTALLATION
- SM-ADJPOLE-S STRONG - SMALL ADJUSTABLE EXTENSION POLE FOR STRONG - PROJECTOR MOUNTS (9-12) (2 pages)
- SM-ADP-M-400X400 STRONG - VESA ADAPTER PLATE (1 page)
- SM-ART1-M STRONG - ARTICULATING MOUNT FOR 22 - 40 FLAT PANEL TVS (2 pages)
- SM-ART1-S STRONG - ARTICULATING MOUNT FOR 13 - 27 FLAT PANEL TVS (1 page)
- SM-CEILING-CA-WH STRONG - CATHEDRAL CEILING ADAPTER FOR CEILING MOUNTS WITH 1-1_2 IN. NPT THREADING (1 page)
- SM-CEILING-CT-2X2-WH STRONG - 2X2 SUSPENDED CEILING TILE REPLACEMENT (2 pages)
- SM-CEILING-DT-L STRONG - LARGE DUAL CEILING MOUNT FOR 36-60 FLAT PANEL DISPLAYS (2 pages)
- SM-CEILING-DT-M STRONG - MEDIUM DUAL CEILING MOUNT FOR 22-40 FLAT PANEL DISPLAYS (2 pages)
- SM-CEILING-SCA-WH STRONG - SUSPENDED CEILING TILE ADAPTER PLATE (2 pages)
- SM-CEILING-TM STRONG - TRUSS MOUNT ADAPTER FOR CEILING MOUNTS (1 page)
- SM-CM-T-L STRONG - LARGE CEILING MOUNT FOR 36-60 FLAT PANEL TVS (2 pages)
- SM-CS-ART1-M STRONG - CONTRACTOR SERIES ARTICULATING MOUNT FOR 26 - 47 FLAT PANEL TVS (2 pages)
- SM-CS-ART2-L STRONG - CONTRACTOR SERIES ARTICULATING MOUNT FOR 42 - 63 FLAT PANEL TVS (2 pages)
- SM-CS-ART2-XL STRONG - CONTRACTOR SERIES ARTICULATING MOUNT FOR 47 - 90 FLAT PANEL TVS (8 pages)
- SM-F-L STRONG - LARGE FIXED MOUNT FOR 36-60 FLAT-PANEL TVS (2 pages)
- SM-FLAT-M STRONG - MEDIUM LOW PROFILE FLAT MOUNT FOR 22-40 DISPLAYS (2 pages)
- SM-FLAT-S STRONG - SMALL LOW PROFILE FLAT MOUNT FOR 13-26 DISPLAYS (2 pages)
- SM-LP-F-M STRONG - LOW-PROFILE FIXED MOUNT FOR 23-37 FLAT PANEL TVS (1 page)
- SM-PROJ-COUPLERS STRONG - 1 1_2 NPT COUPLERS FOR SM-PROJ-M-BLK (3 pages)
- SM-RAZOR-F-L STRONG - LARGE RAZOR FIXED MOUNT FOR 37-55 IN. FLAT PANEL TVS (8 pages)
- SM-RAZOR-L STRONG - LARGE FIXED ZERO CLEARANCE MOUNT FOR 37-63 (2 pages)
- SM-RAZOR-T-L STRONG - LARGE RAZOR TILT MOUNT FOR 37-60 IN. FLAT-PANEL TVS (12 pages)
- SM-SWIVEL-M STRONG - SWIVEL MOUNT FOR 22-40 FLAT PANEL TVS (2 pages)
- SR-CS-RACK-16U STRONG - CONTRACTOR SERIES 16U WITH SIDE PANELS AND FINES FLOOR CASTERS (2 pages)
- EP-400-UPS-8HTR-2200 EPISODE - SURGE RACK MOUNT, 20AMP 8-OUTLET 2U UPS AVR (2 pages)
- WB-100-VPS WATTBOX - VERTICAL MOUNT POWER STRIP (2 pages)
- ZVPRO820 ZEEVEE - DUAL CHANNEL DIGITAL VIA UNENCRYPTED HDMI (8 pages)
- ZVPRO620 ZEEVEE - DUAL CHANNEL ANALOG HD DISTRIBUTION OVER COAX (8 pages)
- HD-2CAT-1080P-130 BINARY - CAT5 HDMI EXTENDER (8 pages)
- B-500-RX-230-IR BINARY - HD BASE T RECEIVER WITH BI-DIRECTIONAL IR FOR B-500 HDBASET MATRIX SWITCHERS (12 pages)
- B-300-HDMATRIX-RCVR BINARY - HDMI SINGLE CAT5E_6 RECEIVER FOR B-300 MATRIX (8 pages)
- B-220-HDSWTCH-5X1 BINARY - HDMI 5X1 SWITCHER (2 pages)
- B-220-HDSWTCH-3X1 BINARY - HDMI 3X1 SWITCHER (2 pages)
- B-220-HDSPLTR-1X8 BINARY - 1X8 HDMI SPLITTER SUPPORTS 3D AND DEEP COLOR (2 pages)
- B-220-HDSPLTR-1X4 BINARY - 1X4 HDMI SPLITTER SUPPORTS 3D AND DEEP COLOR (2 pages)
- B-220-HDSPLTR-1X2 BINARY - 1X2 HDMI SPLITTER SUPPORTS 3D AND DEEP COLOR (2 pages)
- B-100-HDMATRIX-8X8 BINARY - HDMI 8X8 MATRIX SWITCH WITH HDMI OUTPUTS (21 pages)
- B-500-MTRX-230-16X16 BINARY - HDMI 16X16 MATRIX SWITCH WITH HDMI AND HDBASET OUTPUTS (32 pages)
- B-500-MTRX-230-8X8 BINARY - HDMI 8X8 MATRIX SWITCH WITH HDMI AND HDBASET OUTPUTS (28 pages)
- DF-SL-100-AW DRAGONFLY - 100 IN. ACOUSTIWEAVE FILM SCREEN W_BLACK VELVET FRAME (16:9) (2 pages)
- DF-SL-100-HC DRAGONFLY - 100 IN. HIGH CONTRAST FILM SCREEN W_BLACK VELVET FRAME (HDTV) (2 pages)
- EE-IR-RCVR-TABLE EPISODE - ELECTRONICS TABLETOP PLASMA_LED-PROOF IR SENSOR WITH LED FEEDBACK (6 pages)
- WPS-300-DVR-9CH WIREPATH - 9 CHANNEL DVR WITH 500GB HDD (115 pages)
- WPS-100-DVR-8CH WIREPATH - 8 CHANNEL DVR W_500GB HDD (115 pages)
- WPS-100-DVR-4CH WIREPATH - 4 CHANNEL DVR W_500GB HDD (84 pages)