Hyundai elantra touring 2009 - on, Step 4: closing the end support covers, Fig 4a. fig 4c – Draw-Tite 59800 ROOF RACK User Manual
Page 2: Issue a
STEP 2: Mounting the End Supports onto the roof
STEP 5: Using the Roof Racks
A.
B.
Intermittently check that all Screws and Bolts are sufficiently tightened
whilst the Roof Racks are in use.
Refer to ‘Care for your Racks’ to maintain your Roof Racks.
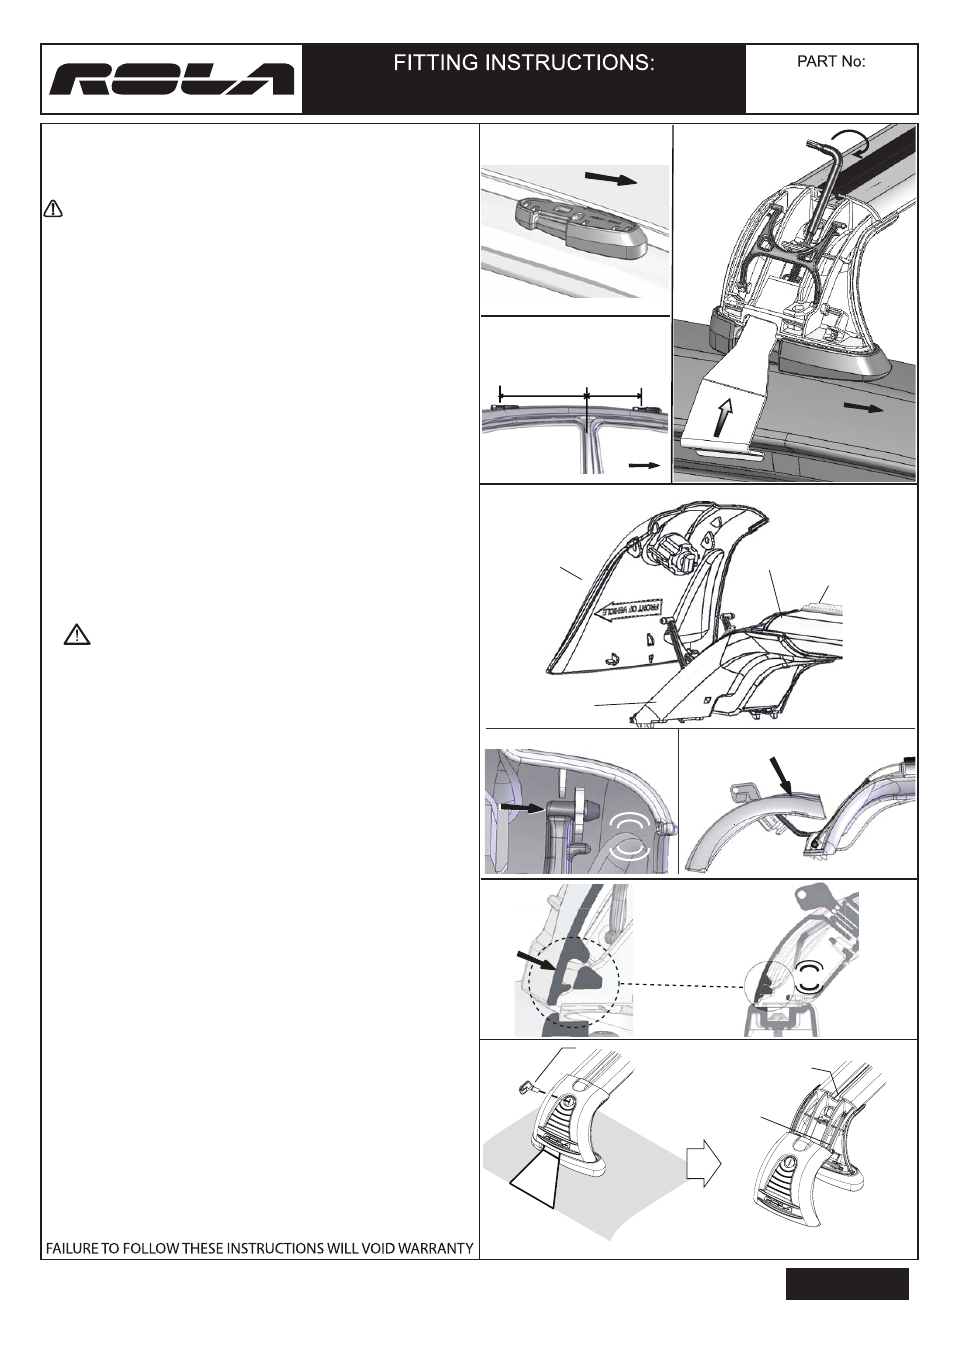
To load accessories into the Channel of the Cross Bars, unlock the
End Support Cover (Fig. 7a). Pull the Cover out and down to fully
access the Channel. Once accessories have been loaded, replace
the End Support Cover and lock.
Fig. 7a
Key
Fig 6a.
Fig 6b.
CLICK
Fig. 7b
A.
B. Store security key in it’s storage location in the End Support (Fig. 7b)
C.
D.
Using the Security Key, tighten the 50mm Bolts to approx. 7Nm of
torque or a firm hand-tightness.
Close the End Support Covers by flipping the cover down and
pushing hard up against the End Support (Fig 6a). You should hear
an audible “click” when the cover has engaged with the End Support.
Lock the covers into place using the Key provided. Remove Keys
and store in a safe place.
A.
The Pads all have a vehicle roof position identification initial on the top
inside surface of the pad. (FR, FL, RR, RL)
Place the pads as shown in Figs 4a & 4b.
With one strap mated around the door return, flex out the second
strap out and around the other door-return ensuring the protective
rubber on the inside of the strap doesn’t peel back.
C.
Using the security key supplied, tighten the bolt to pull the strap upwards
against the vehicle’s door return.
Whilst tensioning the straps, alternating from left to right straps to ensure
an even tention on both sides (Fig 4c.) of the crossbar is attained.
Tighten the bolts to a firm hand tightness (approx 5 Nm).
Ensure Mount Pads correspond with mount positions on the vehicle.
FR = Front Right; FL = Front Left
RR = Rear Right; RL = Rear Left.
B.
D.
Fig 4c.
59800
End Support
Cross Bar
Buffer Strip
End Support
Cover
Fig. 5a
Fig. 5b
Fig. 5c
STEP 3: Fitting End Support Covers to the End Supports
Ensure the Lock Barrels have been inserted into the End Support
Covers before assembly.
A.
B.
C.
Locate the ends of the hinge with the cover mount holes.
Flex the hinge ends together and line themup up with the cover
mount holes.
Push the ends through the holes until capped heads of the hinge
have entirely pushed through (Fig 5a).
Be very careful with flexing hinges so as not to break them
Ensure hinge has been mounted correctly by pushing the ends of
the hinge through the holes in the end support cover until you hear
an audible “click” (Fig 5b).
Fully extend the End Support cover away from the End Support.
Pivot the end support cover on the hinge whilst pushing the top of
the end support cover downwards until the end support cover is
held fixed in place (Fig 5c).
CLICK
Note: You will have to remove or trim
the Buffer Strip to mount accessories
Access to
channel
Key Storage location
STEP 4: Closing the End Support Covers
Front of vehicle
Rear Right End Support Shown.
Front of vehicle
Fig 3b.
7 1/2”
190mm
26 3/4”
690mm
‘B
’ PILLAR
Fig 4b.
Front
Front Right Pad Shown.
Fig 4a.
Fig 4c.
HYUNDAI ELANTRA TOURING
2009 - on
Issue A
03/05/09
59800N
Sheet 1 of 2
www.rolaproducts.com
Cequent Performance Products - Plymouth, MI
Technical Service: (888)521-0510
PRINTED IN AUSTRALIA
Printed in XXXXX