Strainer – ClimaCool IOM AR2 SERIES User Manual
Page 20
18
www.climacoolcorp.com
®
BOLTED LID MODELS: ClimaCool Strainer models CS-4B,
CS-6, CS-8, and CS-10 have “bolted” lid designs . Grade 5 zinc-
plated bolts, nuts, and washers are used to attach the lids to these
strainers . See Table 1 for the proper lid bolt size and torque rating
for each strainer . (Exercise care when tightening the lid bolts so
as not to damage the strainer lid or housing) .
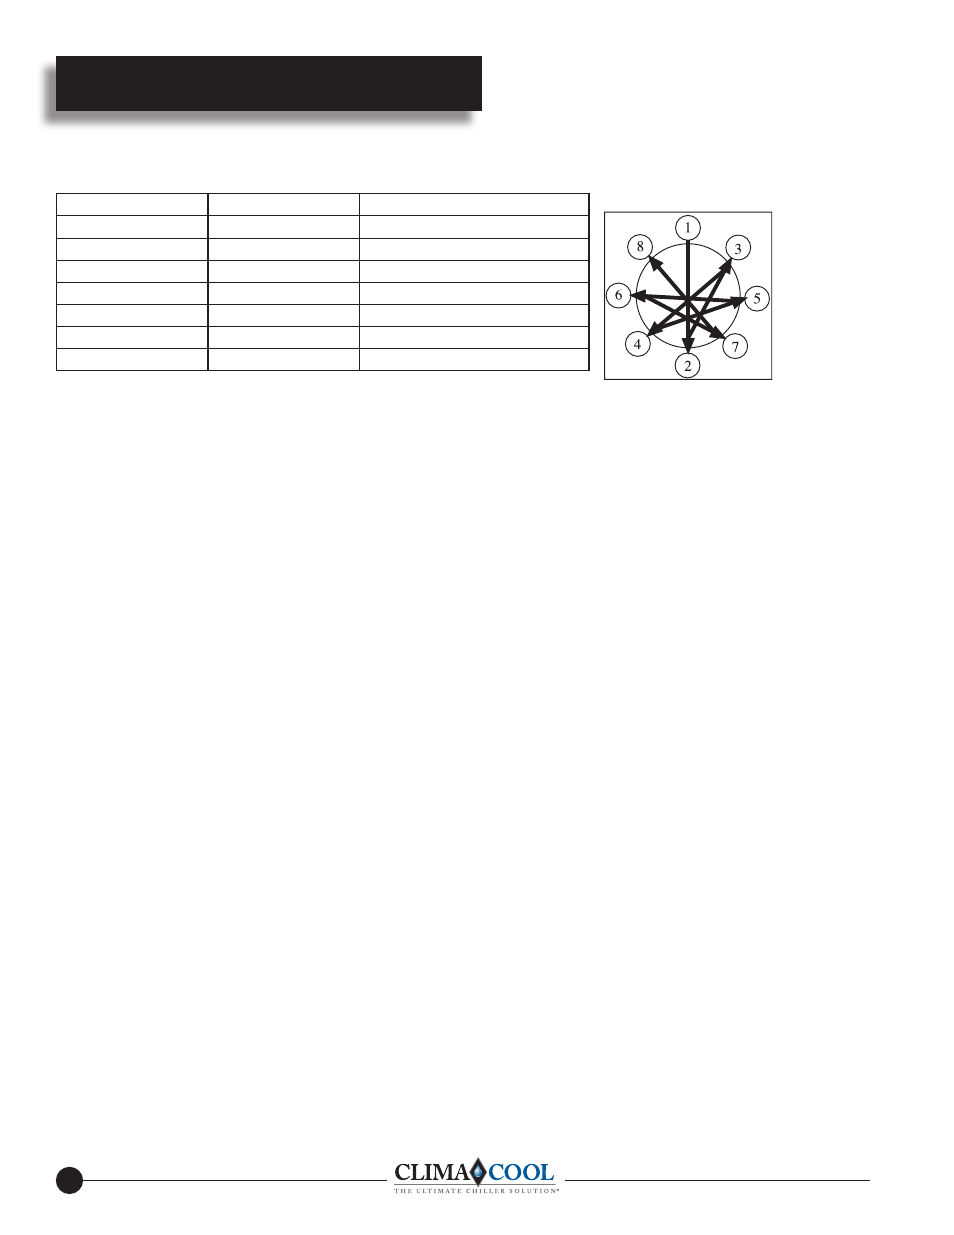
It is important to follow the torque specifications as
overtightening may result in premature failure of the bolts . It
is equally important to follow a star wheel torque pattern when
tightening the lid bolts (see Fig . 2) . The strainer lid may not be
seated down completely after the first torque sequence (this is
especially evident on the larger strainers such as the CS-8 and
larger) . A second torque sequence should be adequate to seat the
lid securely to the body .
Strainer Operation
Periodically, it will be necessary to flush out the debris that is
collected and settles to the bottom of the strainer reservoir . The
larger ClimaCool strainers (CS-4, CS-6, CS-8, and CS-10) are
equipped with a flush port (or drainage port) extending inside the
strainer . When it becomes time to clean the strainer, the flush port
valve should be opened while the strainer is in operation (while
pressurized and with water flowing) . A thorough flushing of the
strainer reservoir will depend upon the length of time the flush
valve remains opened . This flush time will typically range from
15 to 60 seconds depending on the flow, inlet water pressure,
and the amount of debris collected by the strainer . As a general
rule, the larger strainers will require higher inlet water pressures
in order to achieve a complete flushing . For example, the CS-4
model can be flushed with inlet water pressures as low as 15 PSI,
while the CS-6 can be flushed with 30 PSI . The CS-8 and CS-10
models should be flushed with inlet water pressures greater than
40 PSI . Strainer
Note: When shutting down the chiller for extended periods of
time, the strainer should be isolated and completely drained .
Strainer Element Cleaning
If your strainer assembly is equipped with optional pressure
gauges, you will be able to monitor the pressure differential
between the inlet and outlet sides of the strainer . Under a normal
“clean” strainer operation this pressure difference should be
slightly under 1 PSI . When this pressure differential reaches 5-10
PSI, the strainer element may require cleaning .
CAUTION: PRIOR TO DISMANTLING THE STRAINER
FOR CLEANING, IT IS IMPERATIVE THAT THE STRAINER
ASSEMBLY IS ISOLATED AND COMPLETELY DE-
PRESSURIZED . Follow these steps when cleaning the
ClimaCool Strainer element:
Step 1 (Bolted Lid Models): Remove the top of the ClimaCool
Strainer by removing the Grade 5 Zinc plated bolts from the lid .
Step 1 (Band-Clamp Lid Models): Remove the top of the
ClimaCool Strainer by taking off the band-clamp assembly .*
Step 2: Lift the strainer element (conical screen) out of the
strainer body .
Step 3: Carefully scrub down the strainer element with a rigid
nylon brush until all matter is loosened . DO NOT USE STEEL
BRUSH
Step 4: Wash the strainer element off with clean water . It is
preferable to use a hose with a significant amount of water
pressure . DO NOT USE A PRESSURE WASHER .
Strainer
STRAINER
BOLT SIZE
RECOMMENDED TORQUE
CS-2 (Clamp)
5/16 - 18
40 - 50 in . lbs .
CS-3 (Clamp)
5/16 - 18
60 - 80 in . lbs .
CS-4C (Clamp)
5/16 - 18
75 - 85 in . lbs .
CS-4B
3/8 -16
15 - 25 ft . lbs .
CS-6
1/2 - 13
45 - 55 ft . lbs .
CS-8
1/2 - 13
45 - 55 ft . lbs .
CS-10
5/8 - 11
80 - 100 ft . lbs .
Fig . 2 - Recommended
Torquing Sequence
Table 1