Installation, Switching on the appliance, Selecting the temperature – Neff K3990X7 User Manual
Page 26: Installation location, Installing and connecting the appliance, Electrical connection, Observe ambient temć perature and ventilation, Appliances with control panel
26
Installation
Installation location
Install the appliance in a dry, well ventiĆ
lated room. If installation near a heat
source is unavoidable, use a suitable
insulating plate or observe the following
minimum distances to a heat source:
Observe the following minimum
distances to heat sources:
- 3 cm to an electric cooker.
- from an oil or solidĆfuel cooker
30 cm.
The floor on which the appliance is
to be installed must be rigid. If required,
reinforce the floor.
The appliance is very heavy, for empty
weight see the following table.
Basic model
104 kg
Model with dispenser
113 kg
Model with home bar
115 kg
To ensure that the ice maker functions
correctly, the appliance must be upĆ
right. Align the appliance with a spirit
level. To ensure that the doors can open
all the way, observe lateral minimum
distances when installing the appliance
in a corner or recess (see section on
"Appliance dimensions").
Installing and connecting
the appliance
Have a technician install the
appliance and connect it to the
water supply according to the
enclosed installation instructions.
After installing the appliance, wait at
least ½ hour before switching on the
appliance. During transportation the
oil in the compressor may have flowed
into the refrigeration system.
Before switching on the appliance
for the first time, clean the interior of
the appliance (see Cleaning the
appliance").
Electrical connection
Do not use an extension lead or
a multiĆplug socket. A permanently
installed socket is required to connect
this appliance.
The plug to secure the appliance must
be freely accessible. Connect the
appliance to a 220-240 V/50 Hz
ac current via a plug which has been
properly installed. The plug must be
fitted with a 10 A fuse or higher.
If the appliance is to be operated in
a nonĆEuropean country, check on
the rating plate whether the indicaĆ
ted voltage and current type corresĆ
pond to the values of your mains
supply. The rating plate is situated
in the bottom leftĆhand side of the
appliance. Any necessary exchanĆ
ging of the mains lead should carĆ
ried out by a specialist electrician.
!
Warning!
Never connect the appliance
to electronic energy saver plugs
(e.g. Ecoboy: Sava Plug) or to
power inverters which convert the
direct current to 230 V alternating
current (e.g. solar equipment, power
supplies on ships).
Observe ambient temĆ
perature and ventilation
The atmosphere grade is written on the
identification plate. It states the room
temperature within which the appliance
can be operated.
Atmosphere grade
Permitted ambient
temperature
SN
+10
°C to 32 °C
N
+16
°C to 32 °C
ST
+18
°C to 38 °C
T
+18
°C to 43 °C
Ventilation
Never cover the ventilation openings
in the base panel. Otherwise, the
refrigerating unit must work harder and
the power consumption is increased.
Switching on
the appliance
S Insert the mains plug into a socket.
The appliance begins to cool down
as soon as it is connected to the power
supply. When the doors are open,
the interior lights come on.
Note:
The preset temperatures (factory
settings) are reached after approx.
2 to 3 hours. Do not put any food
in the appliance beforehand.
To change the set temperatures
ć> see Setting the temperature".
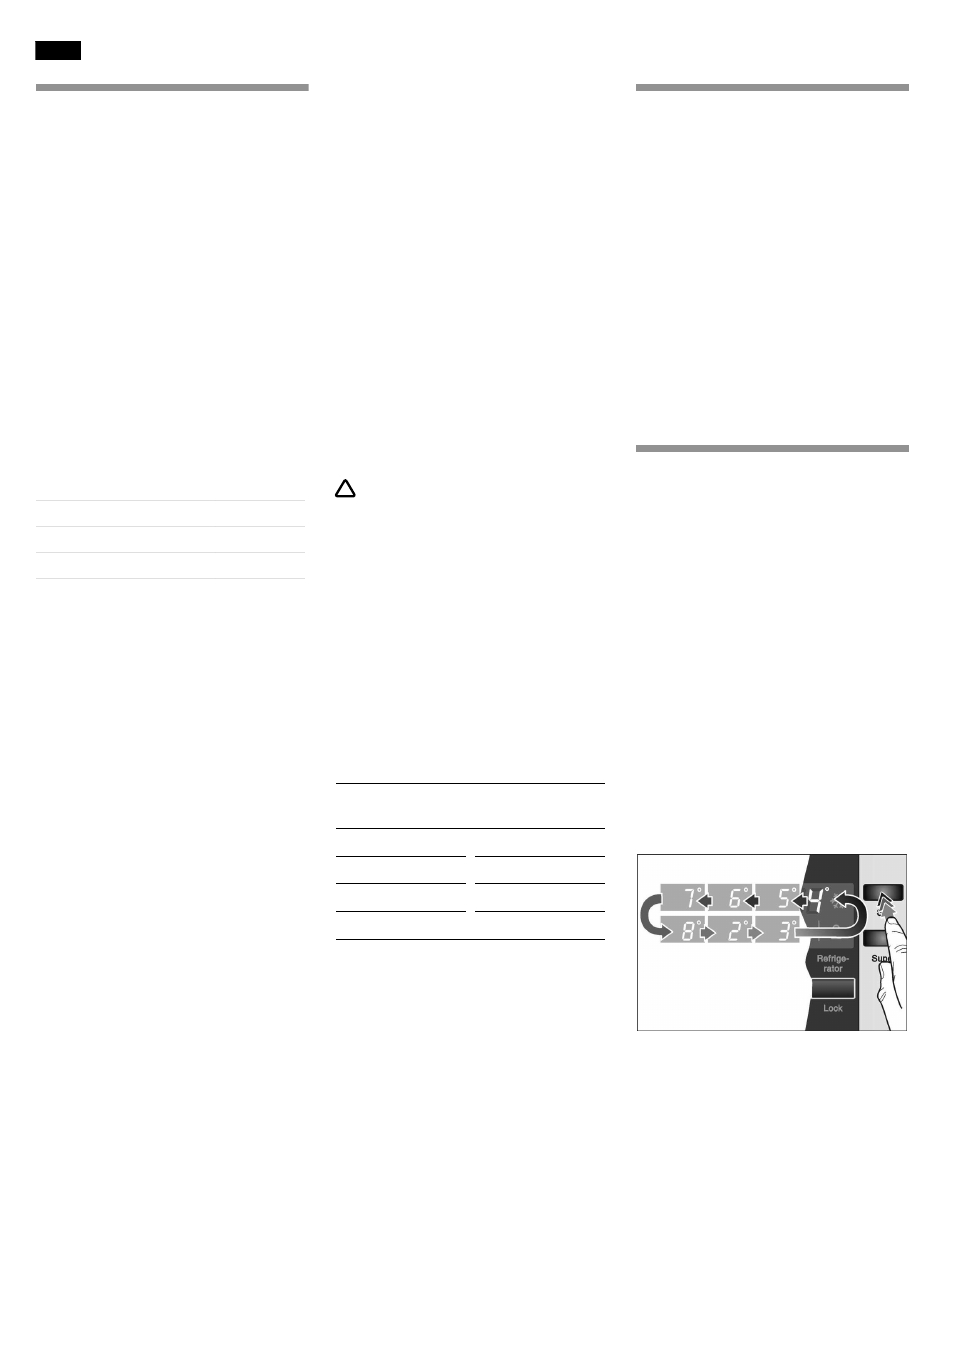
Selecting the
temperature
Appliances with control
panel
- The temperature for the refrigerator
and freezer compartments can be
adjusted separately. The set value
is indicated on the display panel.
- The factory setting for the refrigerator
compartment is 4 °C.
- The factory setting for the freezer
compartment is ć19 °C.
To change the values:
S Keep pressing the Selection button
until the required temperature value
is indicated.
The value last indicated is saved by the
system.
en