Series 98 operation & maintenance, 1 operation – da hydraulic override, Caution – Bray 98 Series User Manual
Page 29: 2 disassembly of hydraulic cylinder, 3 servicing hydraulic cylinder
All information herein is proprietary and confidential and may not be copied or reproduced without the expressed written consent of
BRAY INTERNATIONAL, Inc. The technical data herein is for general information only. Product suitability should be based solely upon customer’s
detailed knowledge and experience with their application.
S98 O & M : 29
Series 98 Operation & Maintenance
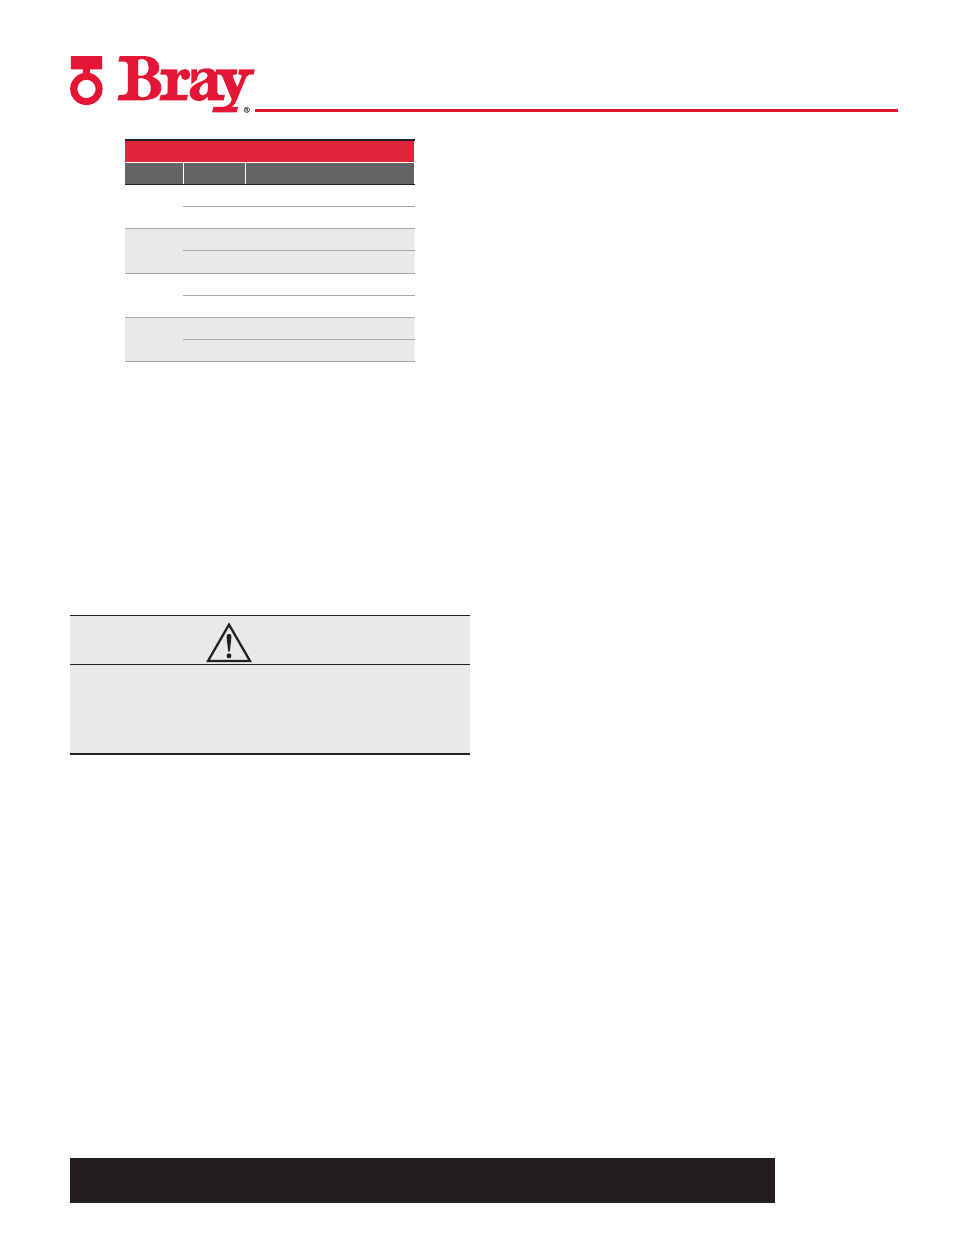
MOP for DA Hydraulic Overrides
Model
MOP
73 E2
psi
1930
bar
133
14 E3
psi
1970
bar
136
24 E3
psi
2080
bar
143
45 E3
psi
1965
bar
135
15.2.1 Operation – DA Hydraulic Override
1. For Manual Override operation, turn the 3-way valves on the
pressure module to vent the cylinder ports to atmosphere
and Close the hydraulic bypass valve, (HBV). Turn the lever
on the direction control valve on the hand pump unit to
select the direction of the actuator rotation and stroke the
hydraulic pump.
2. To restore Automatic operation, turn the direction control
valve to center position, the HBV to Open position and
switch the vent valves to connect the cylinder ports to the
air supply lines.
CAUTION
Over thrust by the hydraulic override may cause actuator
damage. Prevent unsafe conditions and damage by adjusting
the overload valve on the pump to limit the hydraulic pressure
as per the MOP tables.
15.3 Maintenance of Hydraulic Override
15.3.1 Spring Return Hydraulic Override Cylinder
Leakage of hydraulic fluid past the piston seal can be a cause for
failure to hold the position when operating the override. Leakage
can be confirmed if oil can be seen dripping out of the weep hole
on the cylinder. To correct this problem the cylinder must be
taken off the spring module.
15.3.2 Disassembly of Hydraulic Cylinder
1. Disconnect the air pressure and the electrical power from
the actuator and ensure the actuator turns to the fail safe
position.
2. Disconnect the hydraulic tubing from the override cylinder
port.
3. Remove the nuts and spring washers from the studs (10)
holding the cylinder flange on the Spring Module end.
4. Pull the cylinder out of the Spring Module and inspect for
leakage from the weep hole near the guide nut at the rod
end. Proceed to replace seals if leakage is confirmed or as
part of preventive maintenance.
5. Secure the cylinder, loosen and remove the rod end guide nut.
6. Pull the piston assembly out of the cylinder.
15.3.3 Servicing Hydraulic Cylinder
1. Remove the old seal from the piston and replace it with a new
U-cup seal. Install the face of the seal on the hydraulic pressure
side.
2. Replace the wear ring on the piston with a new one. Lubricate
the seal and the wear ring with hydraulic fluid and carefully
slide the piston into the cylinder.
3. Replace the o-ring and guide on the rod side nut and install
the nut.
4. Reassemble the cylinder on the Spring module, connect the
tubing and vent out the air from the line, as described in the
Installation Section.
5. Operate the hydraulic override to test for correct operation.
15.4 DA Override Cylinder
15.4.1 Disassembly of Hydraulic Cylinder
1. Operate the actuator so that the hydraulic cylinder piston is
at the cap end side.
2. Shift the direction control valve on the hand pump unit to
mid position, disconnect the air pressure and the electrical
power from actuator and ensure it stays in this position.
3. Disconnect the hydraulic tubing from the cylinder ports.
4. Remove the tie rod nuts off the hydraulic cylinder and pull
the end cap off the barrel.
5. With a socket spanner located on the hex head of the
hydraulic cylinder’s piston, loosen and disengage the piston
rod from the Guide Block in the Torque Module.
6. Remove the fasteners holding the hydraulic cylinder’s flange
on the Torque Module end.
7. Take the cylinder assembly off the Torque Module.