Eave detail gable detail valley detail – ATAS CastleTop User Manual
Page 2
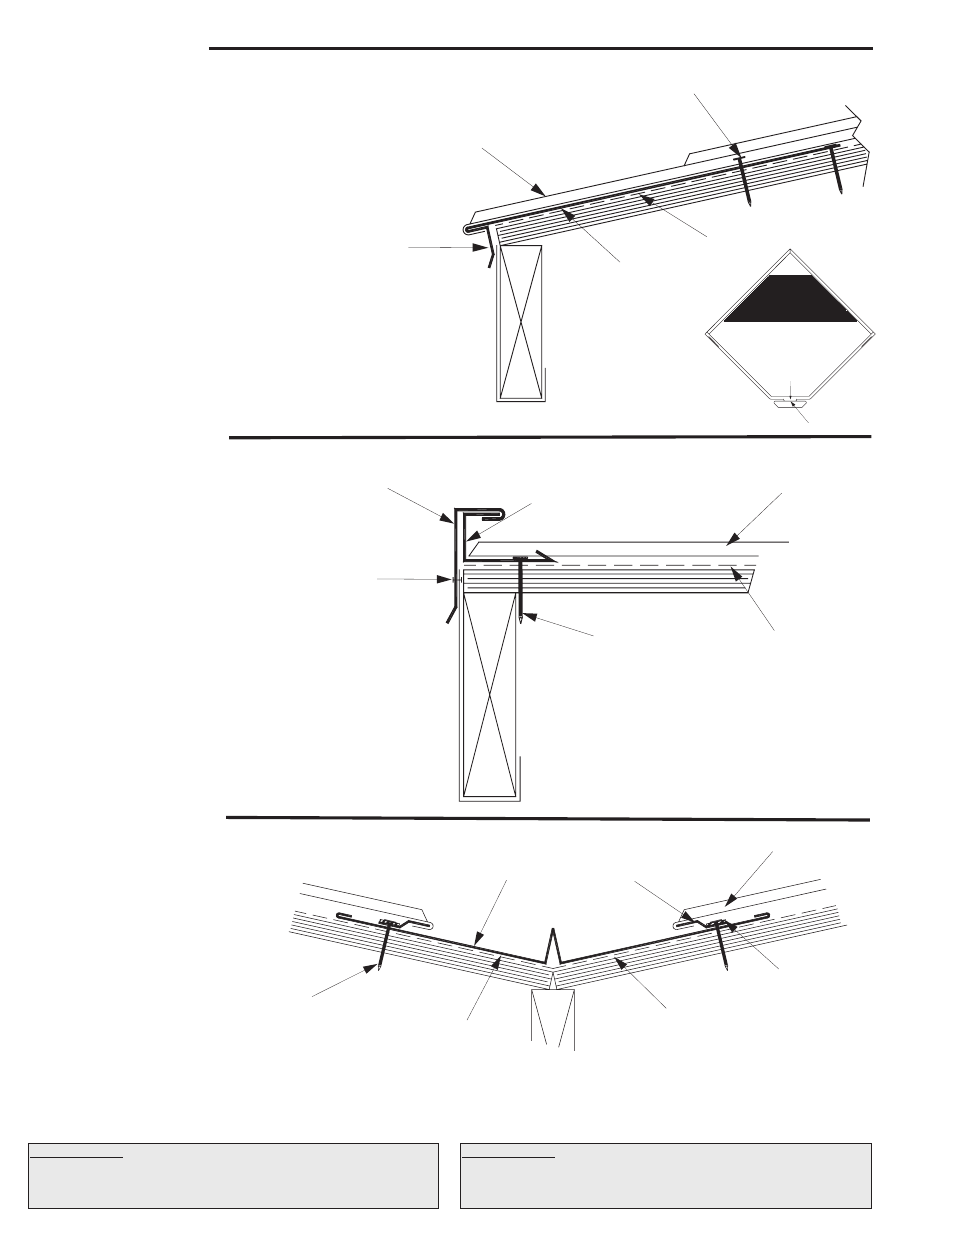
Eave Detail
Gable Detail
Valley Detail
1. When applying in a re-roof application, cut back
existing shingles and drip edge to be flush with the
eave and gable lines. Apply ATA-Shield at eave.
2. Install Drip Edge/Starter Trim. Place lap joint of
starter trim at center of shingles to hide seam.
Fasteners should be located under the center of each
shingle.
3. Apply ATA-Guard to entire roof.
4. Remove the foam backer from lower half of the first
row of shingles to assure a flat seal onto the starter
trim.
5. Cut lower part of locking edge from shingle (see
detail); bend the remaining tab inward under edge of
starter trim to avoid wind uplift. Fasteners must
penetrate solid substrate.
1. Install Channel Trim on gable edge, fasten into
the substrate 12” o.c.
2. Insert cut edge of shingles into channel trim.
3. Hook Gable trim over channel, fasten with
appropriate fastners.
Underlayments: ATA-Shield** is the recommended self adhesive
underlayment for eaves, sidewall and any critical areas exposed to ice
damming and extensive water run off. Available in 65’-8” x 39 3/8” rolls
(200 sq. ft. per roll).
Underlayments: ATA-Guard* is a polyolefin based, 100% asphalt free,
high strength reinforced roofing underlayment for use beneath
metal roofing on steep slope applications. 1000 sq. ft. per roll at 48”
wide.
ATA-Guard*
Castle Top Shingle
2” Ring Shank
Grommetted Nail
HCA112
Drip Edge/
Starter Trim
ATA-Shield**
ATA-Guard*
Castle Top Shingle
2” Ring Shank
Grommetted Nail
Approriate
Fastener
HCA201
Gable Trim Cap
HCA200 Channel Trim
1. Install ATA-Shield** 18” up both side of
the valley line.
2. Install the valley with the joggle cleat
maintaining a 3” clearance from valley’s
center. Place butyl tape between joggle
cleat and pan. Fasten through tape into
the substrate 6” o.c. max.
3. Overlap valley pans by a minimum of
6”.Apply butyl tape/caulk between all
valley metals.
4. Cut backer foam 1” from cut edge of
shingle and turn shingle under as shown.
5. Hook shingles onto the joggle cleat and lay in the valley pan and fasten.
Maintain square line-up of shingles.
Butyl Tape
ATA-Guard*
Castle Top Shingle
2” Ring Shank
Grommetted Nail
HCA800
Valley Pan
HCA975
Joggle Cleat
ATA-Shield**
Remove foam backer from
lower part of shingle
first row only
Bend Line
Cut Line