Pipe detail, Sidewall detail, Atas international, inc – ATAS PC PANEL User Manual
Page 4
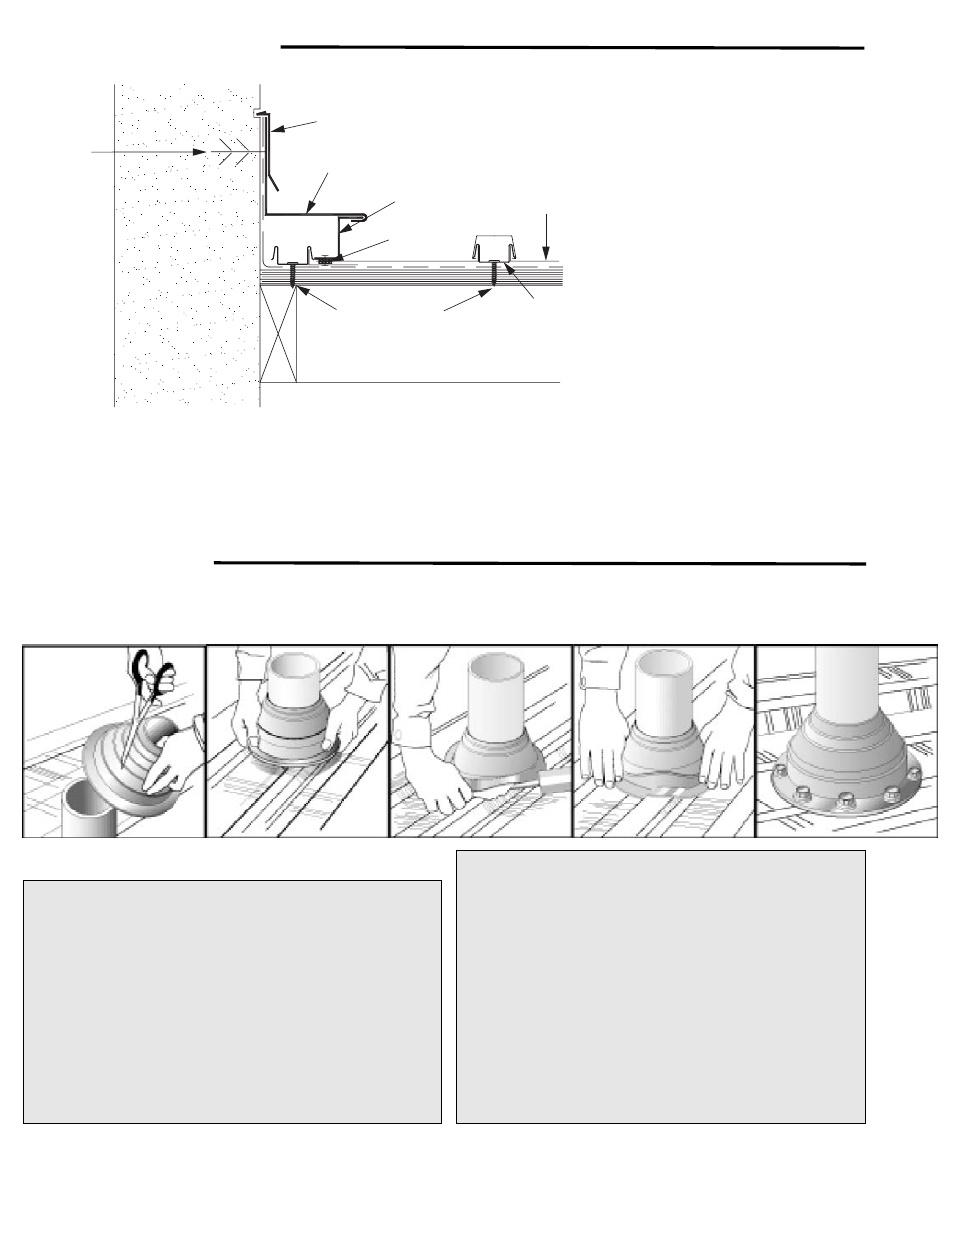
PC System Panel
Anchor Clip
#12 x 1” Wafer
Head Screws
PCA91X
“Z” Closure
Butyl Tape
Sealant
Appropriate
Anchor
Fasteners
PCA980
Counterflashing
PCA410
Sidewall Trim
Pipe Detail
Step 1
Cut on the proper pipe diame-
ter marked on the flashing.
Step 2
Position over pipe and slide
down the pipe.
Step 3
Apply polyurethane sealant to
the bottom of the base.
Step 4
Mold the flexible base to
the panel contours.
Step 5
Fasten with 1/4” x 1-1/8” drilling
fastener every 1-1/2” around
the base.
Pipe drawings provided by Triangle Fasteners
Tools and Rules:
Basic Equipment Required:
Tie-off ropes, safety harness, long level, ladders, scaffolding with
approved planking, extension cords with approved
ground plugs and services.
Additional Tools:
Metal folding tool, hammer, chalk line, measuring tape, metal cutting
tools - nibblers, drills, hacksaw, utility knife, pop-rivet gun, caulking
guns, layout and combination square, C clamps, sheet metal shears
(including RH, LH, straight and overhand). Power driven screw gun
with proper bits, depth setting nosepiece, variable speed.
Choose the correct equipment and tools to do the job in a safe
manner. Wear safety gear and follow OHSA requirements.
Follow of few simple rules:
1. Never cut the panels with an abrasive cut-off wheel or torch, as
this will damage the finish.
2. Do not weld the trim or panels.
3. Remove any small burrs left by cutting, screwing or drilling.
4. Remove protective masking immediately after trim is installed.
5. Caution should be taken when unloading the panels to prevent
damage.
6. Use appropriate screws for the type of underlayment and long
enough to fully penetrate and secure the panel.
7. The stored materials should be kept dry.
8. Do not cut on finished roof. Remove all drill spirals, chips and
dust immediately.
9. Seal neoprene closures and soft cell foam by applying appropri-
ate sealant to both surfaces.
10. Put appropriate sealant/butyle tape between overlapping trims.
11. Overlap trims in a manner not to impede the flow of water.
For further information or assistance, contact our Technical Product Support at 800-468-1441
©2007 ATAS International. All rights
reserved. PC System is a tradename
owned by ATAS International, Inc.
ATAS International, Inc.
Corporate Office
6612 Snowdrift Road
Allentown, PA 18106
Sidewall Detail
1. Install metal panel up to within 1”
of the sidewall.
2. Fasten “Z” closure in bed of butyl
sealant at top of panel with
pop rivets.
3. Fasten sidewall trim over “Z”
closure to face of sidewall.
4. Apply counterflashing over the
sidewall trim, and seal into reglet.
Note Regarding Trim Details
The applicaiton of flashing and trim requires a detailed approach. Consideration should be given to the roof’s geometry and course it
creates for water run-off. Location of gutters and the use of snow retention systems should also be considered. Proper planning
regarding the sequence of material overlap is critical. Sealants, such as butyl tapes and tripolymers, should be used at overlapping
trim edges, in conjunction with exposed fasteners, and to seal flashings and other ancillaries. All fasteners should be properly
tightened and not overdriven at an angle. Fasteners that are too loose can “back out” over time. An overdriven fastener may cause a
depression in the material, which becomes a collection point for standing water.
www.atas.com ~ [email protected]
LAT290