Eave detail gable detail valley detail – ATAS PC PANEL User Manual
Page 2
PC System Panel
Anchor Clip
#12 x 1” Wafer
Head Screws
Butyl Tape
Sealant
PCA800
Valley Pan
PCA975
Joggle Cleat
PC System Panel
Anchor Clip
#12 x 1” Wafer
Head Screws
#12 x 1” Wafer
Head Screws
Painted Pop-Rivet
PCA91X
“Z” Closure
PCA21X
Gable/Rake
Trim
PCA21X
Gable/Rake
Starter Cleat
Panel overlap w/
double sealant &
pop-rivet
PC System Panel
Anchor Clip
#12 x 1” Wafer
Head Screws
ATA-Guard*
ATA-Shield**
PCA11X
Drip Edge
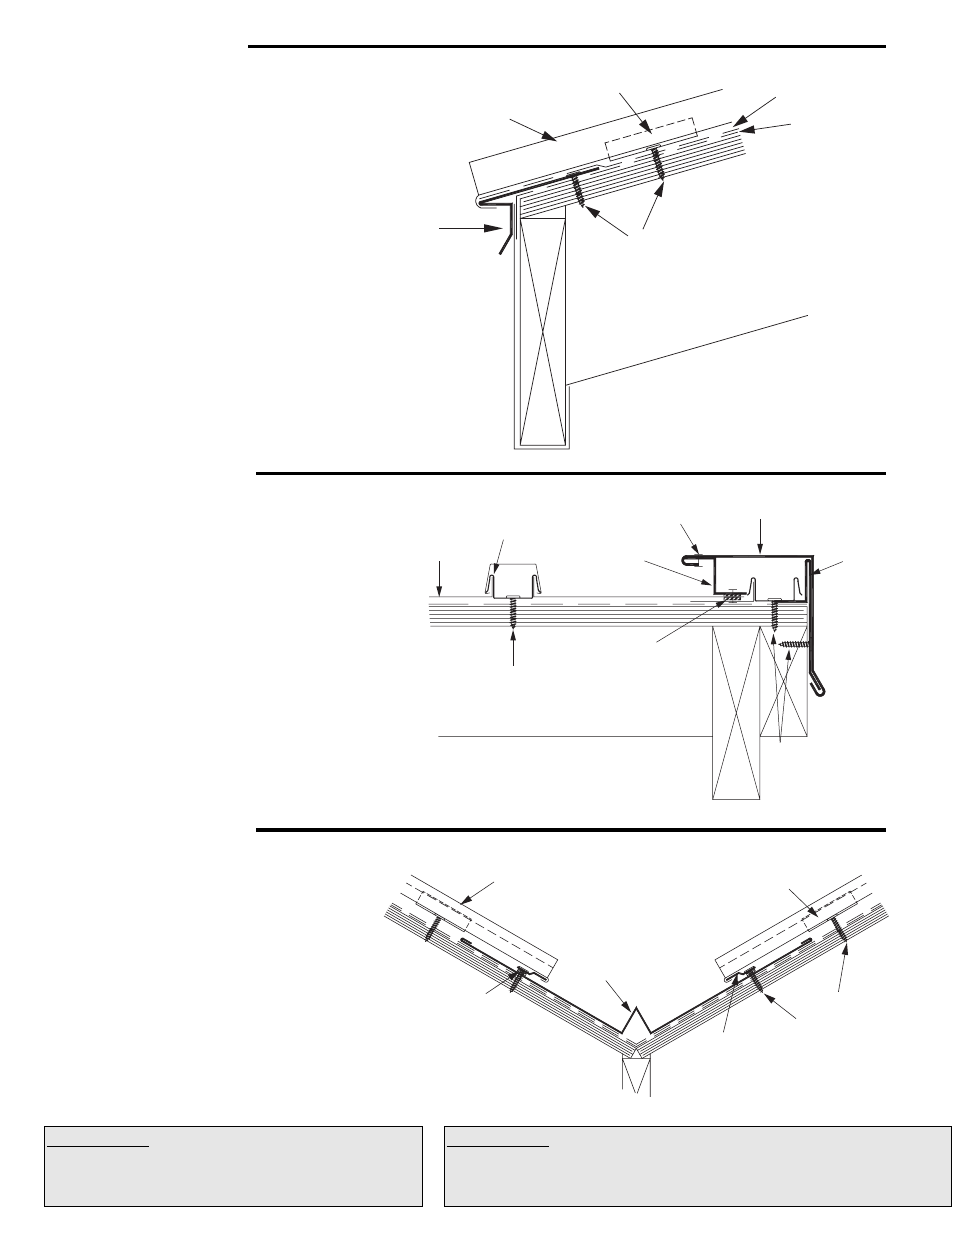
Eave Detail
Gable Detail
Valley Detail
1. In re-roofing applications: cut back and remove
existing shingles and drip edge to be flush with the
eave and gable lines, or as required to install
underlayment.
2. In all applications: apply ATA-Shield** along eave
and up the roof to a point at least 24” beyond
outside face of exterior wall.
3. Install drip edge against fascia trim.
Lay ATA-Guard over eave trim.
4. Trim panel and water leg back to allow for turn
down. Install panel by sliding lower flanged edge
over drip edge. Place clips at water leg.
5. Snap seam or batten over clips after two adjacent
panels are in installed
General Note: Before any installation be sure to lay
ATA-Shield** in all areas where ice & water can occur. 30#
felt or appropriate underlayment should be installed over
the entire roof5When asphalt based felt underlayment is
used install a seperate sheet, such as rosin paper, to
minimize friction.
1. At gable start detail, install gable trim starter
cleat with appropriate fasteners at 2’-0”
into fascia board.
2. At end gable, install cut panel at end with clip.
Bring other panel in and overlap under clip
(see sketch). Be sure to butyl tape panel
end at overlap.
3. Apply double-faced butyl sealant as circled in
sketch. Fasten “Z” closure to panel with pop-rivets.
4. Install starter cleat at end detail same
as start detail.
5. At both ends snap gable/rake trim over starter cleat
and “Z” closure to lock into place. Pop-rivet these
two pieces together with one pop-rivet
per trim length.
1. Install ATA-Shield** approximately 18” up both side
of the valley line.
2. Lay valley pan in valley center. Locate joggle cleat
at 4” to 6” from valley center.
3. Install joggle cleat. Fasten 6” o.c. through butyl
tape and pan into substrate.
4. Turn under edge of panel to slide into joggle
cleat.Place clips at water leg.
5. Snap seam or batten over clips after two adjacent
panels are in installed.
Underlayments: ATA-Shield** is the recommended self adhesive underlayment
for eaves, sidewall and any critical areas exposed to ice damming and
extensive water run off.
Available in 65’-8” x 3’ 3-3/8” rolls (200 sq. ft. per roll).
Underlayments: ATA-Guard* is a polyolefin based, 100%
asphalt free, high strength reinforced roofing underlayment
for use on steep slopes beneath metal roofing.
1000 sq. ft. per roll at 48” wide.