Mounting onto the plate using brackets, Mounting onto the plate using brackets -4, Preliminar y – Extron Electronics PVS 305SA User Guide User Manual
Page 13: Installation
PVS 305SA Switcher • Installation
2-4
Installation
PRELIMINAR
Y
Mounting onto the plate using brackets.
N
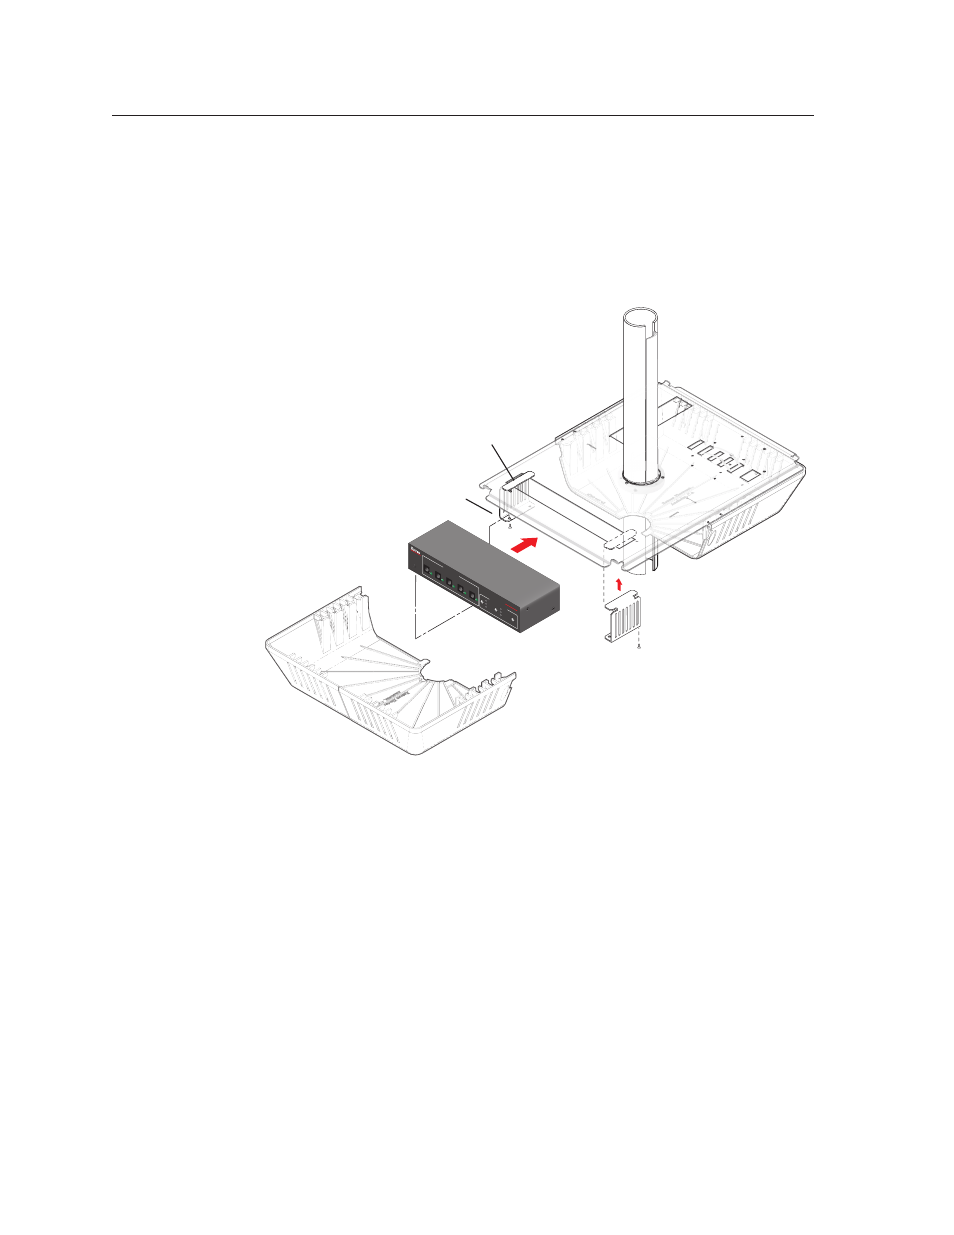
This method allows mounting and removal of the PoleVault switcher without
removing the PMK 550 from the pole.
1
.
Remove the cover securing screws and slide the two plastic covers away from
the mounting plate.
2
.
Install both brackets into the slot (see figure 2-3).
PVS 305S
A
POLEV
AUL
T SWITCHER
INPUT SELECTION
1
2
PEAK
NOR
MAL
SIG
NAL
CONFIG
3
4
5
AUX A
UDIO
AUDIO LEVEL ADJUS
T
PAGING
SENSOR
SENSITIVIT
Y
VOICE
LIFT
MIC
PEAK
NOR
MAL
SIG
NAL
INPUT
Mounting Brackets
Rotate to
install.
Use 2 mounting holes on
opposite corners.
(2) 4-40 x 3/16"
Screws
Figure 2-3 — Fit the brackets in the slot and attach the switcher
3
.
Slide the PoleVault switcher onto the brackets. Secure it in place by its base
using the supplied screws.
4.
Use the supplied hook-and-loop strips to secure the power supply to the
plate.
With the switcher and power supply secure on the plate
:
1
.
Loosen the screws on the pipe collar and slide the plate up the projector pole.
2
. Tighten the screws around the collar, ensuring that at least three screws are in
contact with the pole.
3
.
If installing the full PoleVault system, continue installing the rest of the
hardware, devices and cabling, referring where applicable to the instructions
in the PoleVault System Installation Manual (online at
www.extron.com
).
4
.
Connect the twisted pair, audio, control, and power cables (
see “Rear Panel
5.
Replace the covers of the PMK 550.