Parameter set up – Sanyo PJ-Net Organizer Plus POA-LN02 User Manual
Page 67
7
LD-NET ORGANIZER
OWNER'S MANUAL
Parameter set up
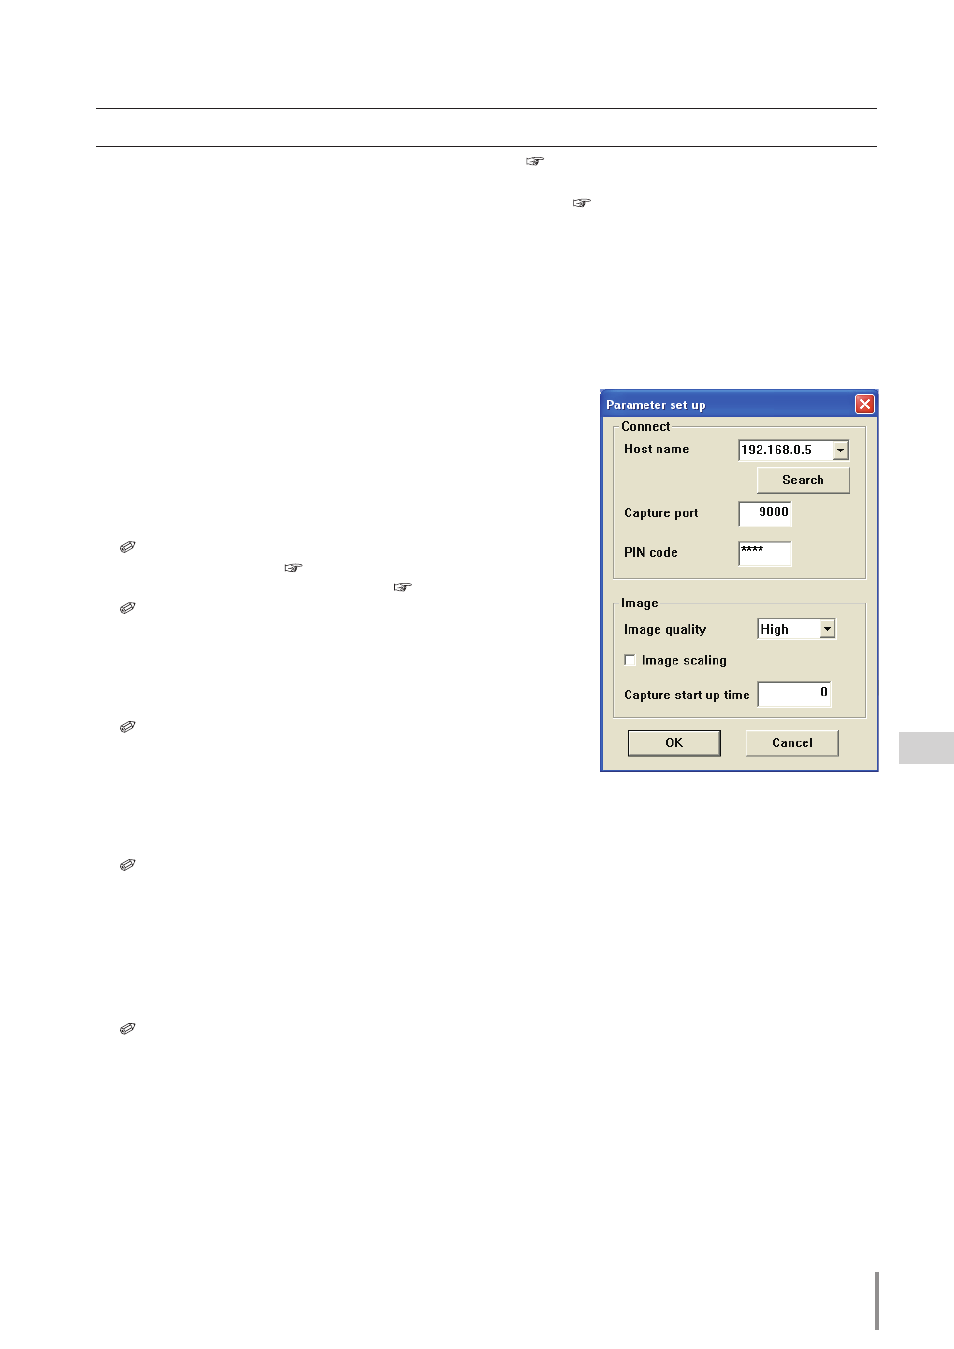
1
Click Network Capture 3 icon on the task bar.
2
Click "Parameter set up" on the popup menu. The set-
ting window will appear.
3
Set Capture Port and PiN code to match to the
monitor’s port number and Network PIN code.
To check the Capture Port number, see item "Control by
the web browser" ( p.70). To check the PIN code, see
item "Network PIN code setting" ( p.35).
Specify the port number of TCP/IP. The default port set-
ting is 9000. There are some reserved port numbers and
also some applications may use their own port numbers.
If one of those port numbers is used, the alert dialog
window will appear and let you know that it is an invalid
port number. In this case, use another port number.
The reserved port numbers are http (80), ftp (21), telnet
(23), etc. The port no. 4352, 10000, 10001 are reserved to
control the monitor through the LAN port.
4
Click search button to list up the available IP address
assigned to the monitor and select desired IP address you use, or you can enter the IP
address or host name manually if you know that IP address or host name.
It may not find any address over the router. Consult your network administrator for further
details.
5
Set the quality of the image.
Quality: Selects from High, Mid, Low
Image Scaling
:
If checked, the screen image size of the computer is automatically adjusted to the
monitor’s screen size.
6
Set capture start time in second unit.
This is effective in the communication mode only. It sets up the time period from executing
the command "Capture transfer" to capturing and transferring the actual screen image. 0 to 60
seconds can be set.
7
Click ok button to close the setting window.
items
Description
Start real time capture .................. Starts the real time capturing. ( p.68) The screen image of the computer is
displayed on the monitor in real time.
Start communication .................... Starts the Network Communication. ( p.71) Captured image is displayed
on the monitor. The captured image edit window appears on the computer
screen.
Parameter set up ............................ Sets the communication parameter between the computer and network
unit of the monitor. For further information, see item "Parameter set up"
below.
Version information ....................... Displays the version of this software.
Shut down ...................................... Quits the application.
about image Quality
Quality : Quality mode of the captured image shows following JPEG compression mode.;
High
: JPEG low compression mode
Medium : JPEG medium compression mode
Low
: JPEG high compression mode
About Network Capture function