Warning, Avertissement – Milwaukee LSM40MP-2 User Manual
Page 26
26
NOTE:.DIAGRAMS.&.ILLUSTRATIONS.ARE.NOT.TO.SCALE.
Only doors certified with the appliance
shall be used.
Seules des portes certifiées pour cet
appareil doivent être utilisées.
CAUTION: DO NOT abuse glass door by
striking or slamming shut.
Step 10. BURNER ADJUSTMENTS
Flame Appearance and sooting
Proper.flame.appearance.is.a.flame.which.is.
blue.at.the.base.and.becomes.yellowish-orange.
in.the.body.of.the.flame...When.the.appliance.
is.first.lit,.the.entire.flame.may.be.blue.and.will.
gradually.turn.yellowish-orange.during.the.first.
15.minutes.of.operation..After.15.minutes.of.
operation,.if.the.flame.is.blue,.or.if.the.flame.is.
orange.with.evidence.of.sooting.(black.tip),.the.
air.shutter.opening.may.need.to.be.adjusted.
If. the. air. shutter. opening. is. closed. too. far,.
sooting.may.develop..Sooting.is.indicated.by.
black.puffs.developing.at.the.tips.of.very.long.
orange.flames...Sooting.results.in.black.deposits.
forming.on.the.logs,.appliance.inside.surfaces.
and.on.exterior.surfaces.adjacent.to.the.vent.
termination...
Sooting.is.caused.by.incomplete.combustion.in.
the.flames.and.lack.of.combustion.air.entering.
the.air.shutter.opening..To.achieve.a.warm.yel-
lowish-orange.flame.with.an.orange.body.that.
does. not. soot,. the. shutter. opening. must. be.
adjusted.between.these.two.extremes..
Air Shutter Adjustment Guidelines
•. If.there.is.smoke.or.soot.present,.first.check.
the.log.set.positioning.to.ensure.that.the.
flames.are.not.impinging.on.any.of.the.logs...
If.the.log.set.is.properly.positioned.and.a.
sooting. condition. still. exists,. then. the. air.
shutter.opening.should.be.increased.
•. The.more.offsets.in.the.vent.system,.the.larger.
the.air.shutter.opening.will.need.to.be.
•. An.appliance.operated.with.the.air.shutter.
opened.too.far,.may.have.flames.that.appear.
blue.and.transparent...These.weak,.blue.and.
transparent.flames.are.termed.anemic..
•. Propane.models.may.exhibit.flames.which.
candle.or.appear.stringy..If.this.is.present.
and.persists,.adjust.the.air.shutter.to.a.more.
closed.position,.then.operate.the.appliance.
for.a.few.more.minutes.to.ensure.that.the.
flame. normalizes. and. the. flames. do. not.
appear.sooty..
The.following.chart.is.provided.to.aid.you.in.
achieving. the. correct. air. shutter. adjustment.
for.your.installation.
Air Shutter Adjustment Guidelines
:
Amount of
Primary Air
Flame
Color
Air Shutter
Adjustment
If air shutter is
closed too far
Flame will
be orange
Air shutter
gap should be
increased
If air shutter is
open too far
Flame will
be blue
Air shutter
gap should be
decreased
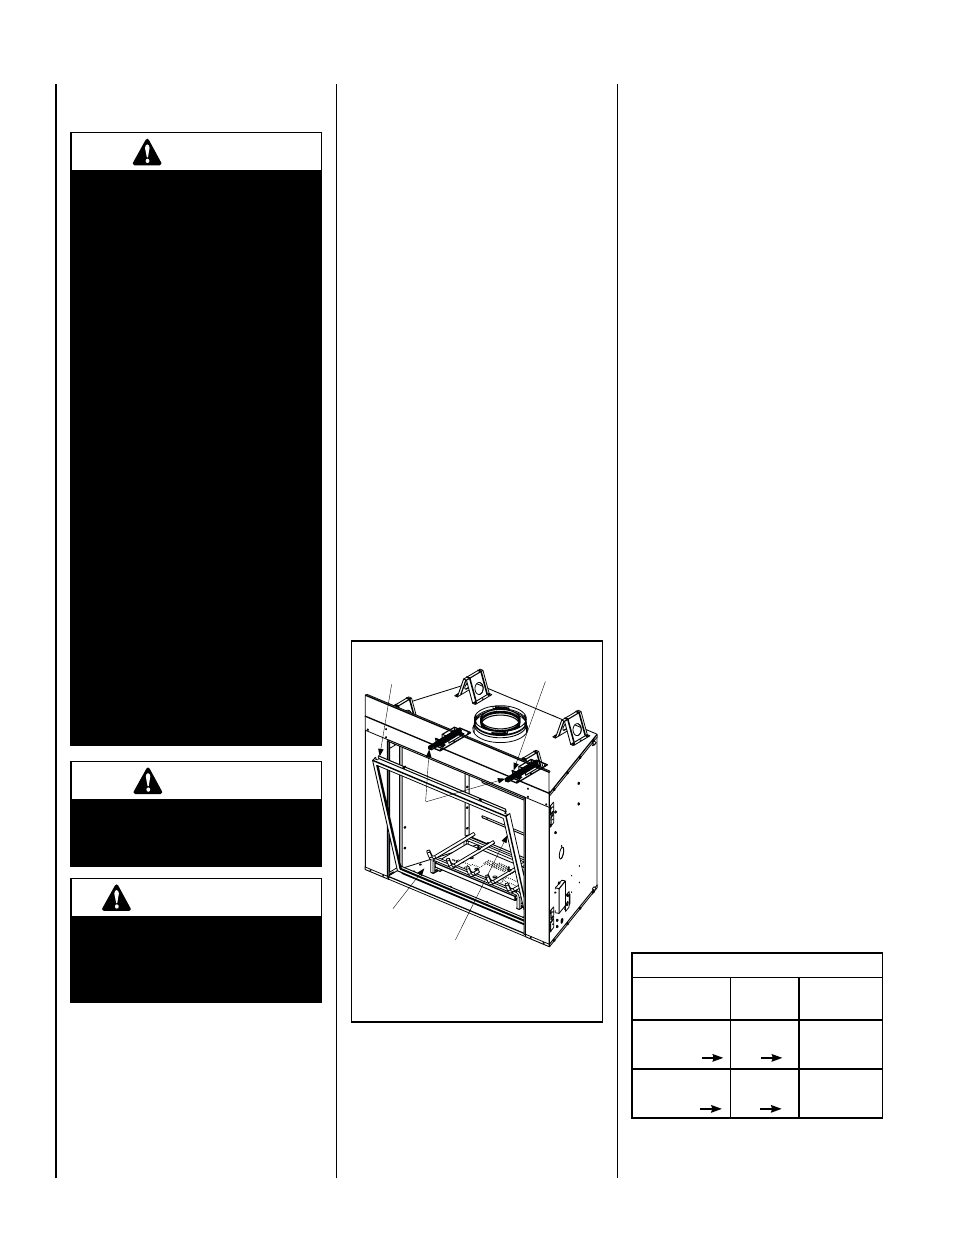
Top Flange Glass door
assembly
Glass Door Latch (2)
Glass Door Assembly
Firebox Floor
Screws
Installing Glass Enclosure Panel
(see Figure 49)
Retrieve. the. glass. door.. Visually. inspect. the.
gasket.on.the.backside.of.the.frame..Gasket.
surface. must. be. clean,. free. of. irregularities.
and.seated.firmly..
Position.the.door.in.front.of.the.firebox.opening.
with.the.top.of.the.door.held.away.from.the.
fireplace.(Figure 49)...Lower.the.bottom.of.the.
door.assembly.on.the.bottom.door.track.and.
set.on.padded.surface...Pivot.the.door.up.after.
engaging.and.centering.in.the.base.channel.
.
Using.a.Phillips.screwdriver,.fasten.the.door.
frame.to.the.door.latch.with.the.two.(2).screws...
The.latch.should. pull. forward. to. engage. the.
door.frame.
Install.the.door.modesty.shield.on.top.flange.
glass.door.as.follows:..grab.the.door.modesty.
shield. with. both. hands,. with. the. open. hem.
going.down.and.engage.it.with.the.upper.lip.
of.the.glass.door.frame.by.pushing.it.all.the.
way.down...Make.sure.the.installed.shield.is.
firmly.in.place.
With.the.firescreen.hanging.on.the.screen.rod,.
insert.the.right.side.of.the.rod.into.the.existing.
hole.on.the.right.modesty.panel...Bend.down.
the.rod.at.the.center.and.drop.the.left.end.into.
the.slot.on.the.left.modesty.panel,.being.careful.
not.to.scratch.the.paint.
Step 9. INSTALLATION AND REMOVAL
OF GLASS DOOR
Figure 49
INSTALLING THE GLASS DOOR
WARNING
•
.
When reinstalling the glass
door, the door latch screws
must be securely tightened
to prevent the glass door
from falling out, which could
potentially cause damage and
possible injury.
•
Do not attempt to substitute the
materials used on this door,
or replace cracked or broken
glass.
•
Handle this glass with extreme
care! Glass is susceptible to
damage – Do not scratch or
handle roughly while reinstall-
ing the glass door frame.
•
The glass door of this appli-
ance must only be replaced
as a complete unit as provided
by the manufacturer. Do not
attempt to replace broken,
cracked or chipped glass sepa-
rately.
•
Do not attempt to touch the
front enclosure glass with your
hands while the fireplace is in
use.
WARNING
Do not operate appliance with
the glass front removed, cracked
or broken.
AVERTISSEMENT
Ne pas utiliser l'appareil si le
panneau frontal en verre n'est
pas en place, est craqué ou
brisé.