MITSUBISHI ELECTRIC DX-NT400E User Manual
Page 25
25
ENGLISH
•••••••••••••••••••••••••••••••••••••••••••••••••••••••••••••••••••••••••••••••••••••••••••••••••••••••••••••••••••••••••••••••••••• Basic Operations
■
Basic manual recording
Normal recording using manual operation is described
below. Before you start recording, check the settings of
“HDD REPEAT REC MAIN” and “HDD REPEAT REC SUB”
in the
see page 47), and
then set the recording settings.
Settings here are for normal recording only. For
timer recording, settings must be made on the
see
page 44).
♦
Setting the recording interval and recording
picture quality for normal recording
To perform normal recording, “PPS” and “GRADE” must
be set for each camera.
25P
12.5P
8.333P
6.25P
5P
4.167P
3.125P
2.5P
1P
0.5P
0.25P
0.125P
12.5P
6.25P
4.167P
3.125P
2.5P
2.083P
1.563P
1.25P
0.5P
0.25P
0.125P
0.063P
8.33P
4.165P
2.777P
2.083P
1.666P
1.388P
1.041P
0.833P
0.333P
0.167P
0.083P
0.042P
6.25P
3.125P
2.083P
1.563P
1.25P
1.042P
0.781P
0.625P
0.25P
0.125P
0.063P
0.031P
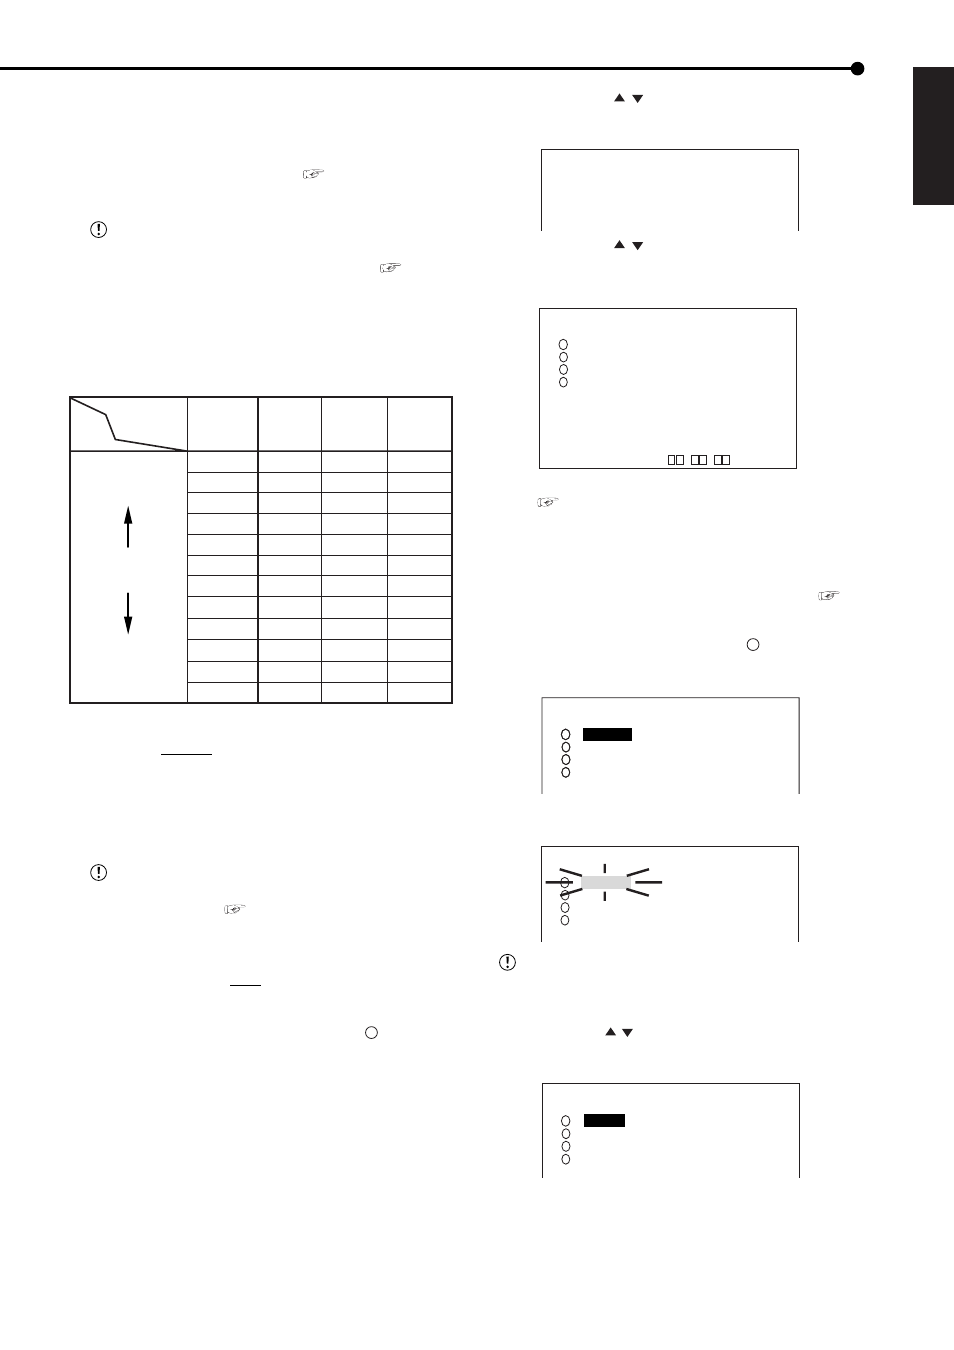
Number of
operational
cameras
PPS
SHORT
Recording
interval
LONG
# 1
# 2
# 3
# 4
Setting of “PPS” (default: “3.125P”)
“6.25P,” “3.125P,” “2.083P,” “1.563P,” “1.25P,”
“1.042P,” “0.781P,” “0.625P,” “0.25P,” “0.125P,”
“0.063P,” “0.031P,” “- - - - - -”
“- - - - - -”: Recording is not performed with camera
set to this item.
Available recording intervals vary depending on
the number of cameras operating or ALARM RE-
CORDING settings (
see page 41). See the chart
above for the displaying interval.
Setting of “GRADE” (default: “STD”)
“SUPER,” “HIGH,” “STD”(STANDARD), “BASIC,”
“LONG”
Example: Setting “PPS” of camera number “
1
” to “1.25P”
and “GRADE” to “HIGH” for normal recording.
1. Press the SET UP button to display the
screen.
2. Press the JOG
, buttons to move the cursor to
“RECORD SETTINGS” and then press the ENTER button.
• The
>>ALARM SETTING
RECORD SETTING
ALARM REC DURATION 5S
3. Press the JOG
, buttons to move the cursor to
“RECORD SETTING” and then press the ENTER button.
• The
4
1
2
3
CAUTION: For
see “Continuous recording time table” on page 77.
NO PPS GRADE A-PPS A-GRADE
>> 3.125P STD 3.125P STD
3.125P STD 3.125P STD
3.125P STD 3.125P STD
3.125P STD 3.125P STD
ALARM TYPE ALARM CH
PRE ALARM REC OFF
CLEAR:BACK
About
• The remaining recordable time is displayed as
depending on the “PPS” and “GRADE” settings. (This time is
not change when changing the alarm recording settings.) For
the details concerning the estimated recordable time,
see page 77.
4. Check that the cursor is positioned at “
1
” and then press
the ENTER button.
• The setting item of “PPS” is highlighted.
4
1
2
3
4
1
2
3
NO PPS GRADE A-PPS A-GRADE
3.125P
STD 3.125P STD
3.125P STD 3.125P STD
3.125P STD 3.125P STD
3.125P STD 3.125P STD
5. Press the ENTER button again.
• The background of the setting item turns red and flashes.
4
1
2
3
NO PPS GRADE A-PPS A-GRADE
3.125P STD 3.125P STD
3.125P STD 3.125P STD
3.125P STD 3.125P STD
3.125P STD 3.125P STD
The menu screen is not cleared even when
pressing the SET UP button while the setting item is
flashing.
6. Press the JOG , buttons to select “1.25P” and then
press the ENTER button.
• Setting item is determined and flashing stops.
4
1
2
3
NO PPS GRADE A-PPS A-GRADE
1.25P
STD 3.125P STD
3.125P STD 3.125P STD
3.125P STD 3.125P STD
3.125P STD 3.125P STD