Top vent rear vent – Heat & Glo Fireplace Heat & Glo Fireplace 6000C User Manual
Page 38
Heat & Glo • 6000C, 6000C-IPI, 8000C, 8000C-IPI • 2164-900 Rev. T • 9/12
38
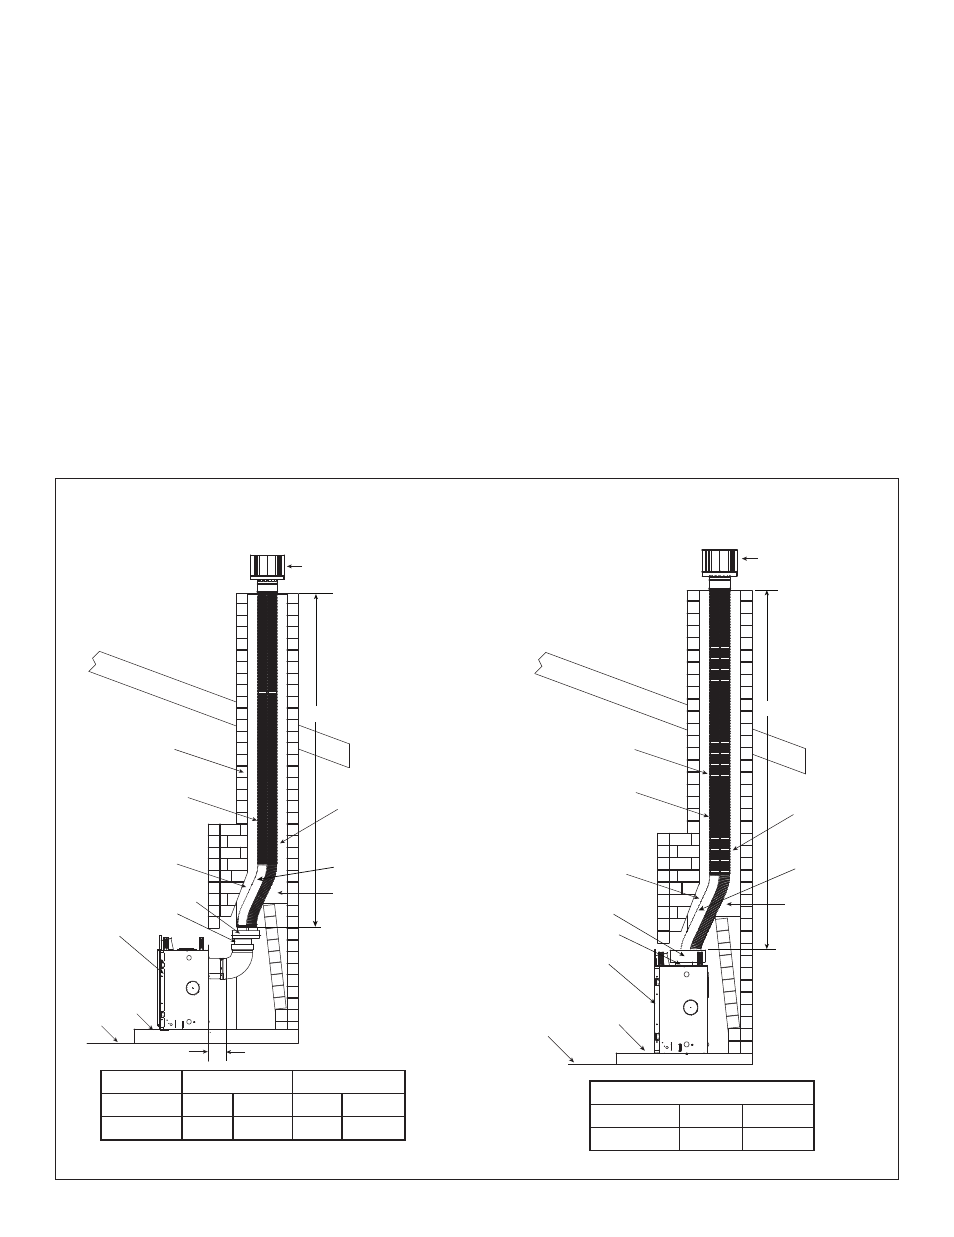
Figure 7.23
EXISTING CHIMNEY
HEARTH
FLOOR
EXISTING CHIMNEY
EXHAUST AIR
VENT PIPE
INLET AIR
VENT PIPE
To minimize cold air
drafts, seal with
non-combustible
insulation.
TERMINATION CAP
DIRECT VENT FIREPLACE
V
DVP-2SL
COAXIAL/COLINEAR
APPLIANCE CONNECTOR
The first 3 feet of
exhaust flue must
be stainless flex
pipe.
TERMINATION CAP
EXISTING CHIMNEY
EXISTING CHIMNEY
EXHAUST AIR
VENT PIPE
V
FLOOR
HEARTH
H
To minimize cold air
drafts, seal with
non-combustible
insulation.
DIRECT VENT FIREPLACE
DVP-2SL
COAXIAL/COLINEAR
APPLIANCE CONNECTOR
INLET AIR VENT PIPE
The first 3 feet of
exhaust flue must be
stainless flex pipe.
TOP VENT
REAR VENT
V
Minimum
10 ft.
3.05 m
Maximum
40 ft.
12.2 m
V
H
Minimum
10 ft.
3.05 m
0 ft.
0 mm
Maximum
40 ft.
12.2 m
2 ft.
610 mm
NOTICE: To achieve optimum perfor-
mance of appliance, minimize or avoid
bends in exhaust vent pipe.
CAUTION! DO NOT use any flue restric-
tor when venting with the DV-46DVA-GCL
adapter and LINK-DV30B kit. This may re-
sult in poor flame appearance, sooting, pilot
malfunction, or overheating.
Connecting the DV-46DVA-GCL Adapter to Appliance
Top Vent
• Remove top seal cap and insulation if equipped. See
Section 14, “Appliance Setup.” Attach the DVP-2SL to
the 8 inch starting collar. Follow installation instructions
included with DVP-2SL kit. Attach the DV-46DVA-GCL
adapter to the appliance starting collar with 3-1/2 in.
self-tapping screws. See Figure 7.23.
Rear Vent
• Remove the rear seal cap and insulation if equipped.
Connect the DVP-2SL adapter to the vertically positioned
elbow. Follow installation instructions included with DVP-
2SL kit. Secure DV-46DVA-GCL adapter to DVP-2SL with
3-1/2 in. self-tapping screws. See Figure 7.23.
Connecting the LINK-DV30B to the DV-46DVA-GCL
adapter
• Insert the two sections of flexible vent pipe down the
existing chimney.
• Attach one section of stainless steel flex pipe to the
exhaust collar on top of the DV-46DVA-GCL adapter with
WARNING! Risk of Fire, Explosion or Asphyxiation!
Do NOT connect this gas appliance to a chimney flue
serving a separate solid fuel or gas burning appliance.
• May impair safe operation of this appliance or other
appliances connected to the flue.
• Vent this appliance directly outside.
• Use separate vent system for this appliance.
three screws.
• Attach one section of flexible vent pipe to the stainless
steel flex pipe with three self-tapping screws.
• Attach one section of flexible vent pipe to the inlet collar
on top of the DV-46DVA-GCL adapter with three self-
tapping screws.
• To minimize cold air drafts, seal around the flex vents
at the damper inside the chimney with non-combustible
unfaced fiberglass or rock wool insulation.
The DV-46DVA-GCL adapter must be recessed into existing
masonry fireplace. This measurement is taken from the top
of the fireplace opening. See Table 1 and Figure 7.22.