How to set up pillar, Schematics of cradle – MINOURA BikeTower10 User Manual
Page 2
- 2 -
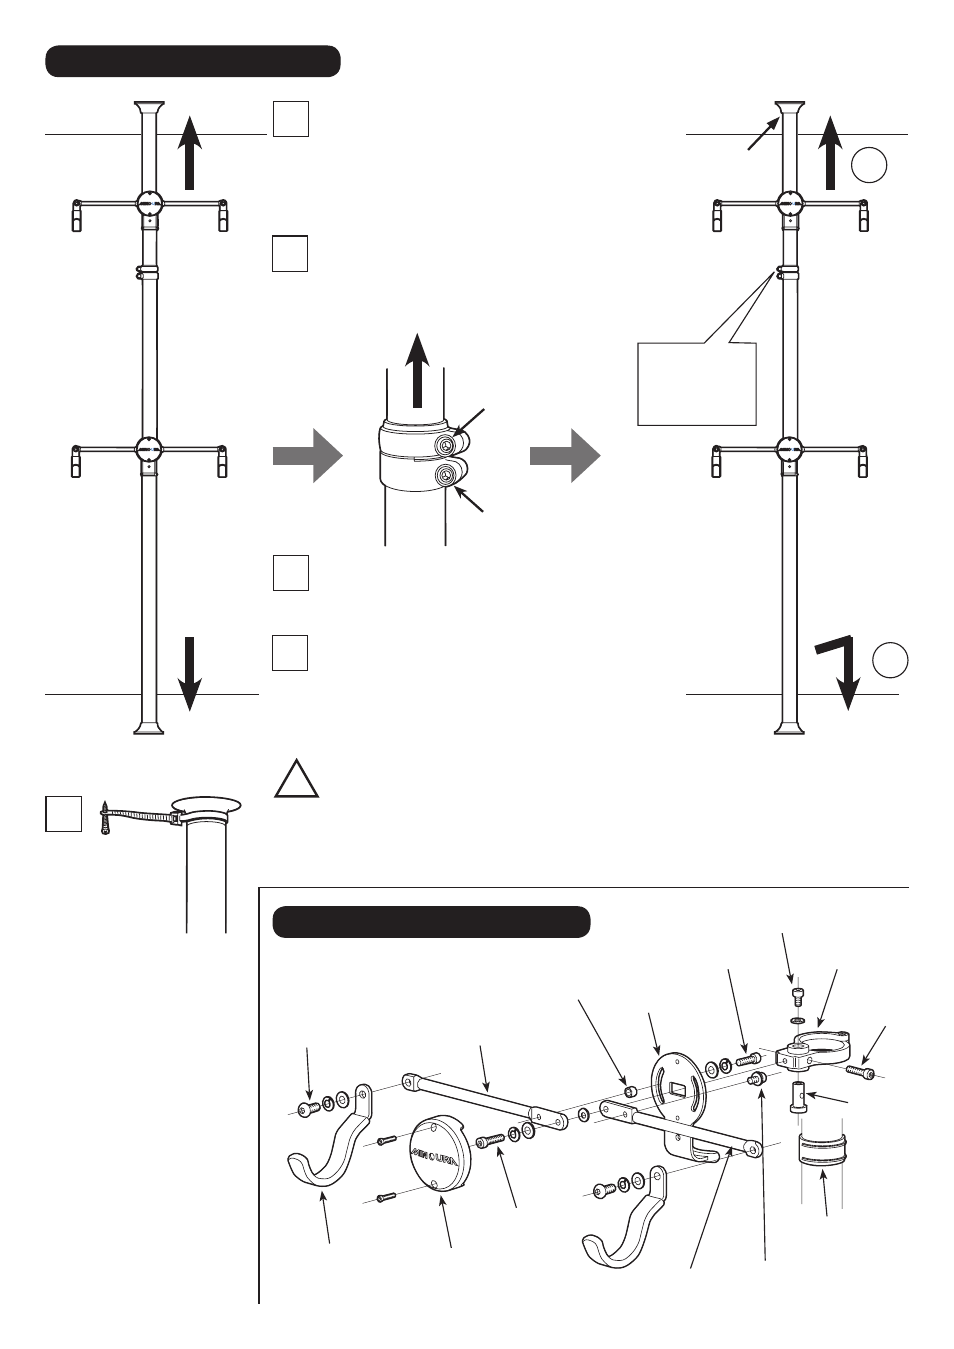
How To Set Up Pillar
1
2
4
1) Extend pillar, 2) Adjust pillar length, then 3) Install in room.
Loosen the upper bolt, extend Top Pillar, attach to
both ceiling and floor to measure the length, then
tighten the bolt temporally to keep the pillar size.
Remove the pillar and lay down on the floor.
Loosen the upper bolt again and extend Top Pillar
20mm
more, then tighten the bolt firmly (5 – 8 N.m).
That is the correct pillar length.
1
2
1. Place the upper rubber cup against the ceiling then
push up to compress the internal spring.
2. While keeping the spring compressed, slide
Bottom Pillar and align it correctly while bringing it
in contact with the floor.
Loosen this
upper bolt
only
Keep tightening
the lower bolt
Extend 20mm more
!
If you see red plastic part in the upper rubber cup when you setup
BikeTower, it's the warning sign that the pillar is not extended
enough. Remove from the ceiling, adjust the pillar length properly,
and try to install again.
Schematics of Cradle
Left side Arm (front side)
Right side Arm
(back side)
Cradle Cap
Hook
Base Plate
Clamp Band
(universal)
Plastic Shim
(for upper pillar only)
Metal Collar
(Left side only)
Pivot Pin
Pivot-Pin Fixing Bolt
Hook Fixing Bolt
Left Arm Angle Fixing Bolt
Right Arm
Angle Fixing Bolt
Arm Connecting
Bolt
Clamp
Tightening
Bolt
Supplied 2 Bike Cradles are
exactly same, except the
plastic shim
Look
Touch
Touch
Push
Lift up
and place
3
Please be aware both bolts on Pillar Joint are
intentionaly loosened in the package condition.
Your first job is loosening the lower bolt, push
down Pillar Joint until the bracket reaches the
Bottom Pillar end, then tighten the bolt firmly.
7
Use either
M3.5x16 or 25
self tapping screw
Tightening
Torque:
5 – 8 N.m
To avoid any chance of
the pillar falling, hold Top
Pillar to the ceiling or the
wall by using the supplied
plastic tie. It's not just
a recommendation, but
your duty.
Wrap the tie around the
pillar just beneath the top
rubber cup and wring it,
put the screw in the hole
on the tip of the tie, then
screw it to the ceiling or
wall.
Make sure the screwing
area is reinforced solidly.
Just the panel will not
work.