9130 full calibration – Super Systems 9130 Series User Manual
Page 84
Series 9130 Operations Manual Rev -
83
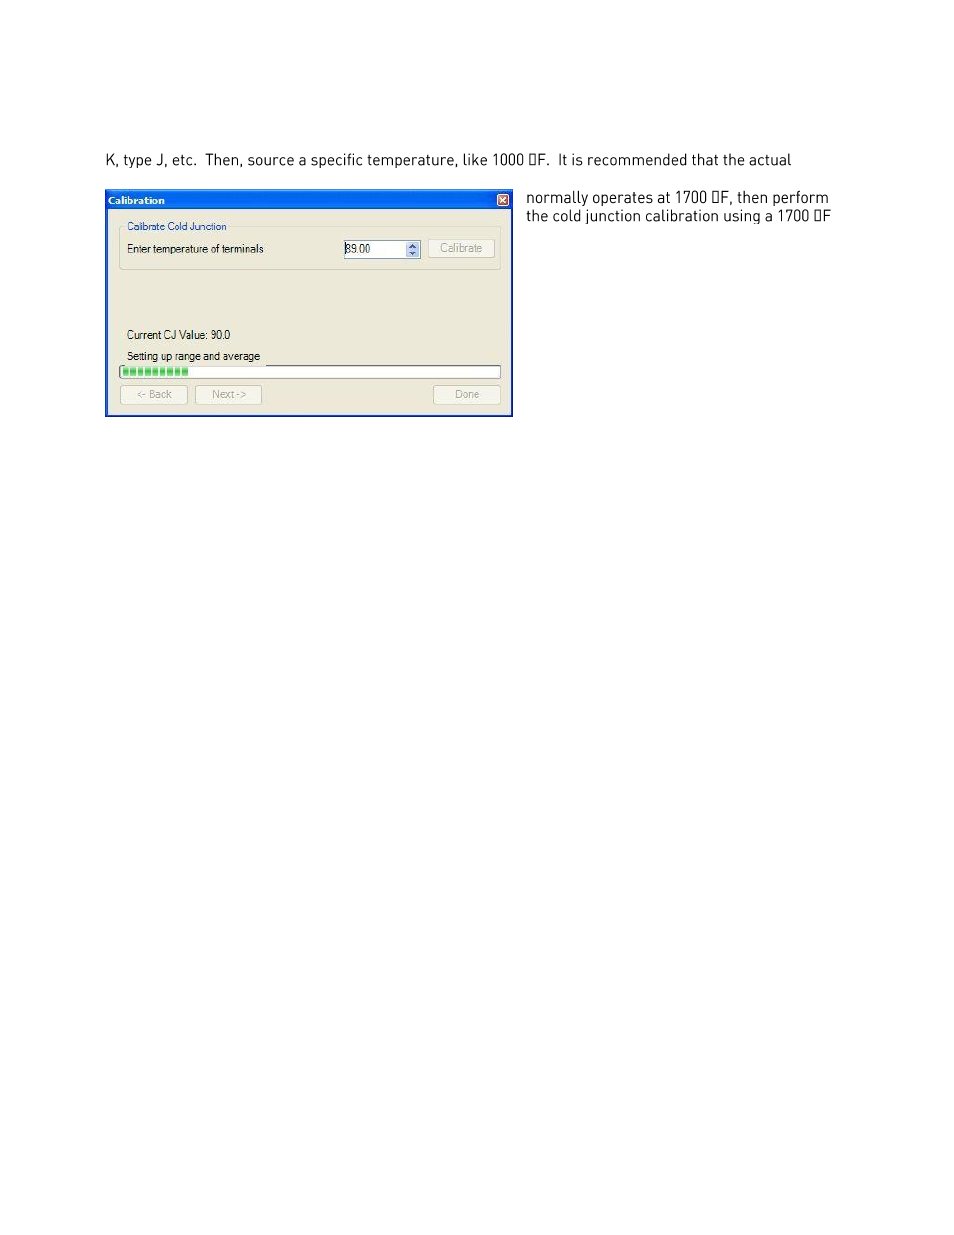
Step 2. Cold Junction Calibration.
Set up the calibrator for the specific thermocouple type of the thermocouples in the analog board, i.e. type
temperature used be similar to an appropriate process temperature. For example, if your equipment
signal.
The user can enter the cold junction offset in
the box next to the Calibrate button. The
current cold junction value will be displayed
next to the “Current CJ Value:” line.
To determine if a cold junction adjust is
necessary, source a specific temperature to
the input(s). If the temperature reading
displayed does not match closely enough to
the source value, then the “Offset” will need to
be changed. Enter the amount of change in
the “Offset” box. If the input was showing 1748.3 °F, then the “Offset” would be set to “1.07” to bring the
display back up to 1750 °F.
Note – The current cold junction value is for display purposes only and should
not be considered when determining the cold junction offset
.
Click on the Calibrate button to begin the calibration.
Wait 120 seconds and verify with a source calibration device with the correct T/C type.
Note: During a
normal calibration procedure, the user should zero and span all of the inputs first and then perform a cold
junction calibration, if necessary
.
Click on the Done button to close down the screen.
9130 Full Calibration
The
Calibration
screen for the 9130 Full Calibration menu option is identical in function and layout to the
9130 User Calibration’s
Calibration
screen. The only difference is the 9130 Full Calibration’s
Calibration
screen contains more screens. The
Calibration
screens for the Full Calibration menu option also has a Set
Nominal button, which will set nominal values for the current screen. The user will have to confirm the
action. This list of screens is listed below in sequential order. Screens only found in the 9130 Full
Calibration menu option are displayed in
Italics
.
1. Cold Junction
2.
Zero/Span Input 1/Range 0
3.
Zero/Span Input 1/Range 1
4. Zero/Span Input 1/Range 2
5.
Zero/Span Input 1/Range 3
6.
Zero/Span Input 2/Range 0
7.
Zero/Span Input 2/Range 1
8. Zero/Span Input 2/Range 2
9.
Zero/Span Input 2/Range 3
10.
Zero/Span Input 3/Range 0
11.
Zero/Span Input 3/ Range 1
12. Zero/Span Input 3/Range 2
13.
Zero/Span Input 3/Range 3
14.
Zero/Span Input 1 Range Jumper
15.
Zero/Span Input 2 Range Jumper
16.
Zero/Span Input 3 Range Jumper
17. Zero/Span Output 1
18. Zero/Span Output 2
Click the Done button to close the screen down.