Avery Dennison 9850 RFID Multi-Protocol User Manual
Page 26
3-2 Setting Up the Printer
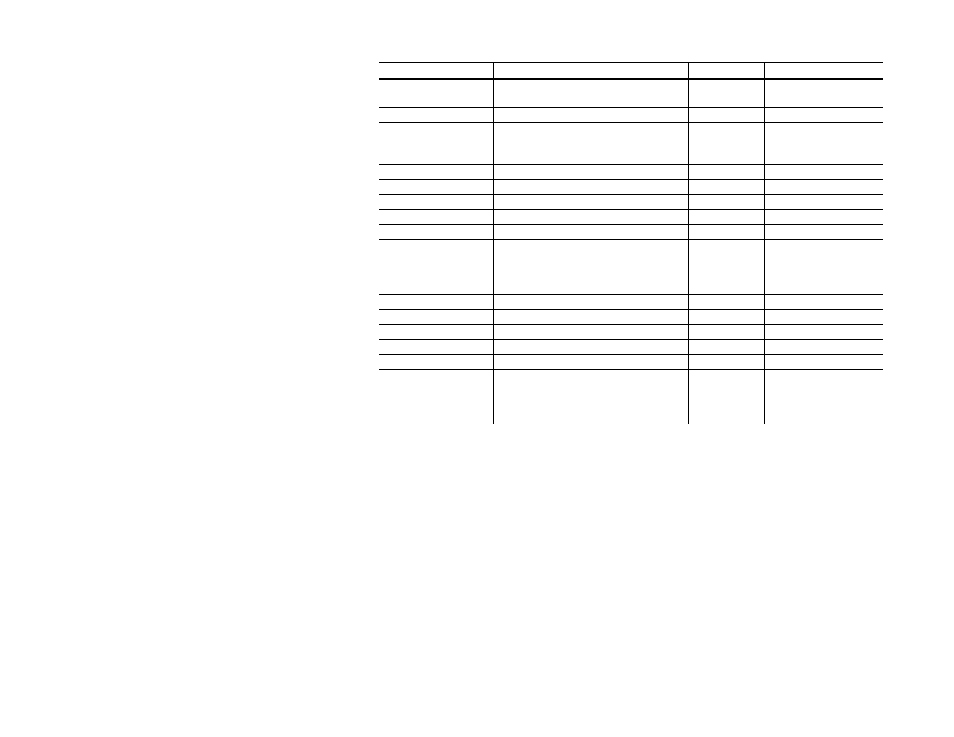
The following table lists the Supply Menu options.
Option
Choices
Default
Use for RFID
Supply Type
Aperture/Die Cut/Black Mark/
Continuous
Die Cut
Die Cut
Ribbon No/Yes/High
Energy Yes
Any
Speed 2.5/4.0/6.0/8.0/10.0/Default
Note: The printer pauses while
programming the RFID tag.
Default Any
Feed Mode
Continuous/On-Demand
Continuous Any
Backfeed Off/On/Extended
Off Conditional*
Print Position
-450 to 450
0
Conditional*
Supply Position
-300 to 300
0
Conditional*
Margin Position
-99 to 99
0
Any
Cut Position
-300 to 300
Note: The knife is not currently
supported for use with RFID
supplies.
0
0 only
Dispense Position
50 to 200
65
Conditional*
Backfeed Distance 10 to 200
65
Conditional*
Separators No/Yes/Long
No Not recommended
Skip Index
No/Yes
No
Not recommended
Knife Control
-20 to 20
0
0 only
Error Action
Normal
Overstrike/Continue 1x to 5x
Note: If using “overstrike,” do not
use Peel Mode.
Normal Conditional*
*
Depends on the supply’s feed length. See “Setting the Print and Supply Positions” for
more
information.
Setting the Error Action
The recovery action from an error condition is in the Setup, Supply Menu.
You can change how the printer responds to a bad label. The choices
include normal and overstrike/continue one to five consecutive bad
labels. The overstrike pattern is created to prevent someone from using
the label.
Selecting overstrike and continue 1x-5x sets the number of times the
printer prints an overstrike pattern on consecutively bad labels before
generating an error. The user must clear the error before operation can
continue.